How to build a WiFi connected Fingerprint Sensor with Home Assistant

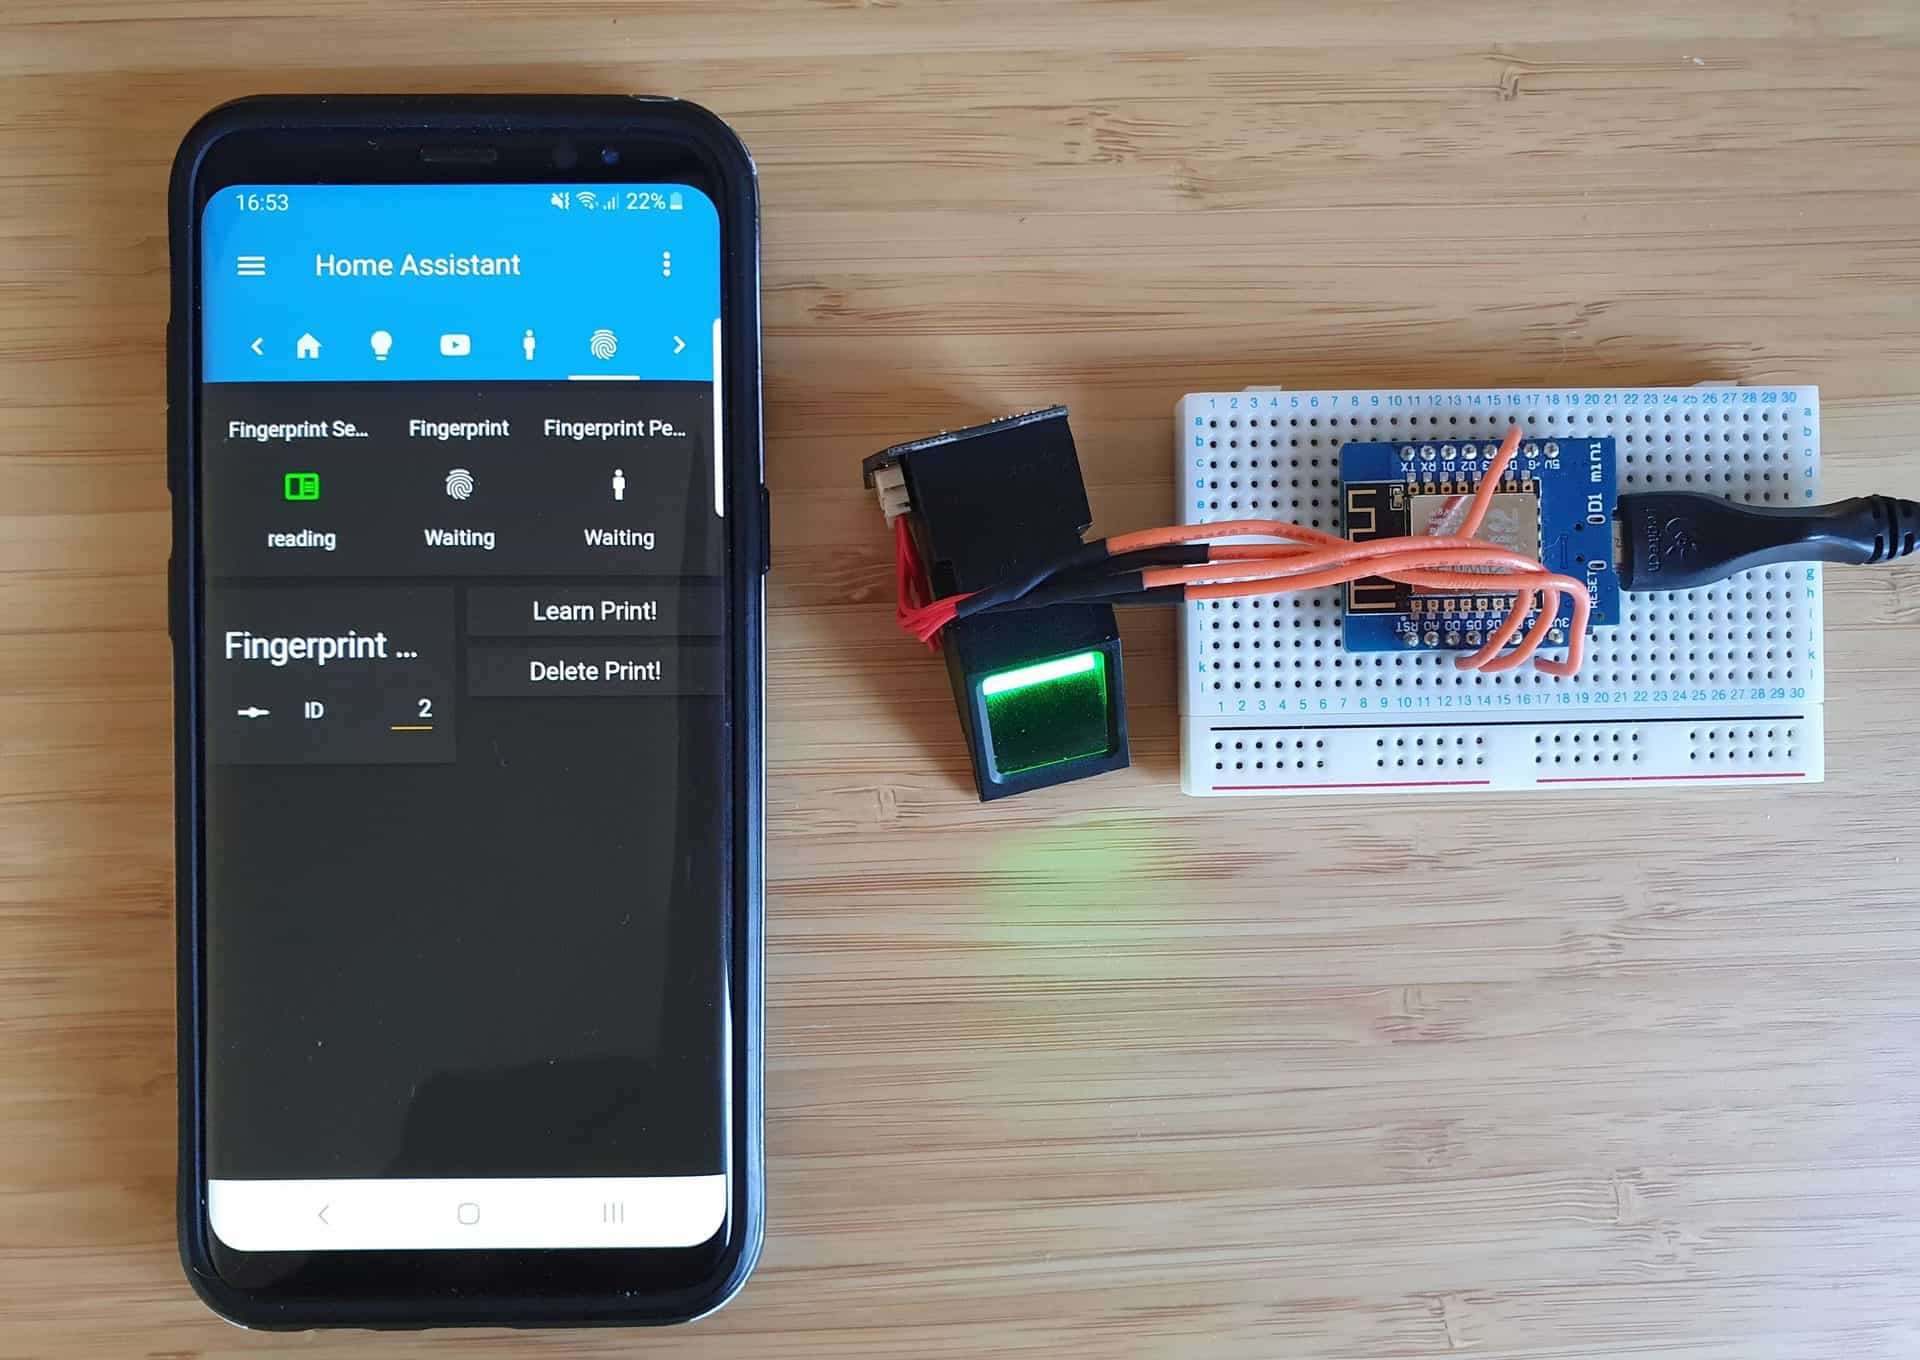
When I posted some update videos on Reddit and Twitter (make sure to follow me there for more updates!) earlier this week about the Fingerprint Sensor update, the reaction was so wonderfully positive that I knew I had to get onto this guide as soon as possible! Here was one of the videos showing the fingerprint sensor connected to Home Assistant over WiFi:
Quick update on the fingerprint sensor, you can see how I can add and delete fingerprints easily through the @home_assistant app!#homeassistant #homeautomation #IoT pic.twitter.com/krOHvmCwub
— Everything Smart Home (@EverySmartHome) May 26, 2020
A bit of back story on this project and how it came about – I’ve had these fingerprint sensors for about 5 years now just sitting in a box, I had played with them initially and got them working but to me they were inconvenient because you couldn’t easily add and delete prints without reprogramming them and if you had multiple sensors you’d have to add a new print at each sensor individually – this was before I’d heard of any ESP8266 boards and was working with Arduino boards only.
At the time I searched for ways to use the fingerprint sensor as a scanner, while storing the print data in some sort of database. I couldn’t find anything at all and so I put them back in the box and moved onto other projects. Fast forward 5 years and I decided to take another crack at them, ideally integrating this fingerprint sensor directly with Home Assistant.
Not much has changed in terms of the information online, except I see more and more people asking how to connect them to a network to be able to manage them, but no answers!
So that’s where this guide comes from, I wanted to provide answers and a method for those people asking how to do it that never got their answer. To be clear, you notice I said above I wanted to store the print data in a database – this guide does not solve that aspect (although it wouldn’t be hard to do from here), but it does allow you to manage it from a central location and easily add and remove prints.
Let’s get into it!
Guide
Video Guide
Intro
If you have not yet checked out the simpler version of this guide yet, I’d suggest following that first so that you are familiar with some of the concepts of enrolling and checking prints, I go over the concepts in a bit more detail there. This guide will move at a bit of quicker pace than that one.
Similarly, we are using MQTT as our method of communicating with Home Assistant, if you do not have an MQTT broker installed or don’t know what one is, check out this guide here for everything you need to know and how to install.
Finally, we are going to be adding various sensors to Home Assistant via the config files, be sure you are familiar with how to do that by reading the Getting Started with Home Assistant series. Of course you can use any other MQTT compatible Home Automation software you wish, that’s the beauty of MQTT!
Parts List
If you followed the Arduino version of this guide, the parts list is similar with a few exceptions:
- Wemos D1 Mini – You should be able to use any ESP8266 board such as a NodeMCU and in theory an ESP32 should be compatible but it depends on the libraries – I have not tested this yet!
- Fingerprint Sensor Module FPM10A
- Solderless Breadboard
Hardware
Wiring the Fingerprint Sensor is a pretty easy job with just 4 wires required (despite there being 6 pins on the board). First lets take a look at an overview of the sensor:


And here is some of the specifications of this sensor from the Adafruit listing:
- Supply voltage: 3.6 – 6.0VDC
- Operating current: 120mA max
- Peak current: 150mA max
- Fingerprint imaging time: <1.0 seconds
- Storage capacity: 162 templates
- Safety ratings (1-5 low to high safety)
- False Acceptance Rate: <0.001% (Security level 3)
- False Reject Rate: <1.0% (Security level 3)
As you can see, its a pretty capable sensor for the price!
Firstly, here is the wiring diagram we are going to be working with:
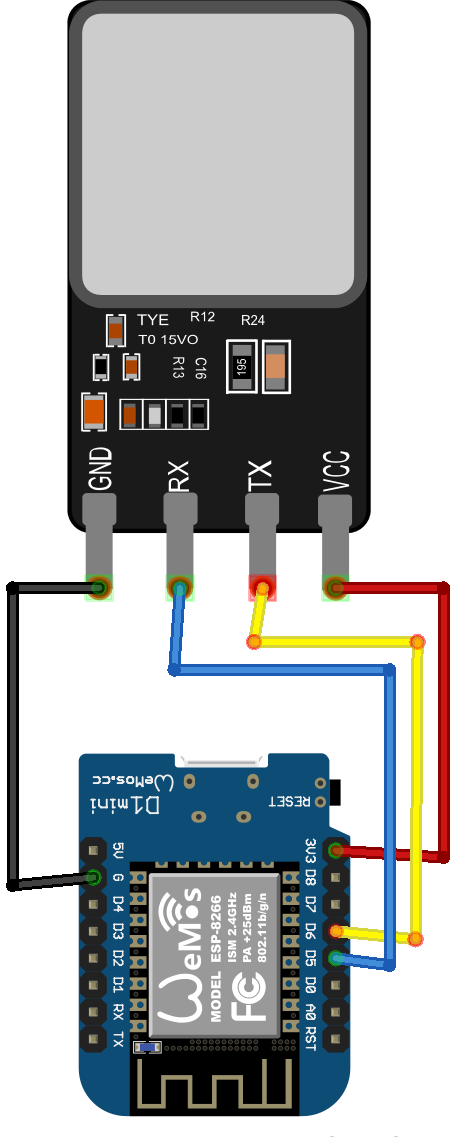
One thing to bear in mind here is that the pins marked on the ESP8266 boards do not translate directly into the Arduino IDE – i.e D4 is not pin 4 in the IDE – Arduino IDE uses GPIO so make sure to look up the GPIO output for your board. In my case, I’m using pins D5 and D6 on the Wemos, which translates to GPIO 14 and GPIO 12, which is the pins we use in the code for the TX and RX pins.
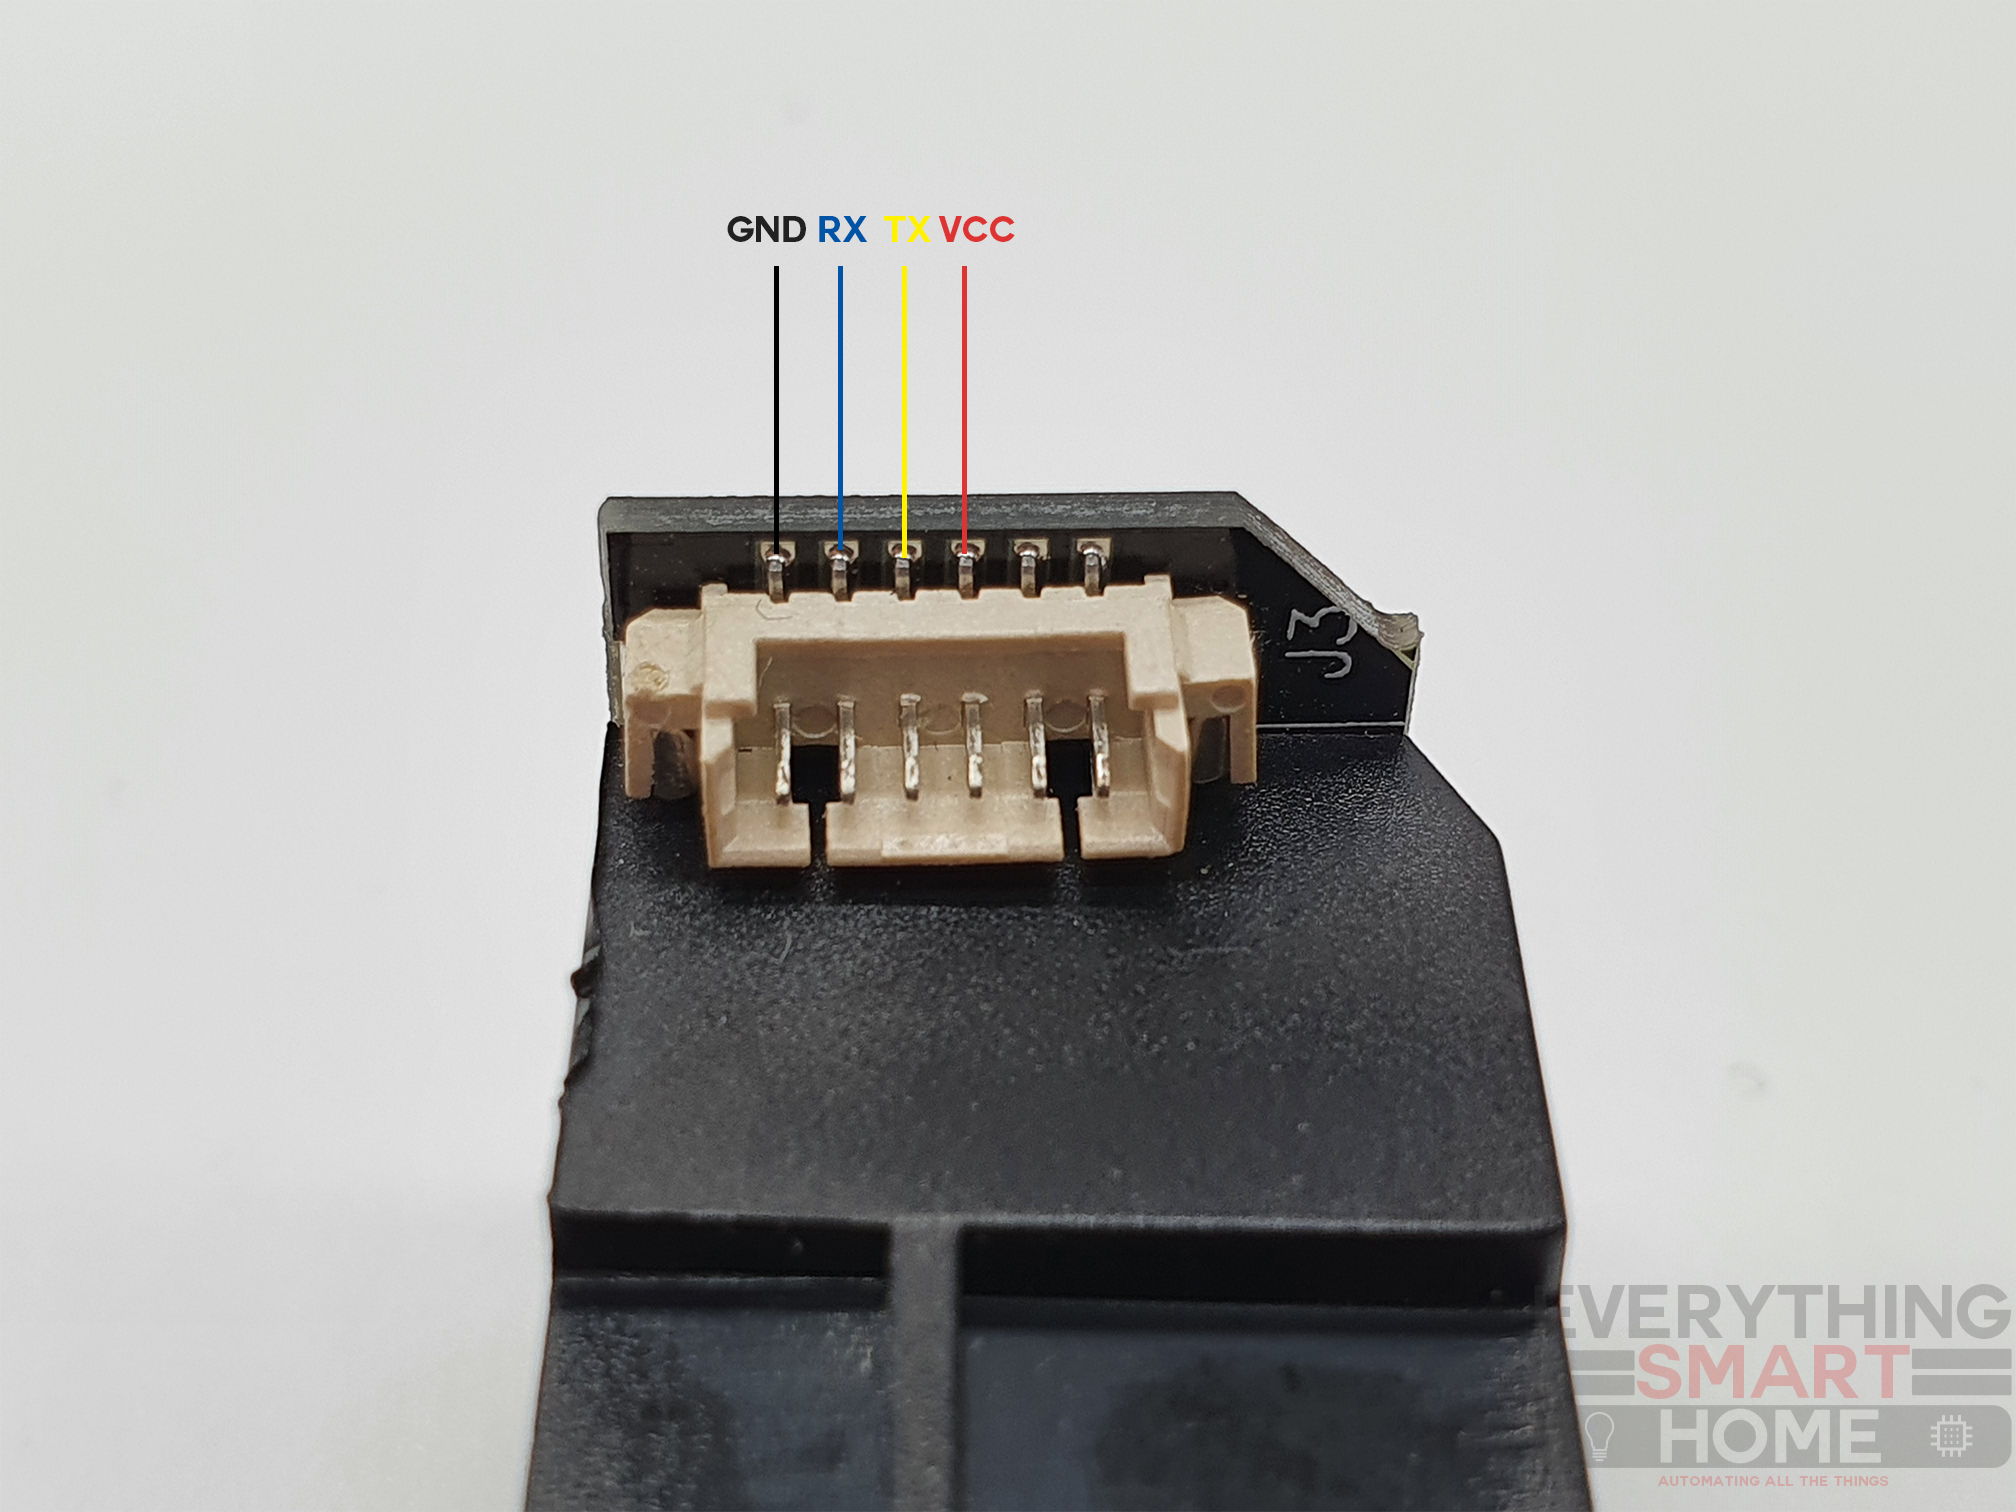
And here is a close up of the sensor with each pin labelled:
Go ahead and wire everything up, connect your Wemos via USB to your computer and startup the Arduino IDE.
Software
Arduino IDE
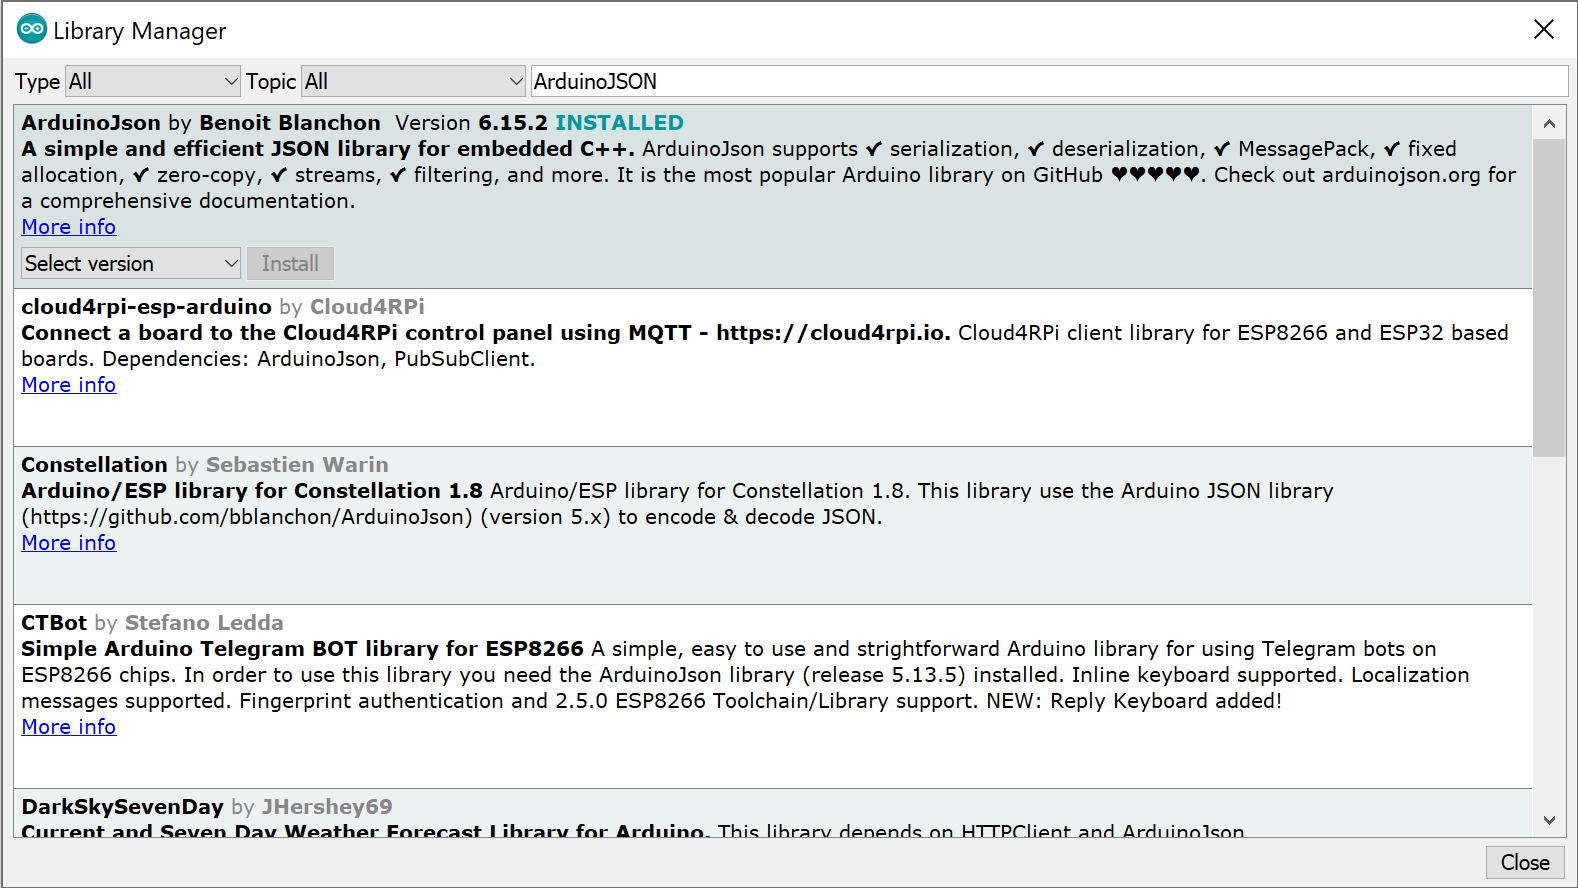
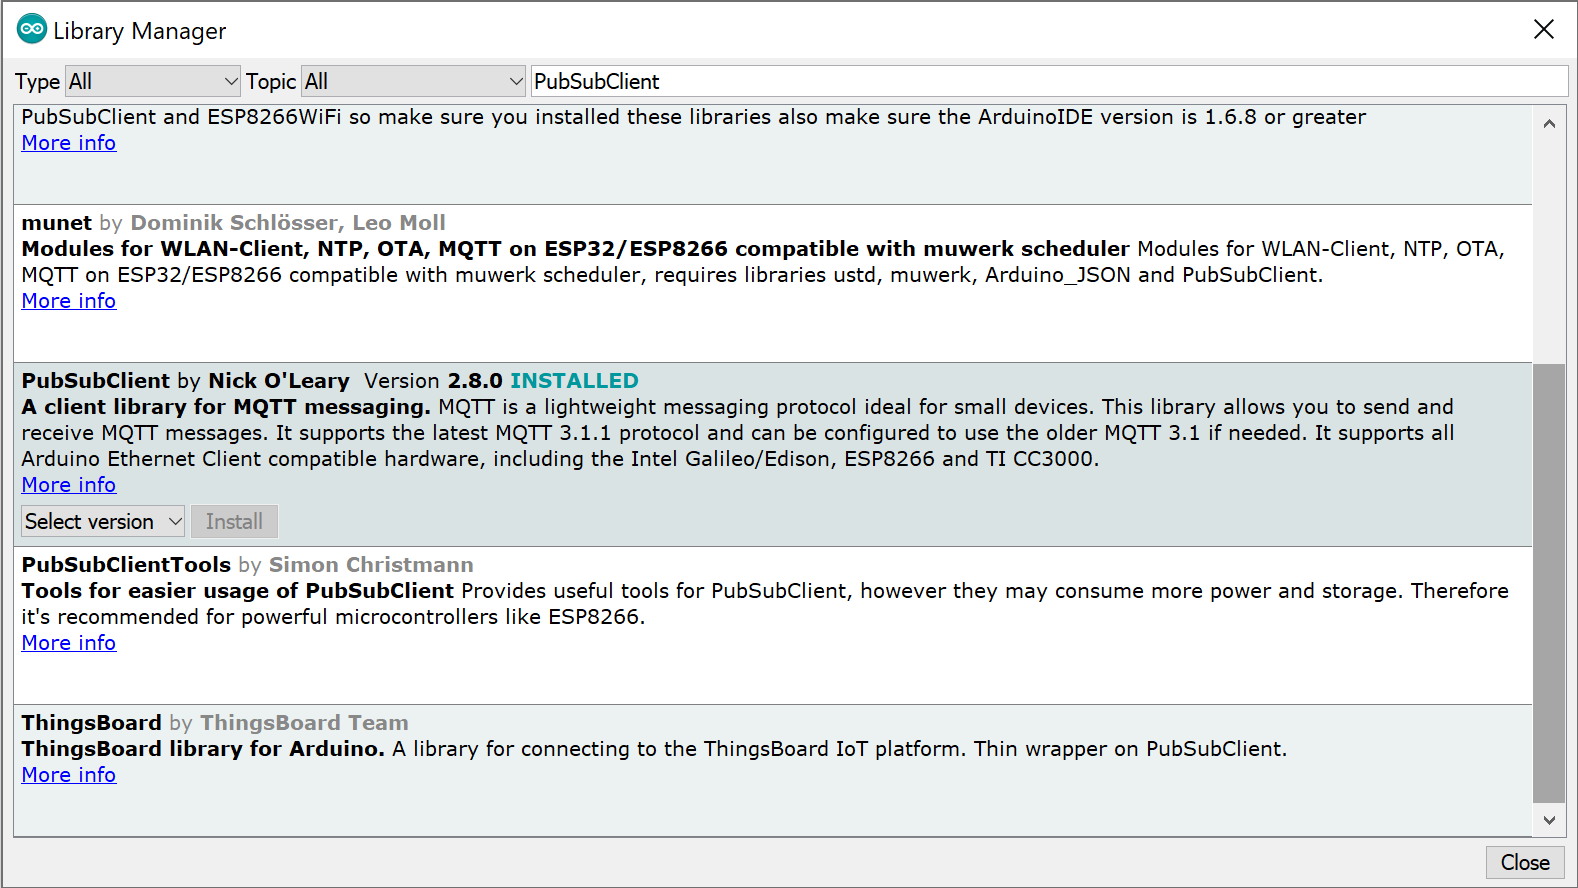
Firstly, make sure you have esp8266 boards added to Arduino IDE. Follow this super quick guide to do that (takes less than a minute). Once you’ve done that, we need to add some additional libraries which are as follows:
- Adafruit Fingerprint Sensor Library – allows us to easily interface with the fingerprint sensor
- PubSubClient – provides the MQTT connectivity
- ArduinoJSON – provides the framework for sending JSON message to Home Assistant
One other important thing to check, make sure the Arduino IDE is up to date, I had real issues with the SoftwareSerial library (included in core) using an esp8266, the Wemos D1 would lose connection to the sensor all the time, I eventually found I was using version 5.x of the SoftwareSerial library which worked fine with Arduino but not with esp8266 – updating to 6.8.1 immediately fixed all these issues.
With that out the way, we can now continue to load the code into the IDE. You will find the latest code on GitHub here.
Load the fingerprint_mqtt sketch and be sure to select the correct board from the boards menu, “LOLIN(WEMOS) D1 R2 & mini” for Wemos D1 Mini, and also make sure to select the COM port.
Change the variables at the top to suit your environment, making sure to set the SSID, WiFi password, MQTT topics and MQTT credentials. Again if you are unsure, check the MQTT guide for details.
You can now upload the code to the board and open the serial monitor, you should see something like this:
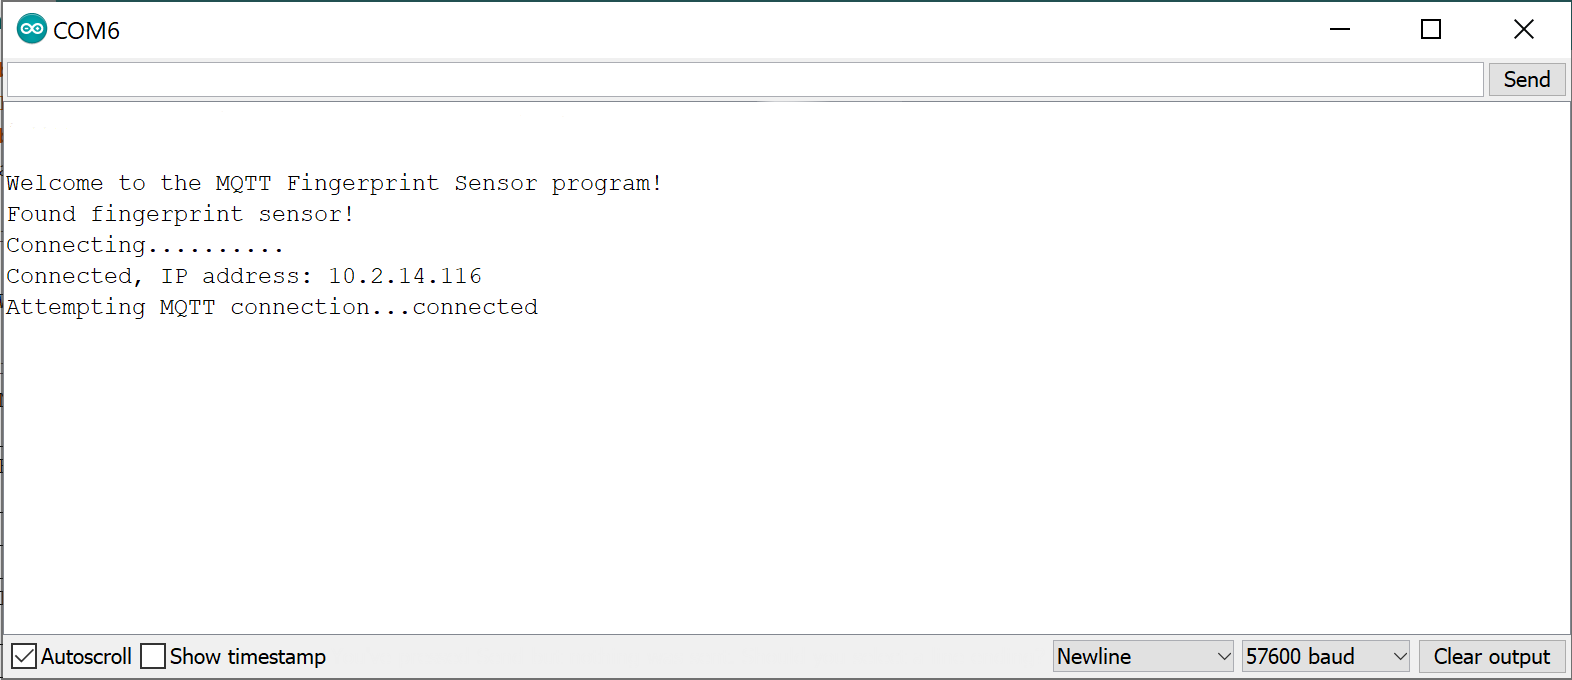
Which is perfect, the device is now awaiting for a finger to be placed on the sensor. If you receive a message that the sensor is not found, double and triple check the wiring, particularly the RX and TX lines – it’s very easy to get them the wrong way round.
Hopefully you followed the Arduino guide and you have enrolled some prints. If you haven’t we can do it later but you can still test the scanner by placing a finger on it:
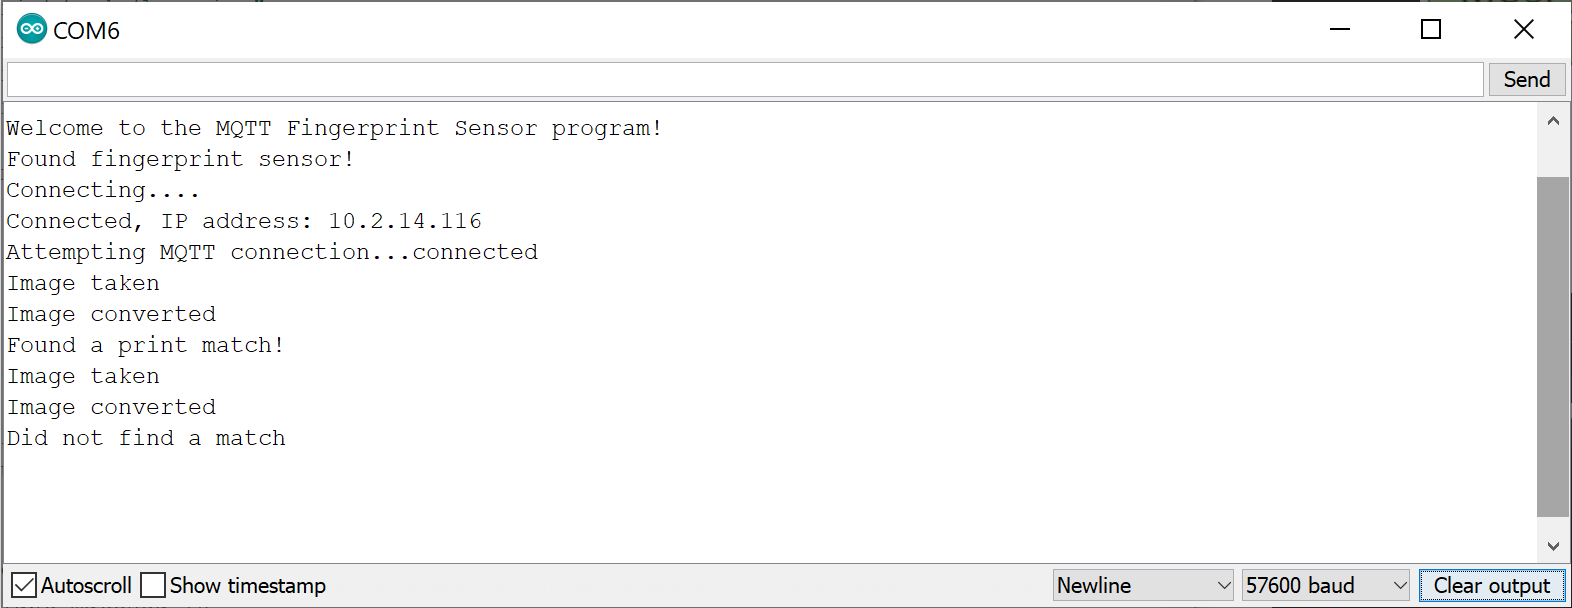
If all is successful, we are ready to add it to Home Assistant!
Home Assistant
We need to create a few sensors in Home Assistant, make sure to check GitHub for the latest code but add the following to the configuration.yaml file (make sure you have added MQTT broker to Home Assistant first):
configuration.yaml:
sensor:
  - platform: mqtt
    name: "Fingerprint"
    state_topic: "/fingerprint/mode/status"
    value_template: "{{value_json.state}}"
    json_attributes_topic: "/fingerprint/mode/status"
    json_attributes_template: "{{value_json | tojson}}"
  - platform: template
    sensors:
      fingerprint_mode:
        friendly_name: "Fingerprint Sensor Mode"
        value_template: >-
          {{state_attr('sensor.fingerprint', 'mode')}}
        icon_template: >-
          {% if is_state('sensor.fingerprint_mode', 'reading') %}
            mdi:book-open-outline
          {% elif is_state('sensor.fingerprint_mode', 'learning') %}
            mdi:book-open-page-variant
          {% endif %}
      fingerprint_state:
        friendly_name: "Fingerprint State"
        value_template: >-
          {{states('sensor.fingerprint')}}
        icon_template: >-
          {% if is_state('sensor.fingerprint', 'Waiting') %}
            mdi:fingerprint
          {% elif is_state('sensor.fingerprint', 'Matched') %}
            mdi:fingerprint
          {% elif is_state('sensor.fingerprint', 'Not matched') %}
            mdi:fingerprint-off
          {% endif %}
      fingerprint_id:
        friendly_name: "Fingerprint ID"
        value_template: >-
          {{state_attr('sensor.fingerprint', 'id')}}
      fingerprint_person:
        friendly_name: "Fingerprint Person"
        value_template: >-
          {% if is_state('sensor.fingerprint_id', '1') %}
            Lewis
          {% elif states.sensor.fingerprint_id.state | int > 1 %}
            {{states.sensor.fingerprint_id.state}}
          {% elif is_state('sensor.fingerprint', 'Waiting') %}
            Waiting
          {% elif is_state('sensor.fingerprint', 'Not matched') %}
            Not matched
          {% endif %}
        icon_template: >-
          {% if is_state('sensor.fingerprint', 'Waiting') %}
            mdi:human-male
          {% elif is_state('sensor.fingerprint', 'Matched') %}
            mdi:human-greeting
          {% elif is_state('sensor.fingerprint', 'Not matched') %}
            mdi:police-badge
          {% endif %}
You can see from the code that the first sensor we create, we stores the state of the fingerprint, then everything else as attributes. Then the template sensors are used to bring the attributes out into their own sensors so we can display them in Lovelace.
Make sure to restart Home Assistant to add the sensors, then make sure you are receiving data using the Dev Tools for those sensors.
Next, we need to create an input box which will allow us to tell the sensor which ID we want to either add a fingerprint as, or which fingerprint we want to delete. In Home Assistant, head over to Configuration > Helper and add a new helper. Select number from the list. Fill out the details as follows:
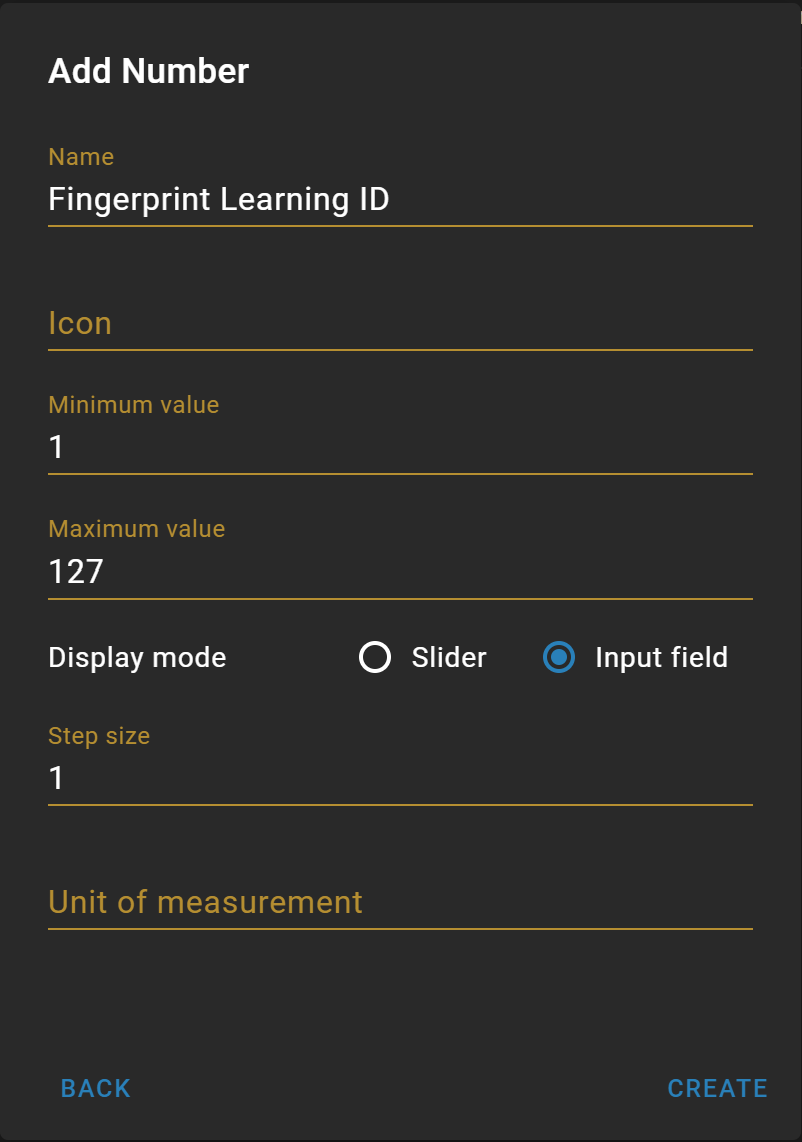
Make sure to set the minimum and maximum numbers to 1 and 127, this is the range of IDs that the sensor can accept.
Once you have created your helper, you will notice the entity ID has been generated, be sure to take a note of this for the next step.
Then, we need to create 2 scripts to allow for learning and deletions of prints. In Home Assistant, head over to Configuration > Scripts and add a new script for learning which looks like this:

You can see we are using the MQTT publish service to trigger our esp8266 into learning mode, sending the ID to use as the payload.
Note how the payload of the message is the input helper we created, expressed as an integer, which is what our MQTT topic is expecting.
Do the same for the deletion, being sure to change the topic:

If you are using config files for scripts, the code looks like this:
'1590438622575':
  alias: Fingerprint learning mode
  sequence:
  - data:
      payload_template: '{{states(''input_number.fingerprint_learning_id'') | int}}'
      topic: fingerprint/mode/learning
    service: mqtt.publish
'1590488431995':
  alias: Fingerprint Delete Print
  sequence:
  - data:
      payload_template: '{{states(''input_number.fingerprint_learning_id'') | int}}'
      topic: fingerprint/mode/delete
    service: mqtt.publish
And finally, head to Lovelace and add your entities and buttons (for the learn script and delete script) like so:
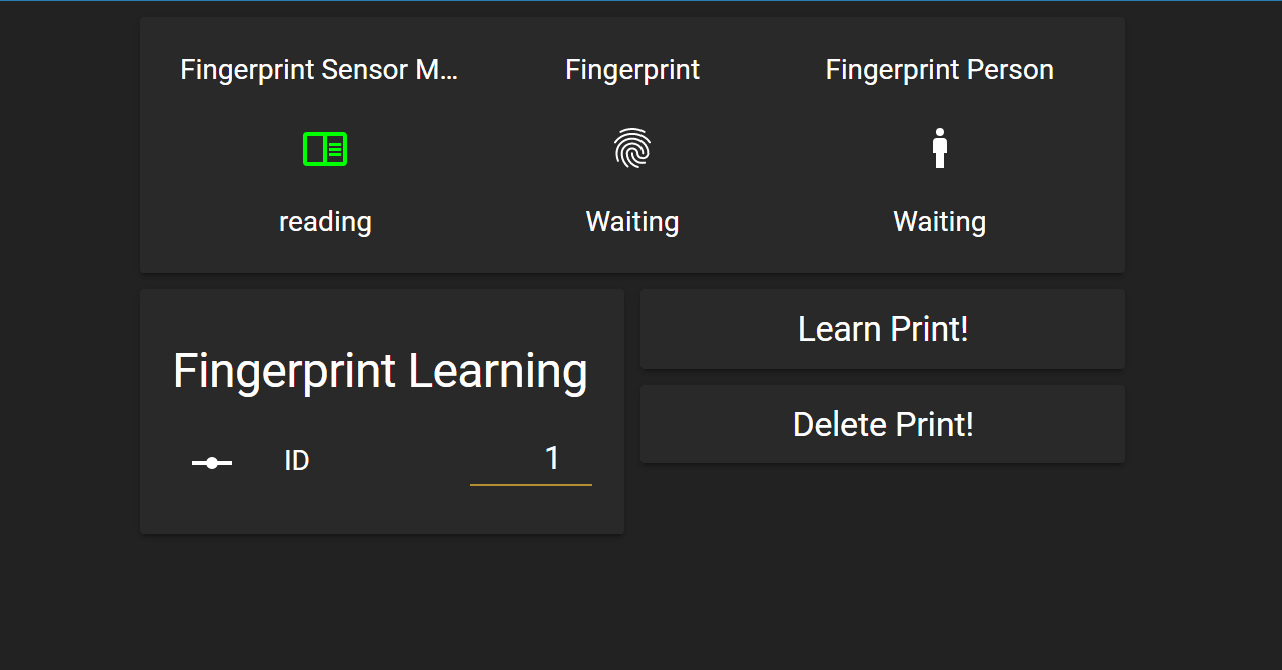
The way I am achieving this is using a glance card with the 3 entities along the top – Fingerprint Mode, Fingerprint State and Fingerprint Person – then the bottom card is a horizontal stack card with an entity card for the ID text box, then a vertical stack card with 2 button cards, one for each script.
If all goes well, you should now have everything working!
Adding/Deleting prints
Now that you have completed the above, we should now have the ability to add and delete fingerprints from the fingerprint sensor using Home Assistant.
Go ahead and enter an ID in the input box, from 1 to 127, and hit learn. You will see the state box changes state to tell you to place the finger. Once placed, the fingerprint sensor will take an image, ask you to remove the finger then replace the same finger again to make sure it matches. Once you remove the finger a second time the print will be stored.
Deletion is as easy as entering the ID you want to delete and hitting delete, a message will appear instantly telling you its been deleted.
Troubleshooting
As always, be sure to check wiring, in particular the TX and RX pins are the correct way round.
Ensure that you are getting power to the sensor, there are testing pads on the back that you can check the voltage, you should be receiving 3.3v at the pads.
Make sure the SoftwareSerial library within Arduino IDE is on the latest version!
In Home Assistant, go to Dev Tools > MQTT and subscribe to the state topic to ensure events are coming through correctly, if they are then you know data is being published from the esp8266 correctly.
Improvements
There are a couple of improvements that can be done to make things a bit nicer, you can change the colour of the icons depending on a match or fail by using the “Custom UI” add-on for Home Assistant, you can find it on Github here.
I’ve also been trying to think of a way to be able to store the fingerprint sensor ID numbers and a persons name in Home Assistant so that they can be used on match but I haven’t figured out a way to do that yet unfortunately.
For example, I’d like to have a text box next to the ID box that you could enter a name in on the learning process that would create a sensor in Home Assistant called “sensor.fingerprint.id.x” where x is the ID number, then the state of that would be the name in the box so “Lewis”. Then when the ID is sent from the sensor, it would match up and display the persons name in the UI. You can do this manually by adding this to the person sensor in the config file:
fingerprint_person:
        friendly_name: "Fingerprint Person"
        value_template: >-
          {% if is_state('sensor.fingerprint_id', '1') %}
            Lewis
          {% elif states.sensor.fingerprint_id.state | int > 1 %}
            {{states.sensor.fingerprint_id.state}}
          {% elif is_state('sensor.fingerprint', 'Waiting') %}
            Waiting
          {% elif is_state('sensor.fingerprint', 'Not matched') %}
            Not matched
          {% endif %}
But its tedious to add one every time. If anyone discovers a good way, please do let me know!
Enclosure
Community member James has kindly designed 2 enclosures for this project, one as a standalone case and one that will fit inside a wall plate. You can check them out here and here.
Thanks also to LuckyPants for designing this enclosure which clips together and mounts to a wall.
Conclusion
I hope you enjoyed this project and you have successfully managed to add a fingerprint sensor to Home Assistant, it was surprisingly a lot of fun making it, and I really appreciated all the message/comments/general enthusiasm I got from everyone.
I’d love to see what you guys make with this, please tweet or send photos to me of what you make and come up with!
Any problems, let me know in the comments, make sure to subscribe below for instant updates on future posts!