Setup a PIA VPN with pfSense 2.4.5

Many of us use a VPN in one way or another these days, they have seen a surge in popularity over the last decade or so with many people seeking to use them as means of bypassing content restrictions with Netflix or other streaming services, as a way of connecting to home or work to access documents on the go, or to just retain as much of our privacy online as we can.
As part of the recent pandemic measures here in the UK, I was recently tasked with designing a solution for our enterprise to scale our current VPN solution, which would see around 100-150 users daily, to be able to handle 1000+ users simultaneously in just a few hours. Almost 3 months later, that solution still performs exceptionally well every day. But we are getting a bit of topic here..
Having been a pfSense user for close to 8 years now and a Private Internet Access (PIA) user for coming up to 4 years, I decided it makes sense to document how to setup a PIA VPN with pfSense as a permanent VPN connection, then we will cover how to route certain devices through PIA whilst leaving all other traffic untouched.
This guide uses pfSense 2.4.5-release which is the current version as of the time of writing. Everything is applicable to most older versions although your interface might look a little different depending on your version.
Guide
There is a few different settings you can use with regards to security, what is deemed as “weak” “recommended/medium” and “strong” – I’m going to give recommendations for medium and strong profiles since I see these as acceptable. If performance isn’t quite up to what you were expecting, you can try using the weak profile but I’d recommend going with the medium settings if possible. With that in mind, the recommended and strong settings vary a little in their port selection and certificates:
- Recommended: UDP Port 1198 with AES-128 for encryption
- Strong: UDP Port 1197 with AES-256 for encryption
To give you some reference, the APU2 that I reviewed here is capable of 100mbps over VPN using the recommended security we see here, but cannot get close to the 300mbps my link is capable of. Perhaps time to upgrade..
Certificate installation
First we need to install the PIA CA certificates into pfSense so that we can use them within the VPN configuration.
First download the correct certificate here:
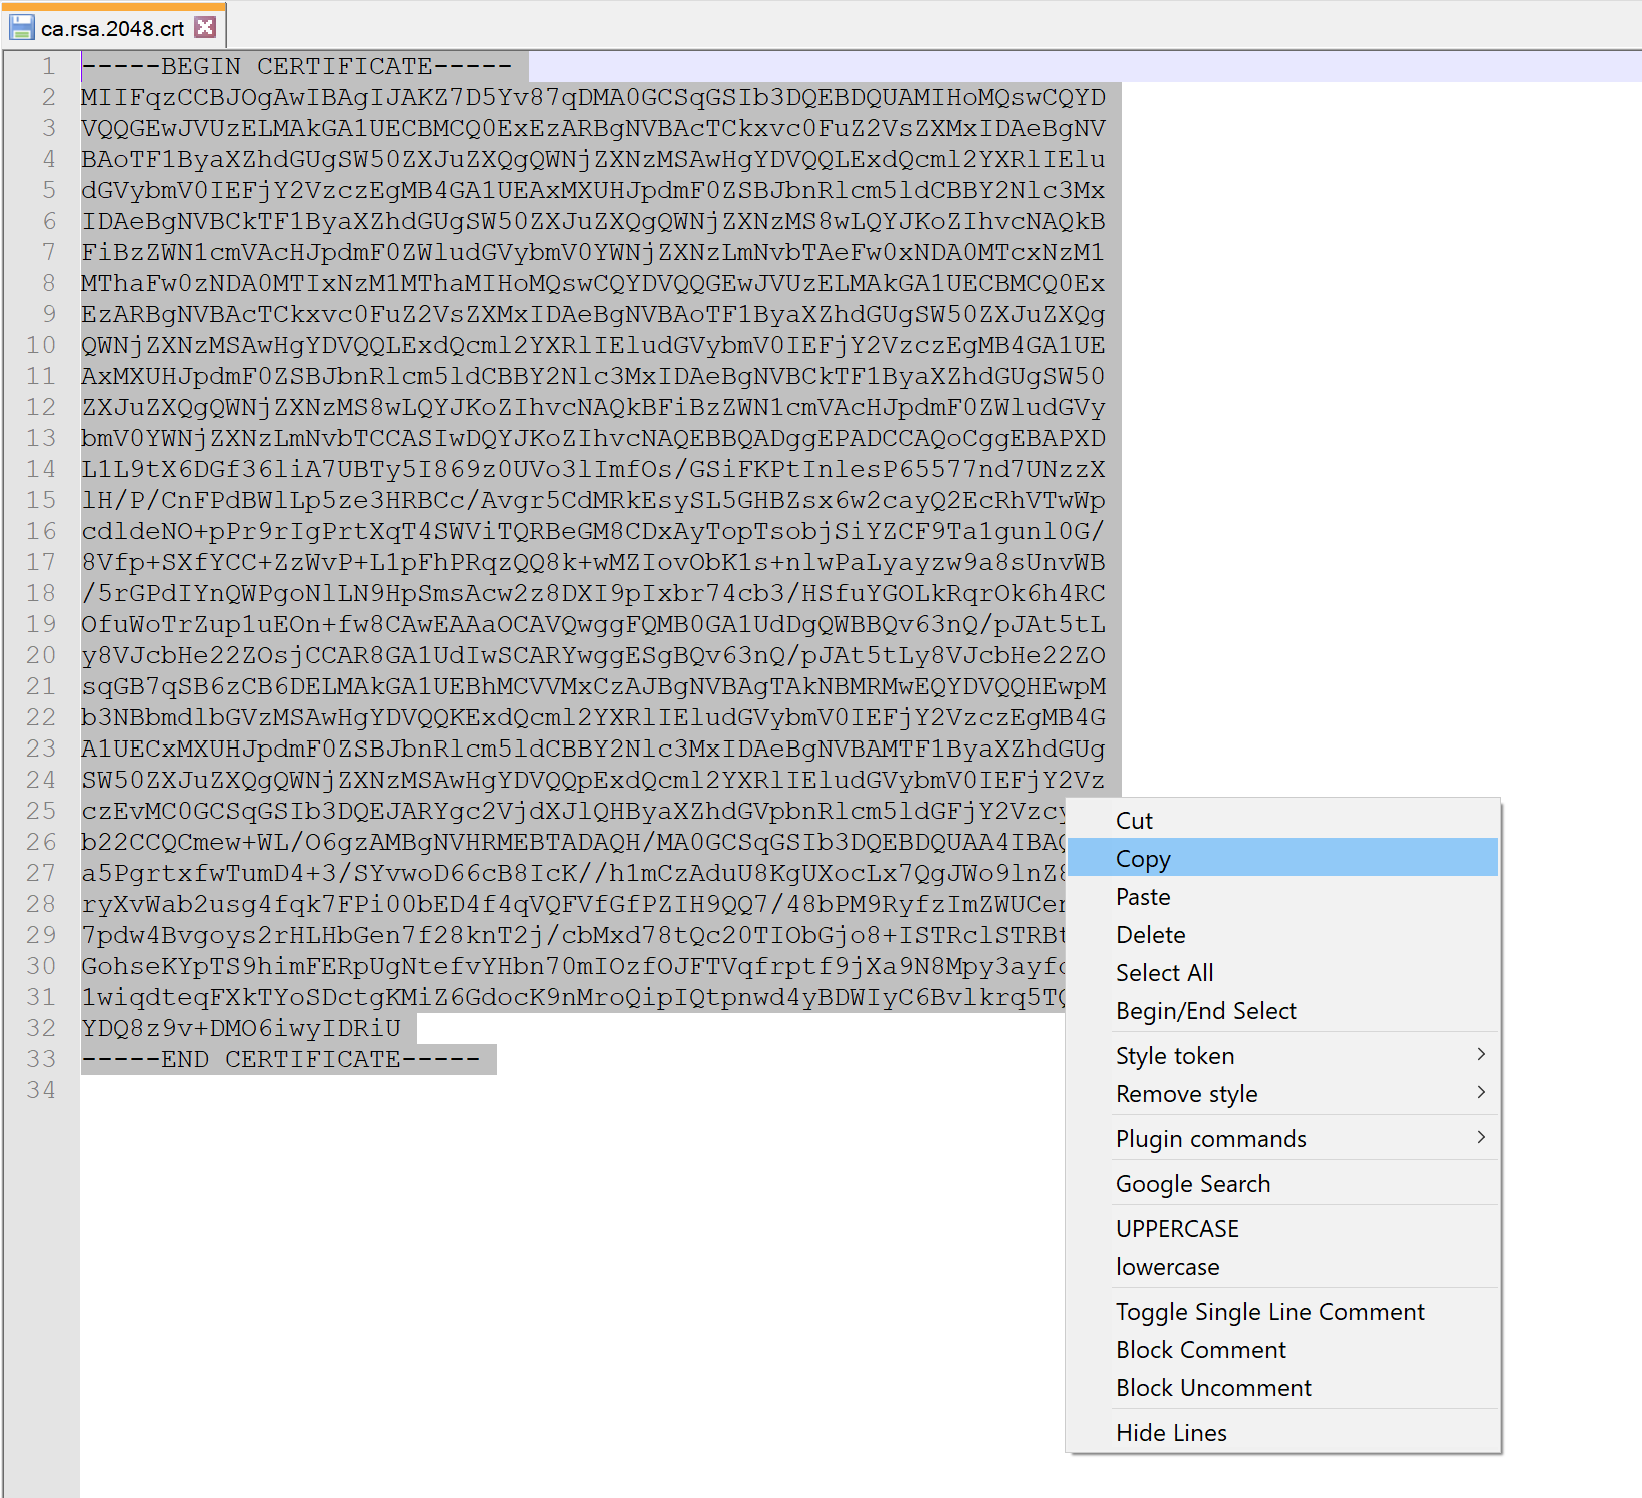
Once downloaded, open the file in notepad/notepad++ and highlight everything within the file and copy to clipboard:
Prev1of1Next
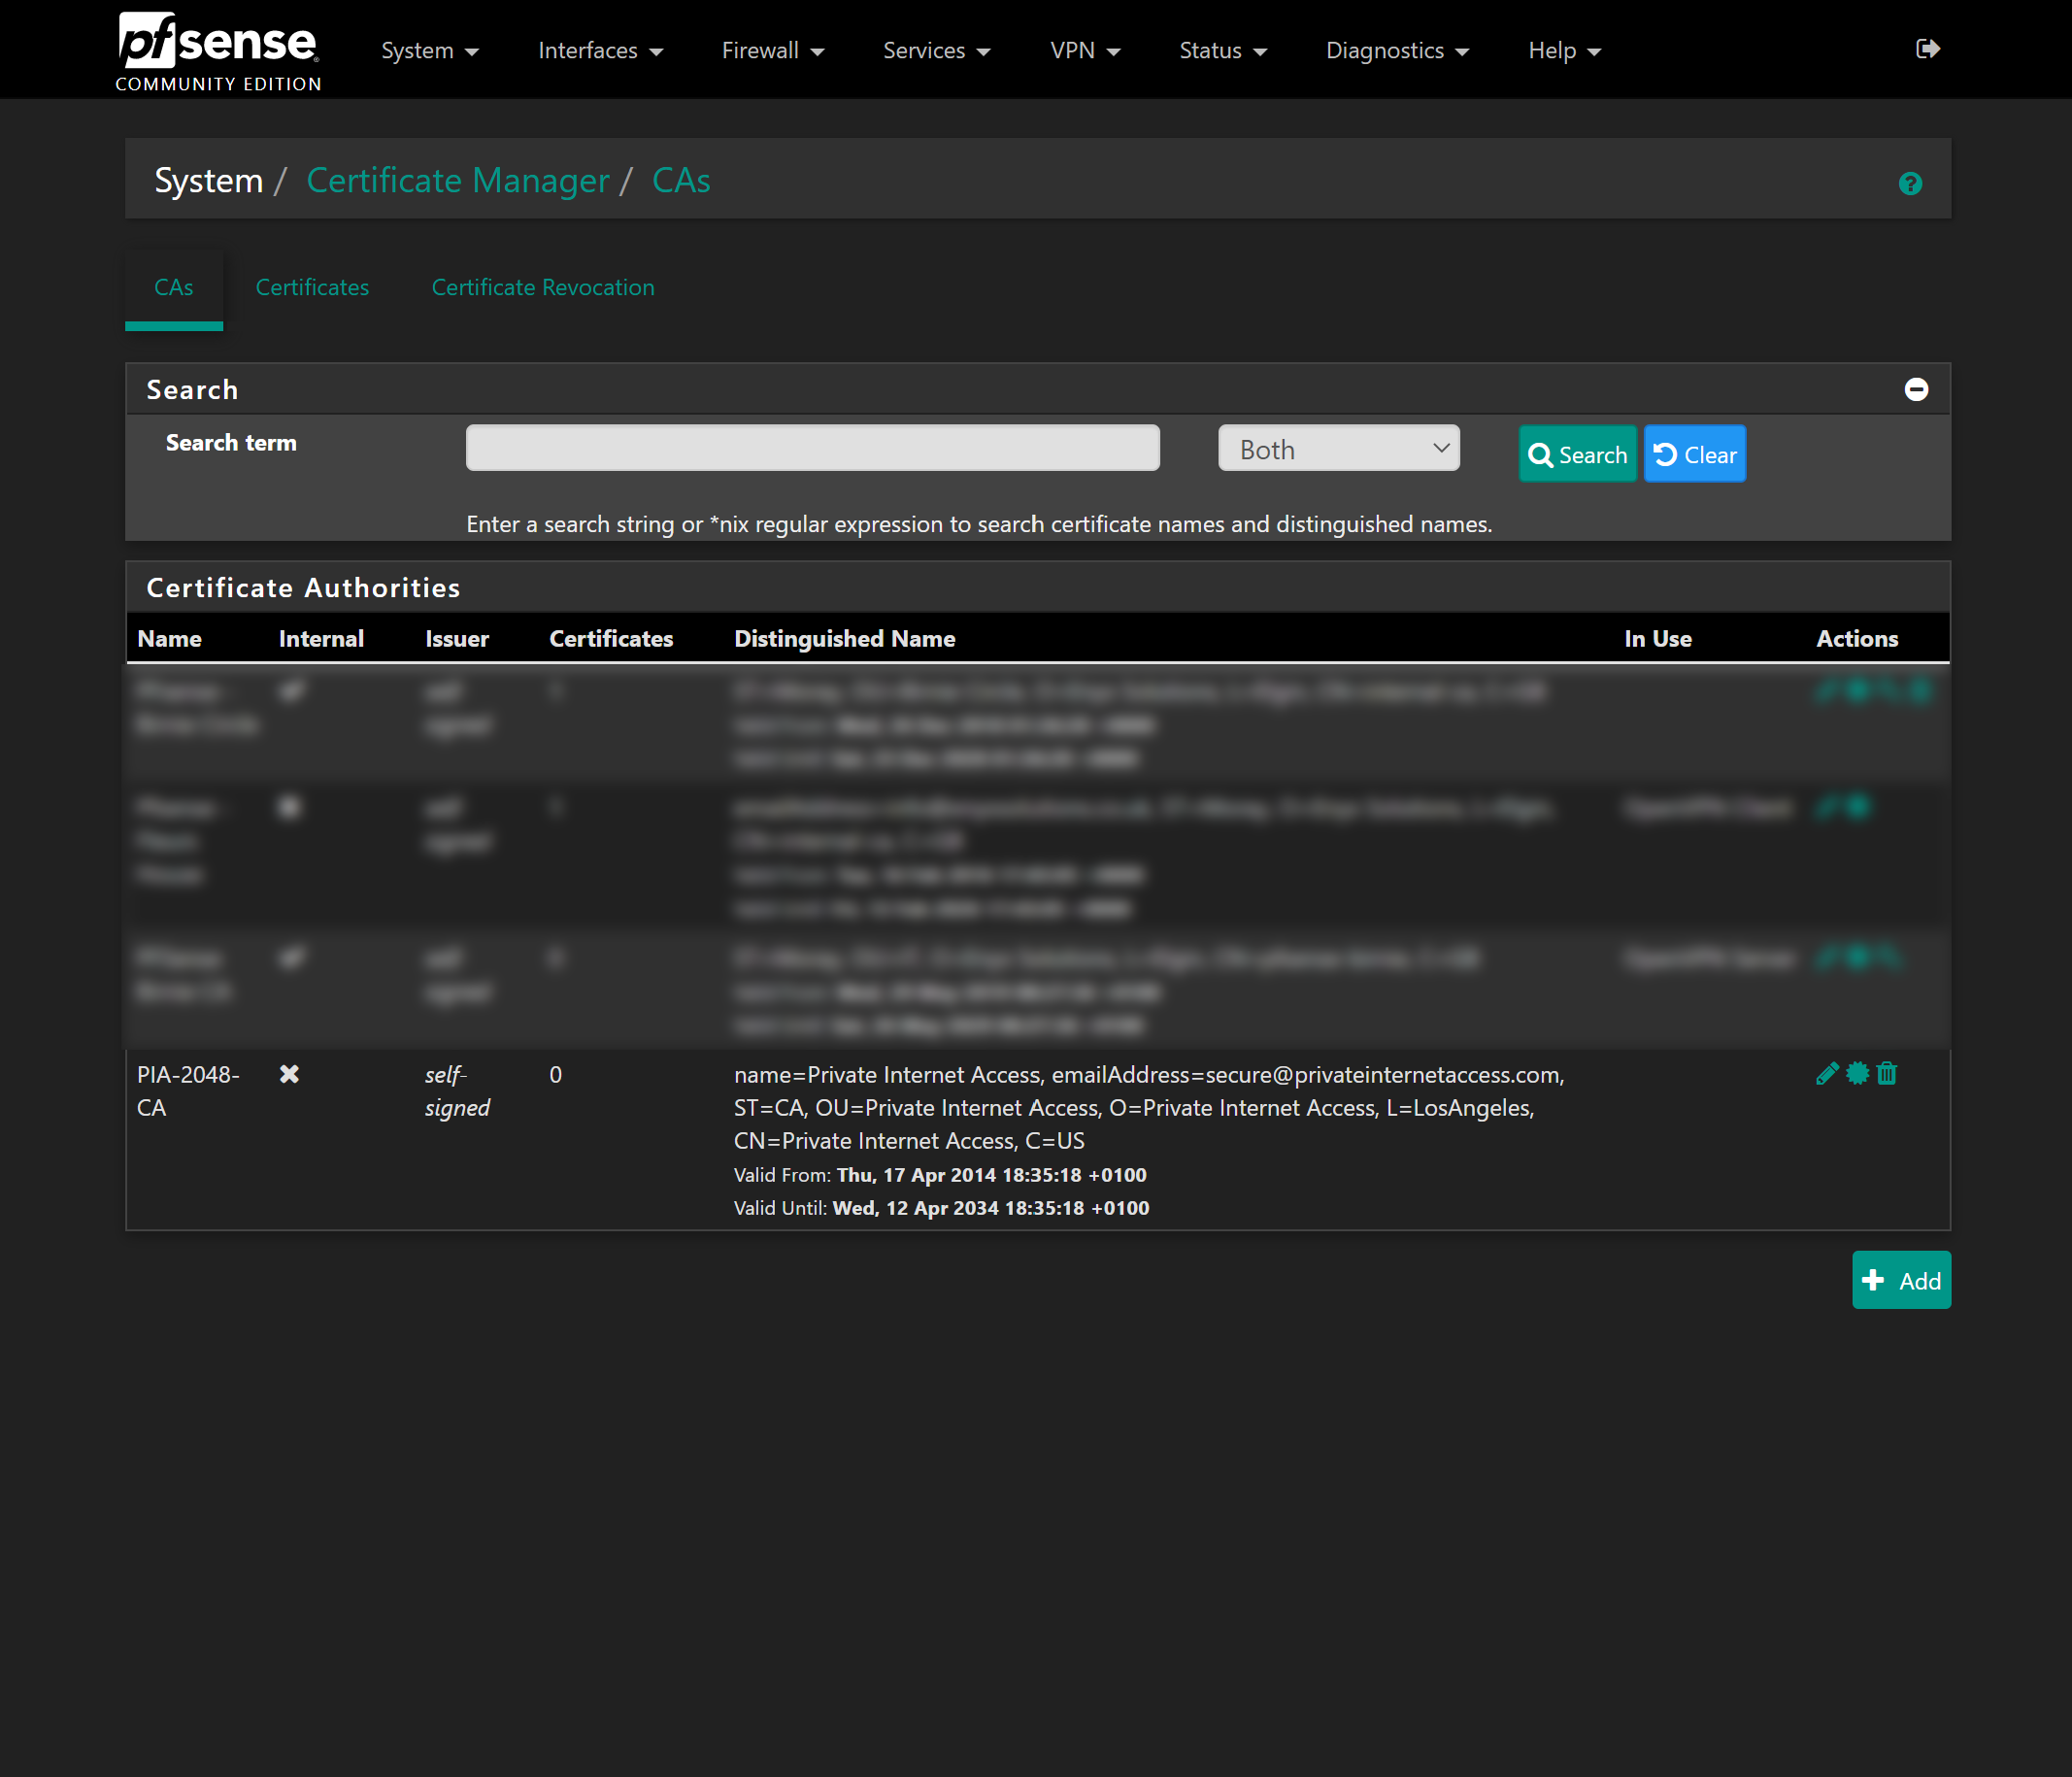
Next, head to System > Certificate Manager and make sure you are on the CAs tab. Click Add to create a new Certificate Authority. Give a descriptive name and change the method to “Import an existing Certificate Authority“. Then in the Certificate data box, paste the certificate data you copied:
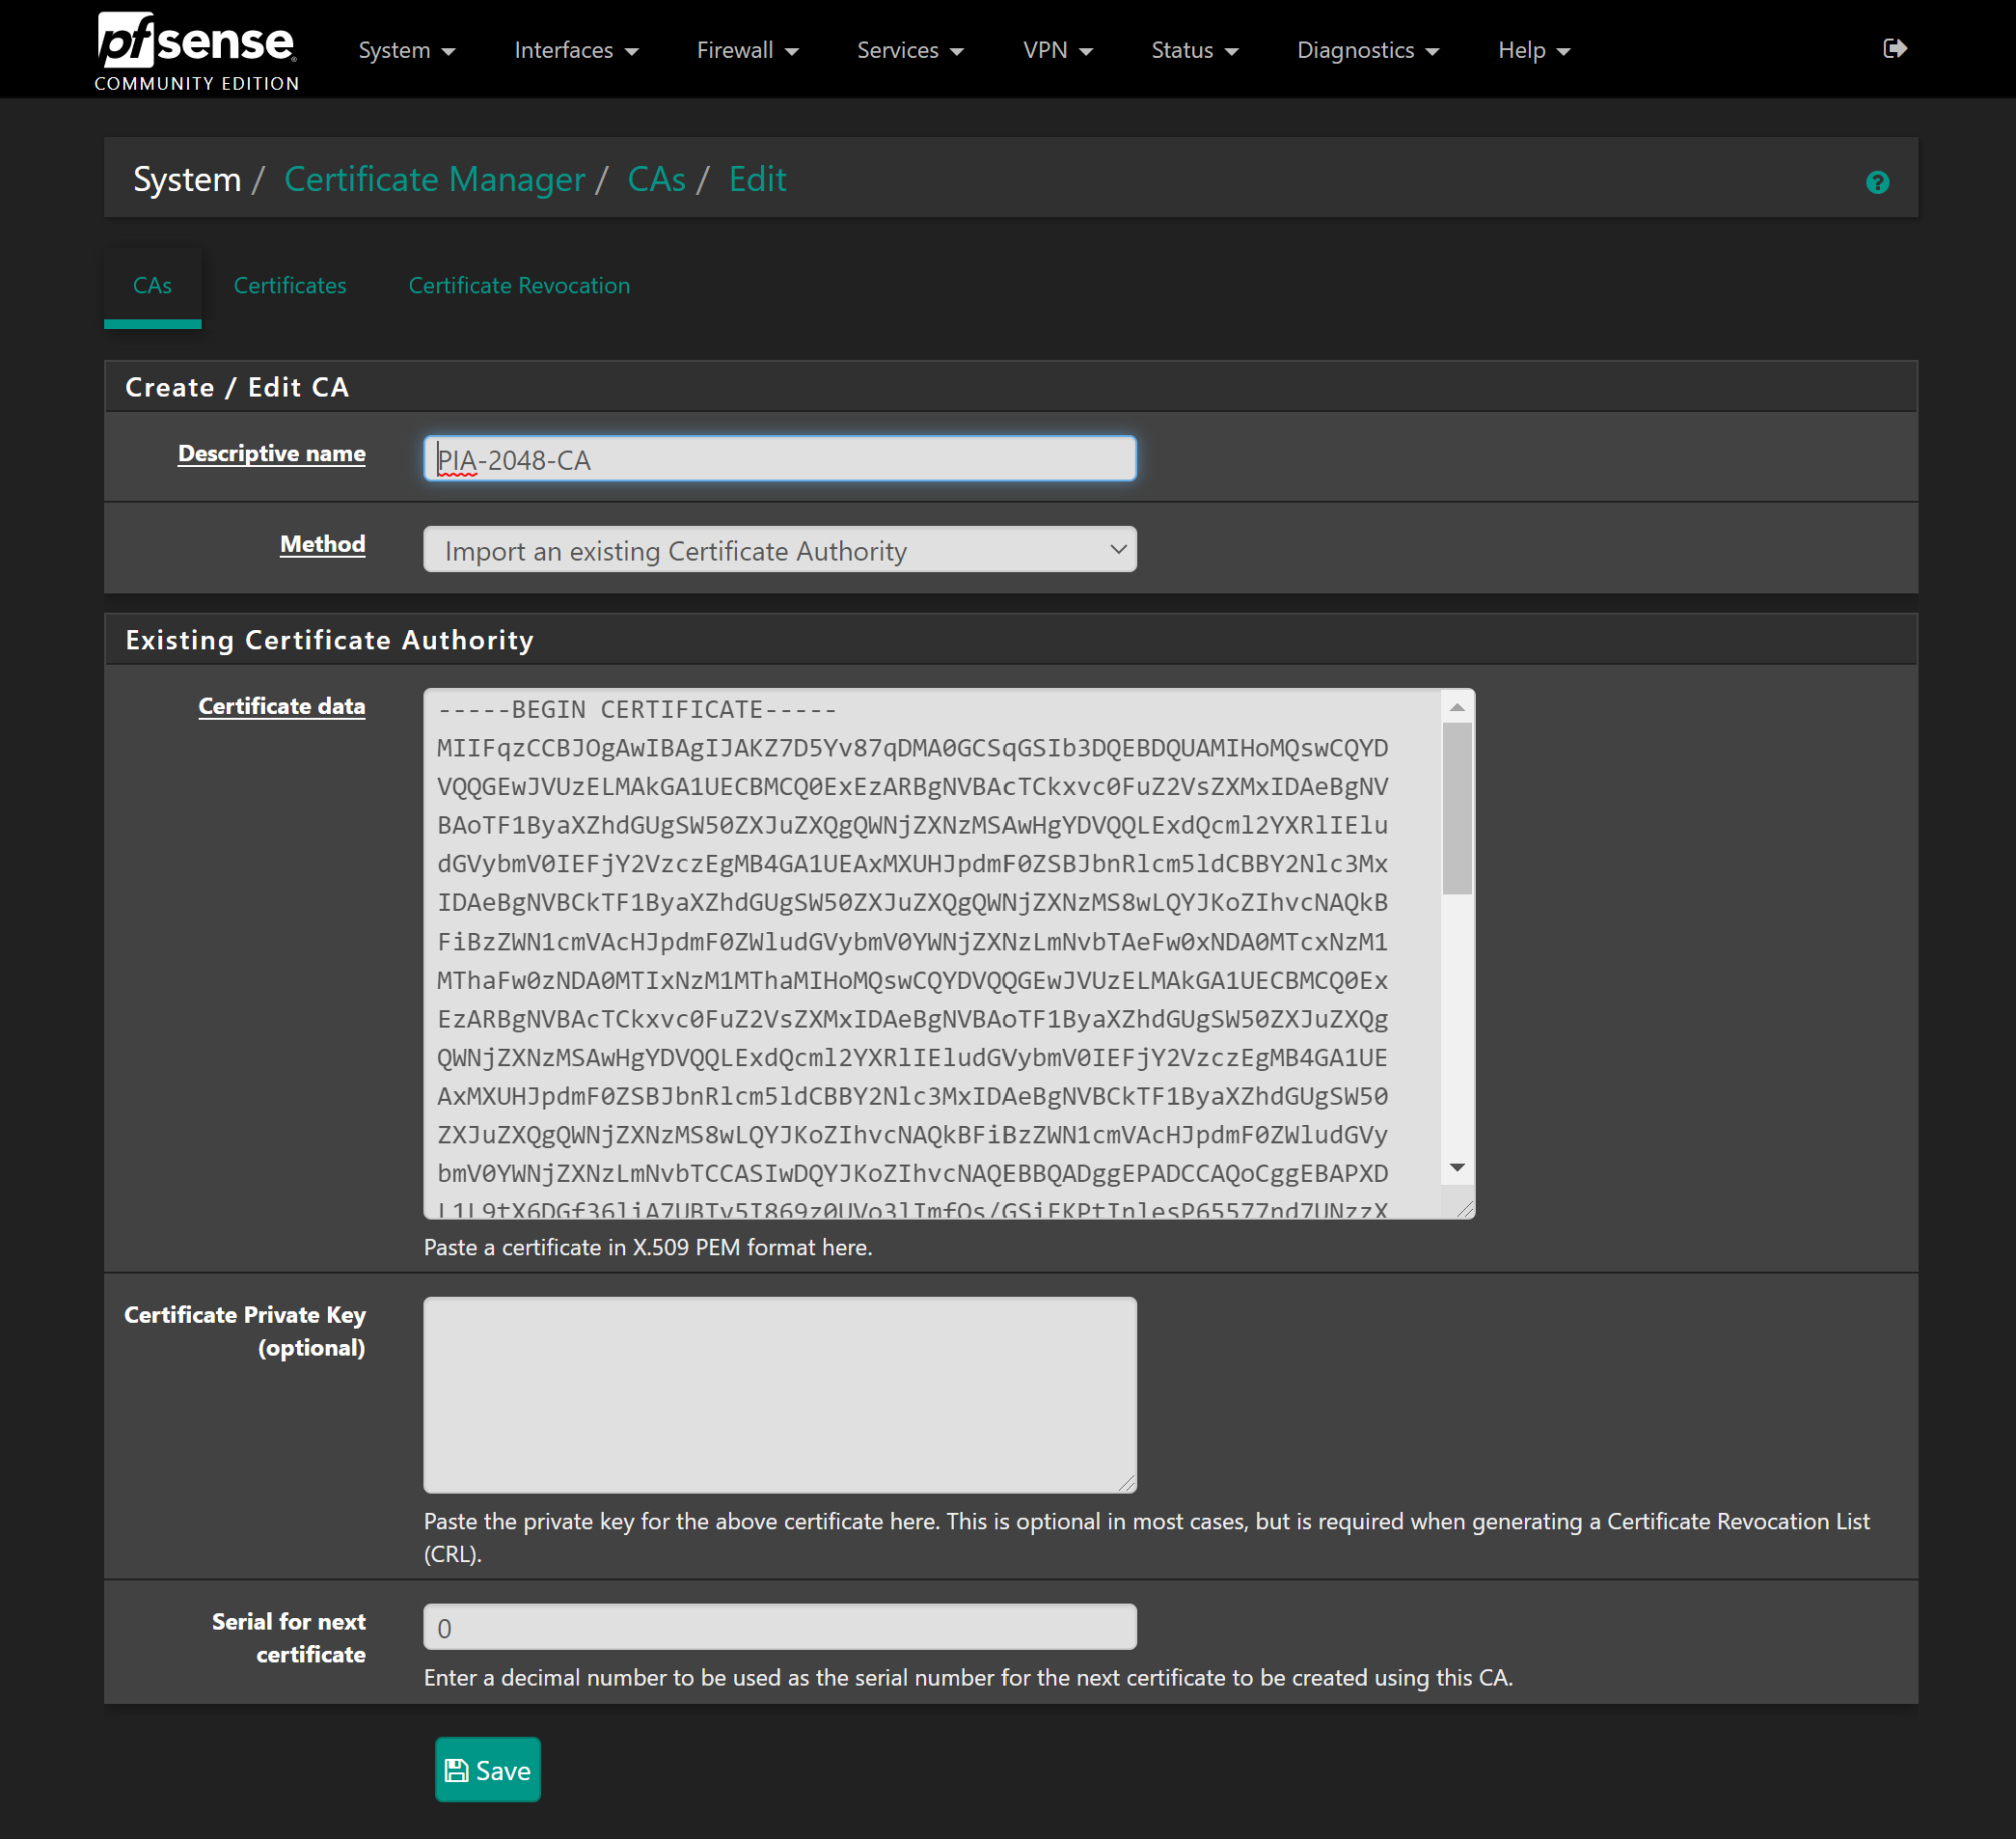
Finally hit Save to create that CA. If everything worked, you will now have a new CA listed in the table and the “Distinguished name” (DN) column will have pre-populated information:
OpenVPN Setup
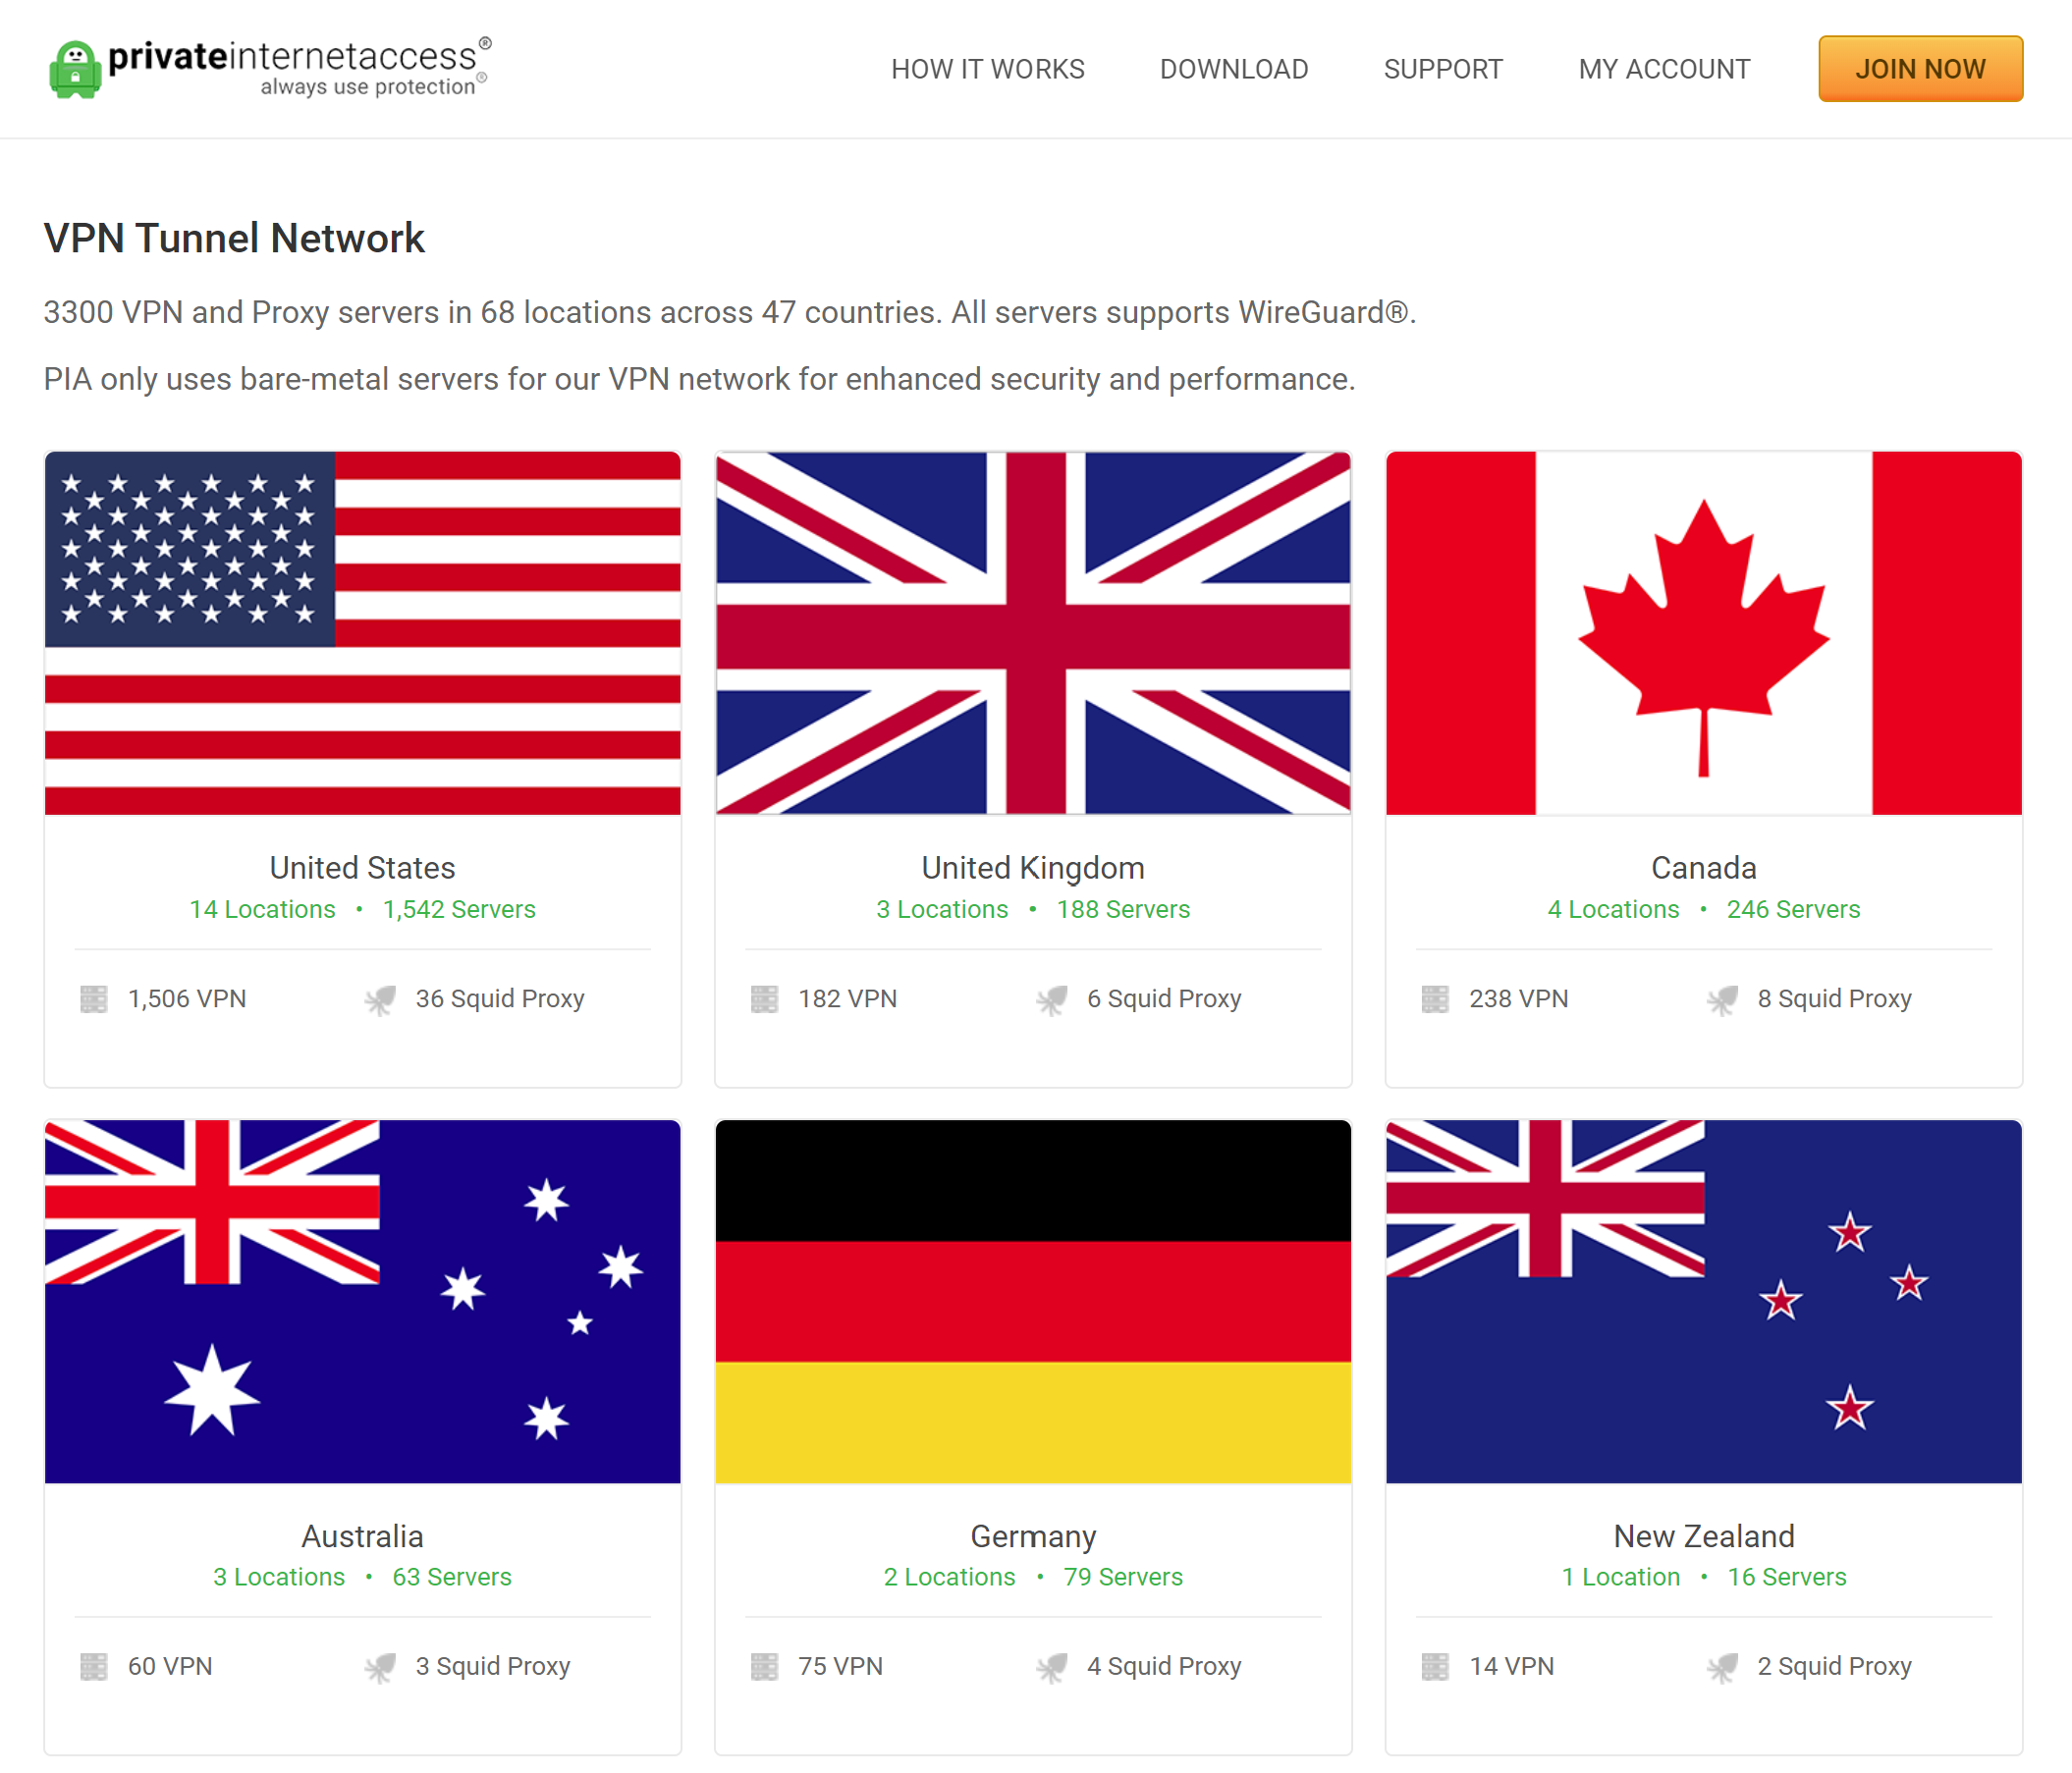
We need to decide which server location we want to connect to, PIA currently has 3300 servers in 68 locations across 47 countries, so quite a wide range.
Head to this link here.
Then select the server you want to use, you can repeat this for as many servers as you want to use, you might want one in the UK and one in the US. Select a location, then copy the address you want to use. For example, clicking on the UK reveals 3 VPN servers, select the address of the one you want to use, I am using the London one in this example:
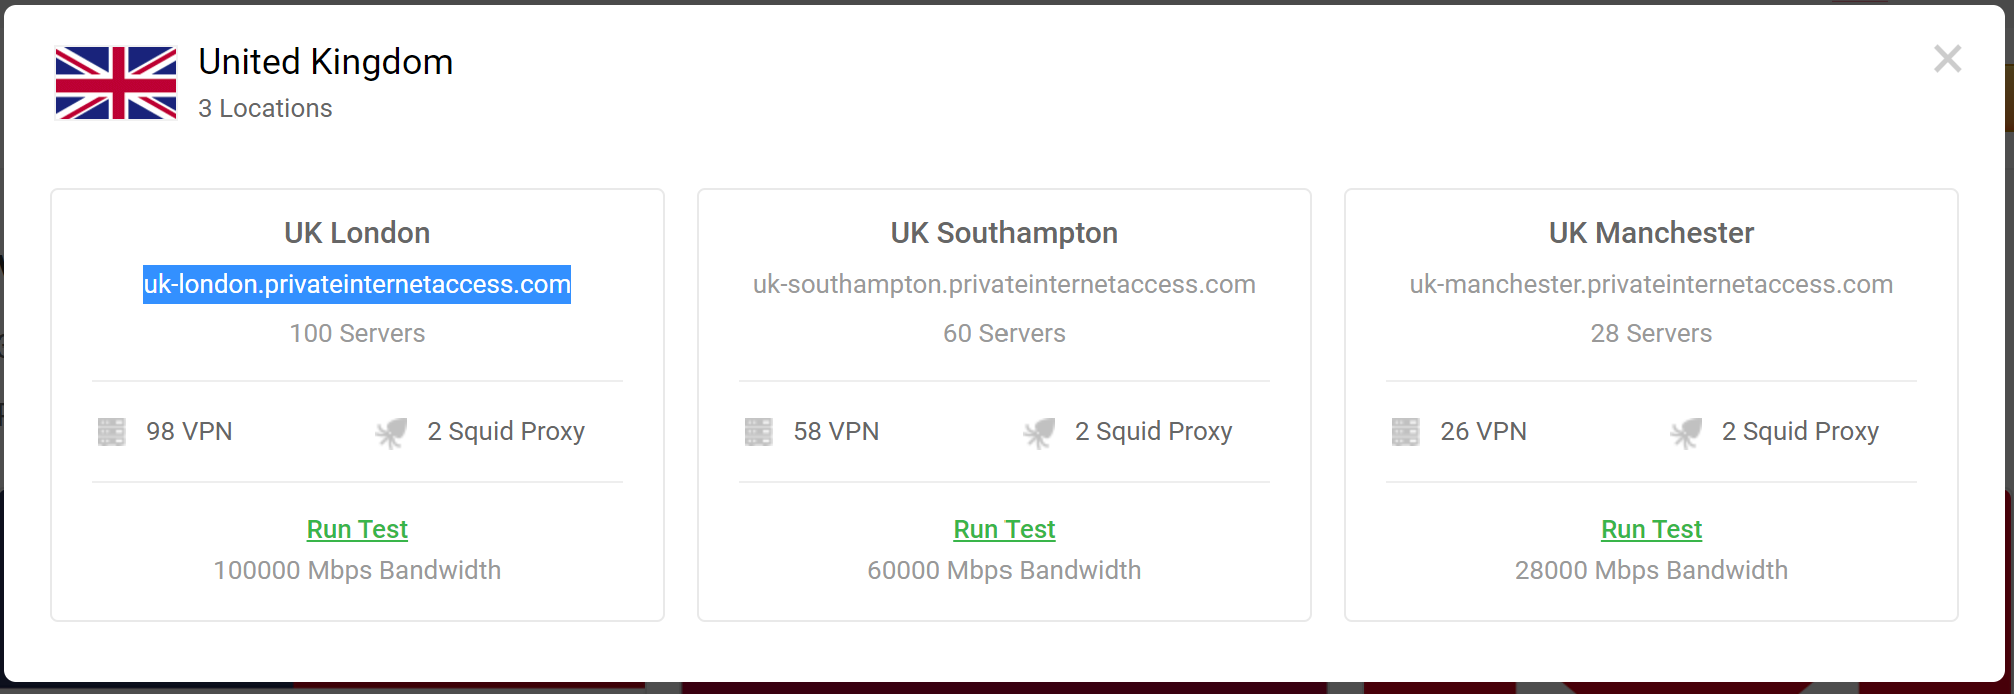
Copy this address. I am using uk-london.privateinternetaccess.com for this example.
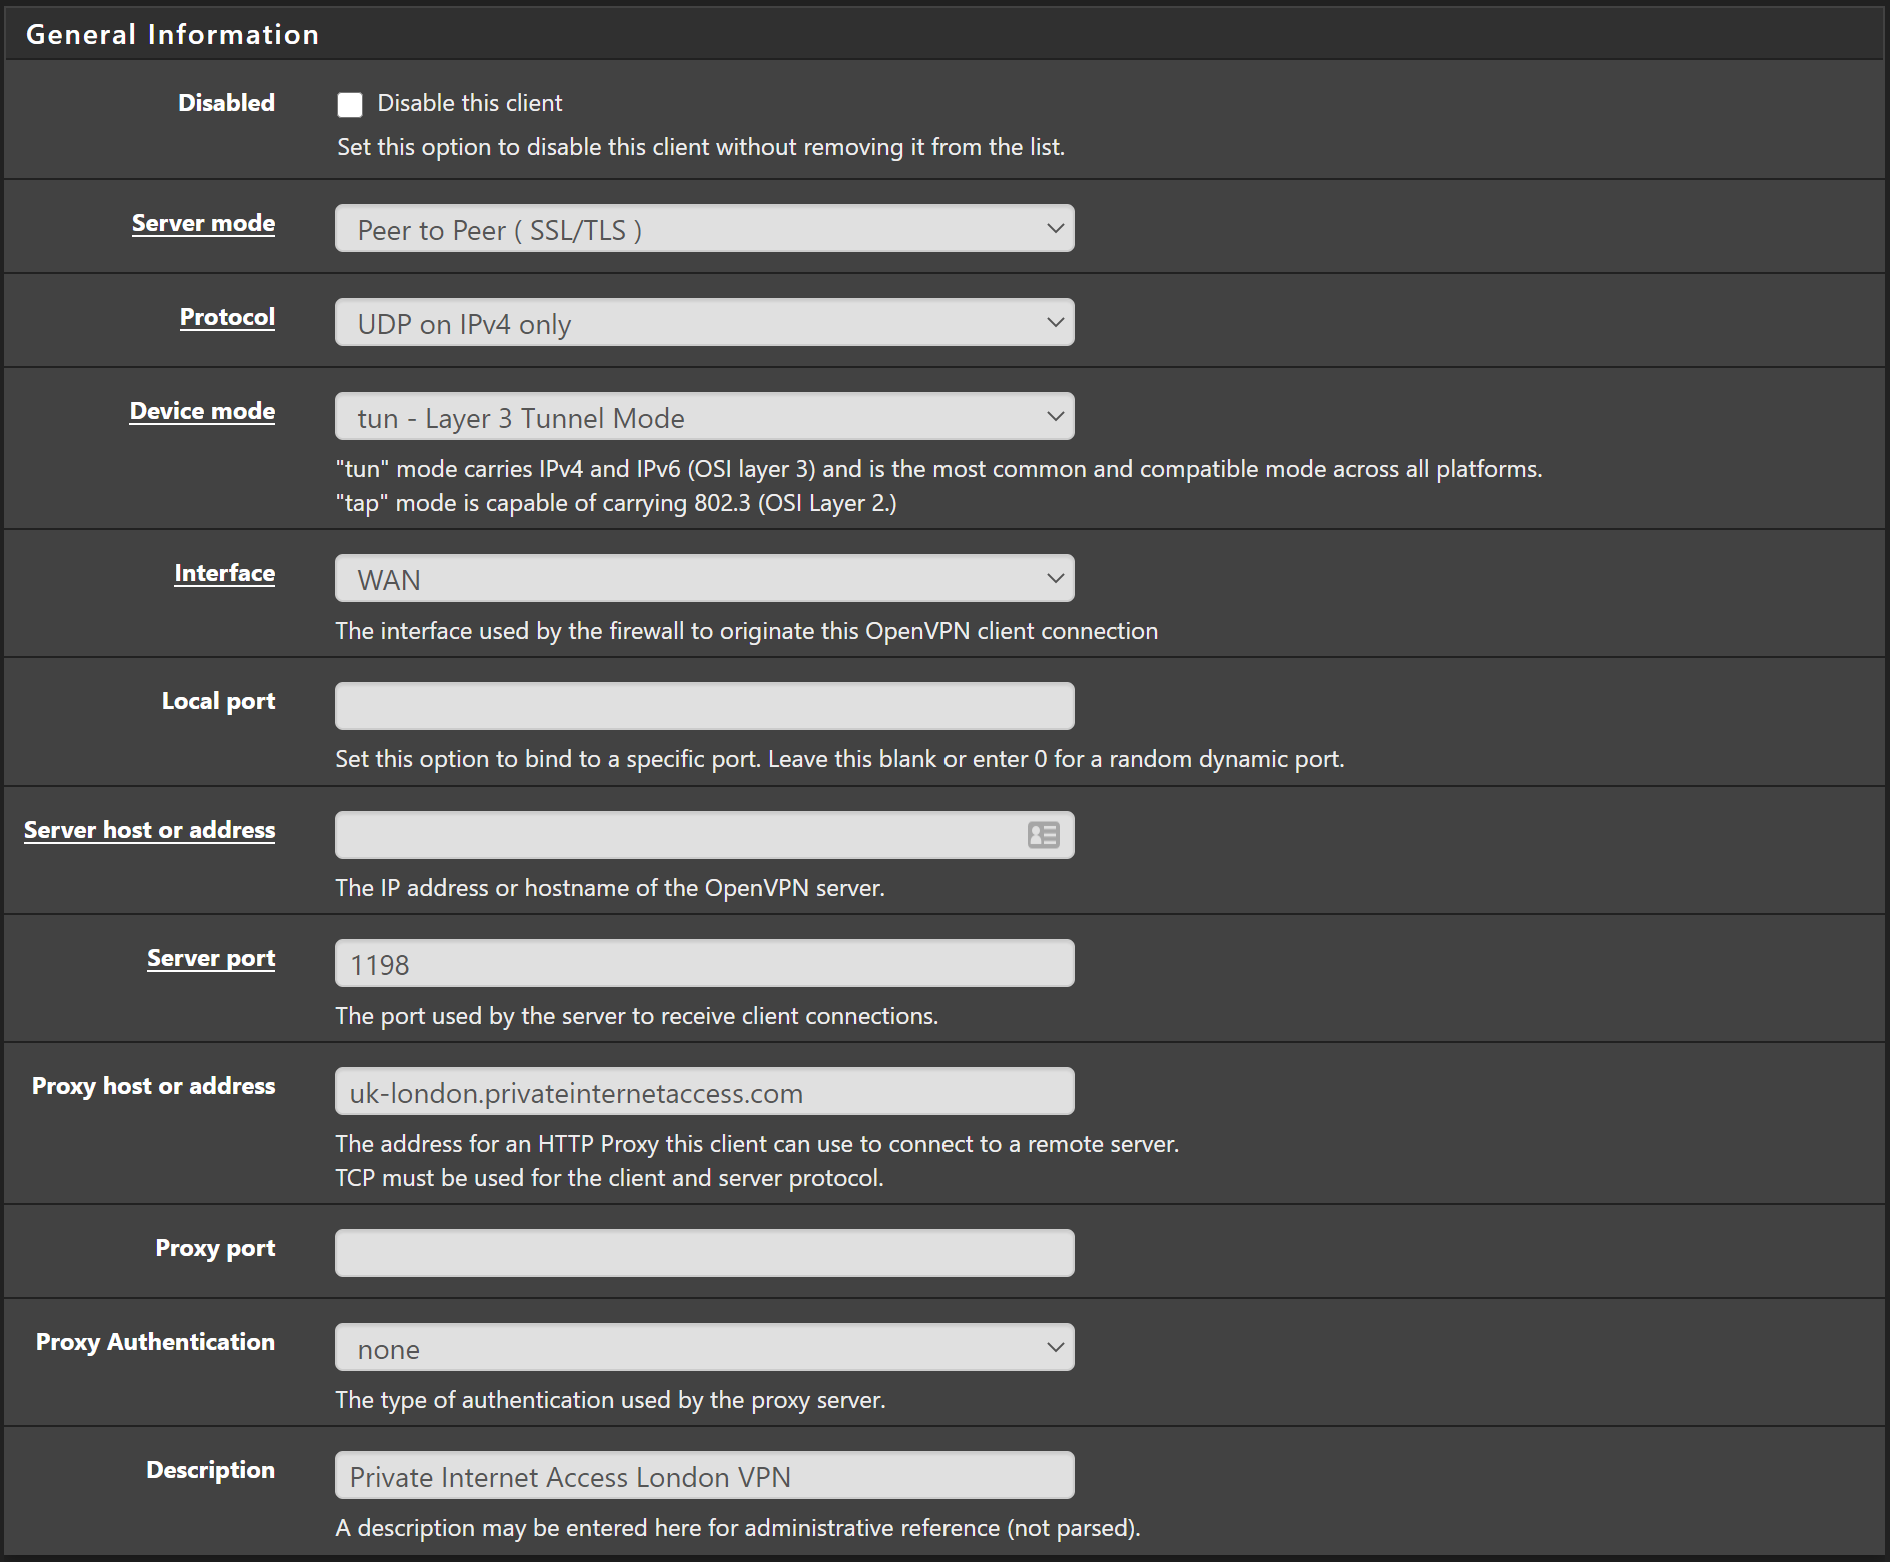
Head over to VPN > Clients > Add to add a new VPN client.
Many of the settings can be left at default, if I do not mention them then they are the stock settings so refer to the images for what they should be.
General Information
In the General Information section change the following values:
- Server host or address: uk-london.privateinternetaccess.com (or whichever location you copied above.
- Server port: 1198 or 1197 depending on which security level you want.
- Description: Private Internet Access London VPN
You should have something looking like this:
User Authentication
In the user authentication settings section, enter your PIA username and password. You can find your username in your account on the PIA website, it usually starts with the letter “p” followed by numbers.
I would personally leave Authentication Retry unchecked which will automatically re-connect if the connection is dropped. If you have issues with this you can tick the box to disable it.
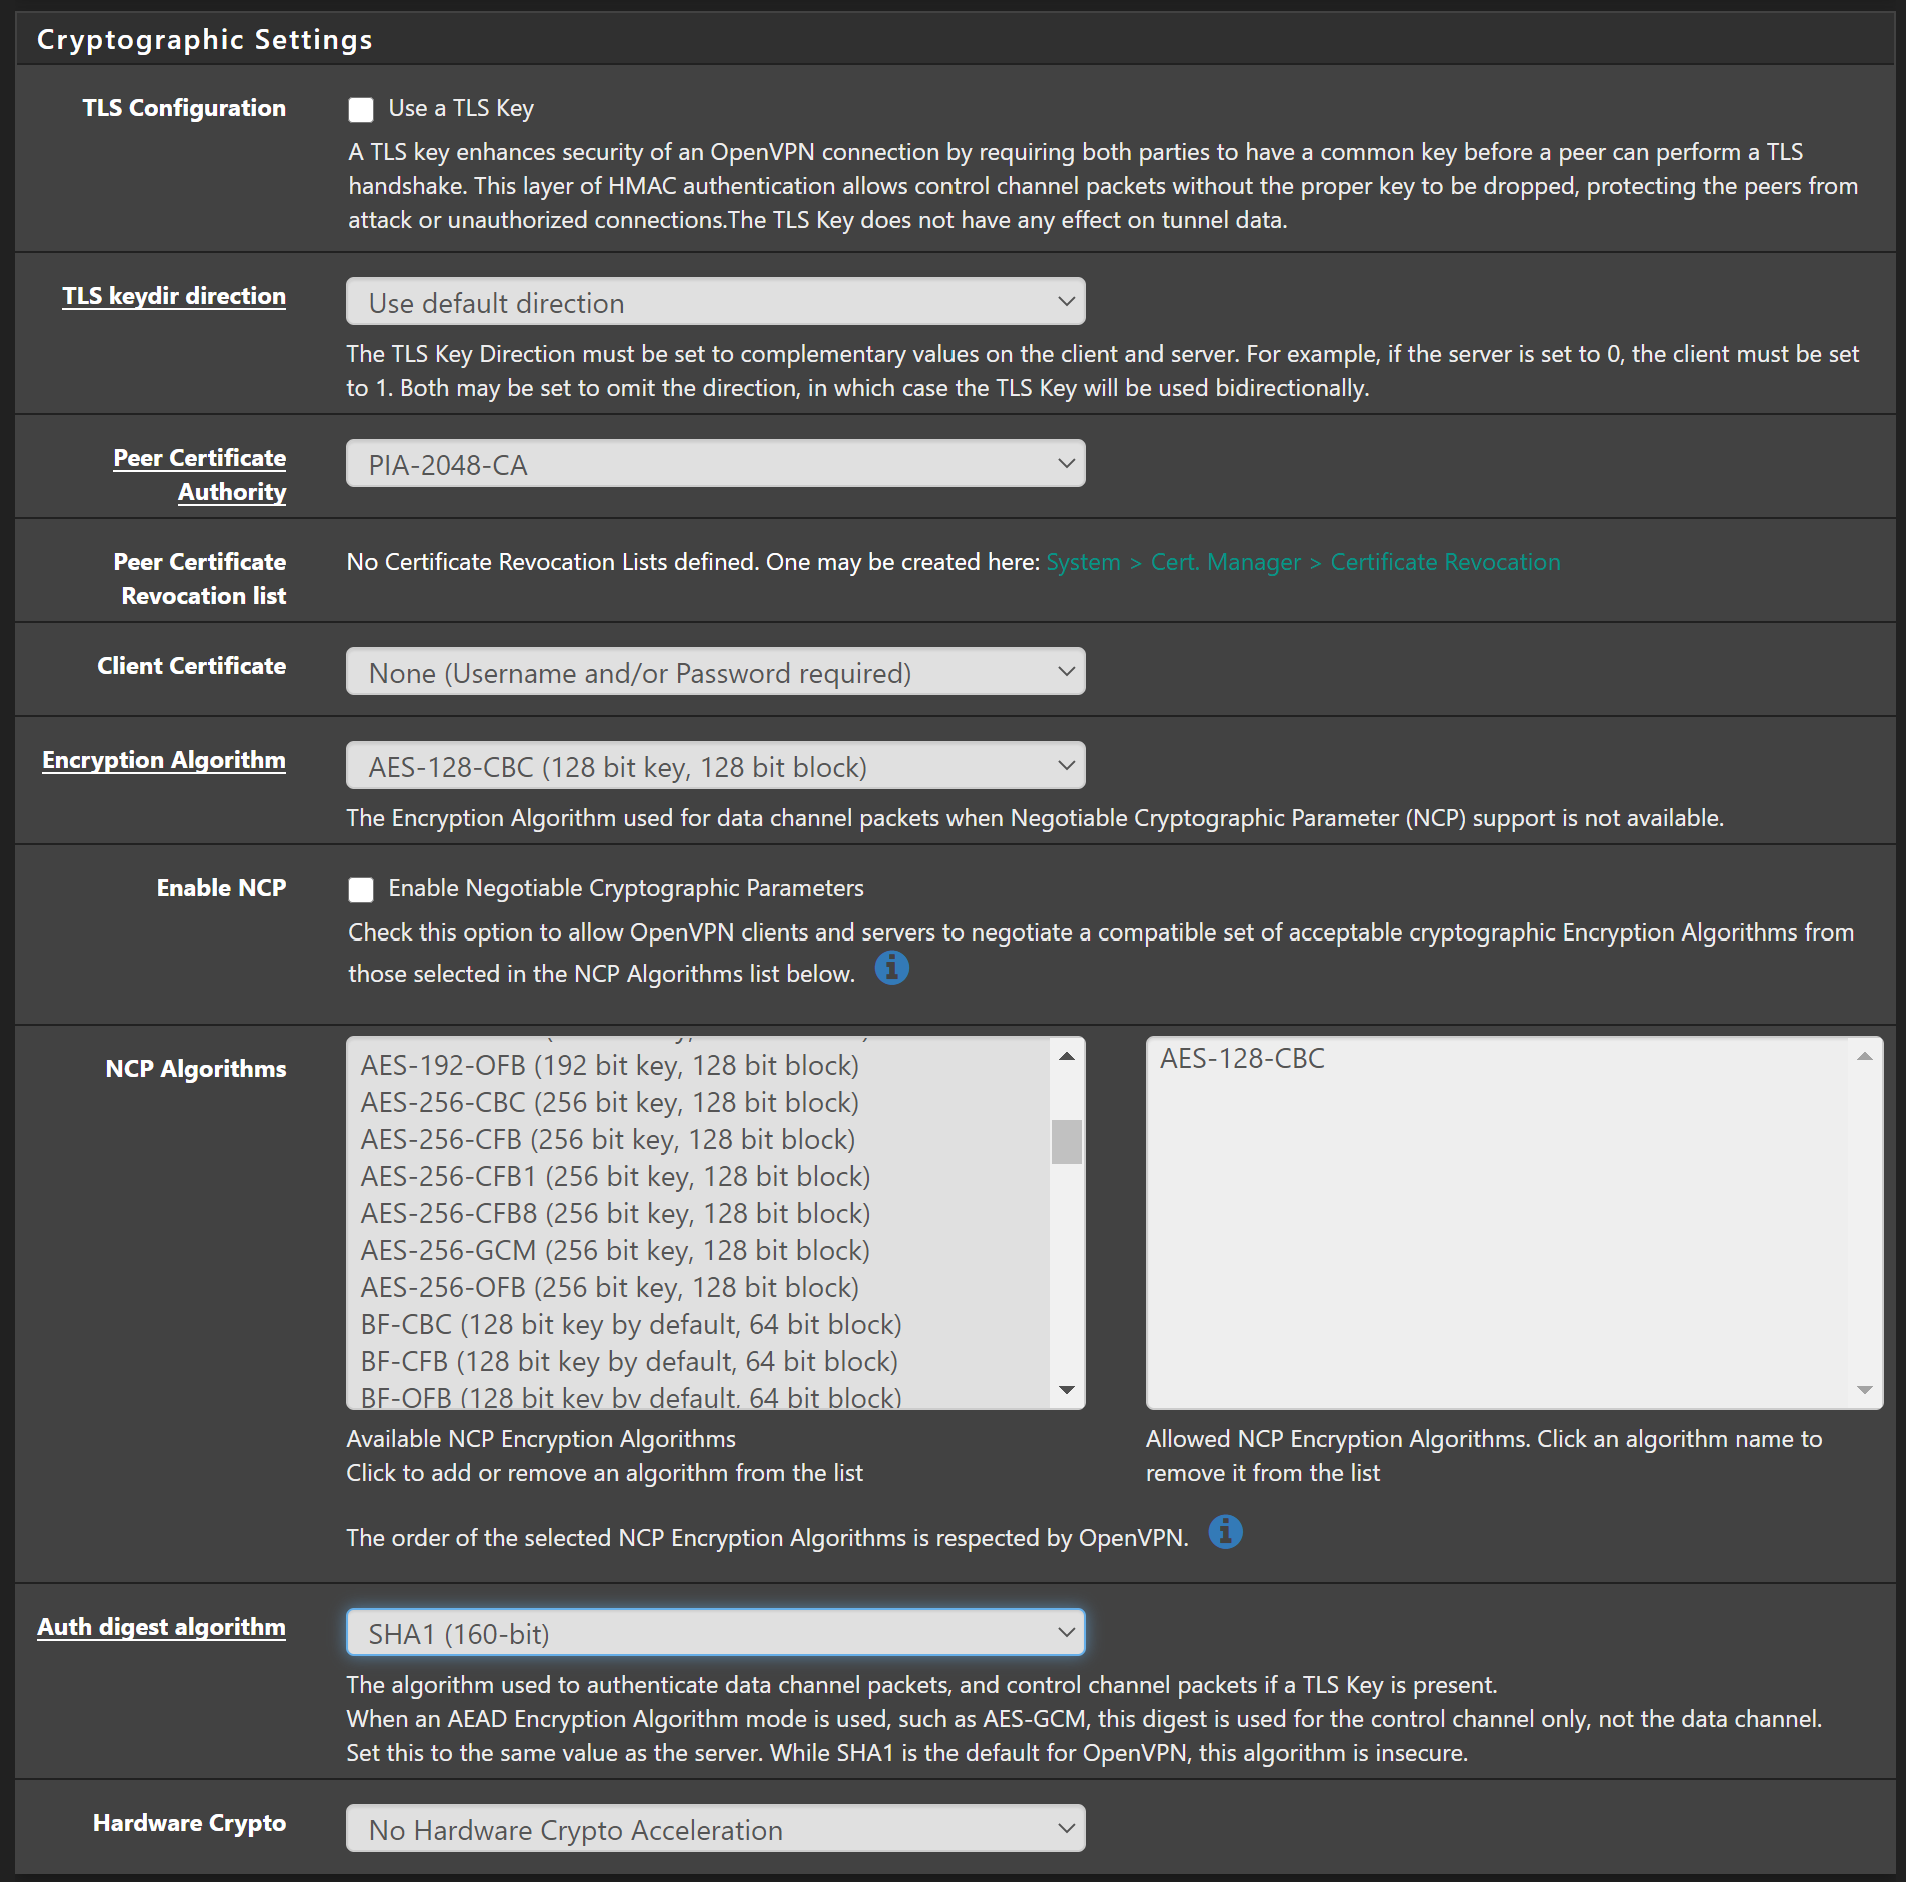
Cryptographic Settings
Under the Cryptographic Settings section make sure to change the following settings:
- TLS Configuration – Uncheck
- Peer Certificate Authority – PIA-2048-CA (the descriptive name you gave the CA earlier)
- Encryption Algorithm – AES-128-CBC
- Enable NCP – Uncheck
- Auth digest algorithm – SHA1 (160-bit) for medium security, SHA256 (256-bit) for strong security.
- Hardware Crypto – if you have AES-NI acceleration available, select that from the list, or leave set to “No Hardware Crypto Acceleration” initially and come back and change afterwards to tweak performance.
You should have something that looks like the following:
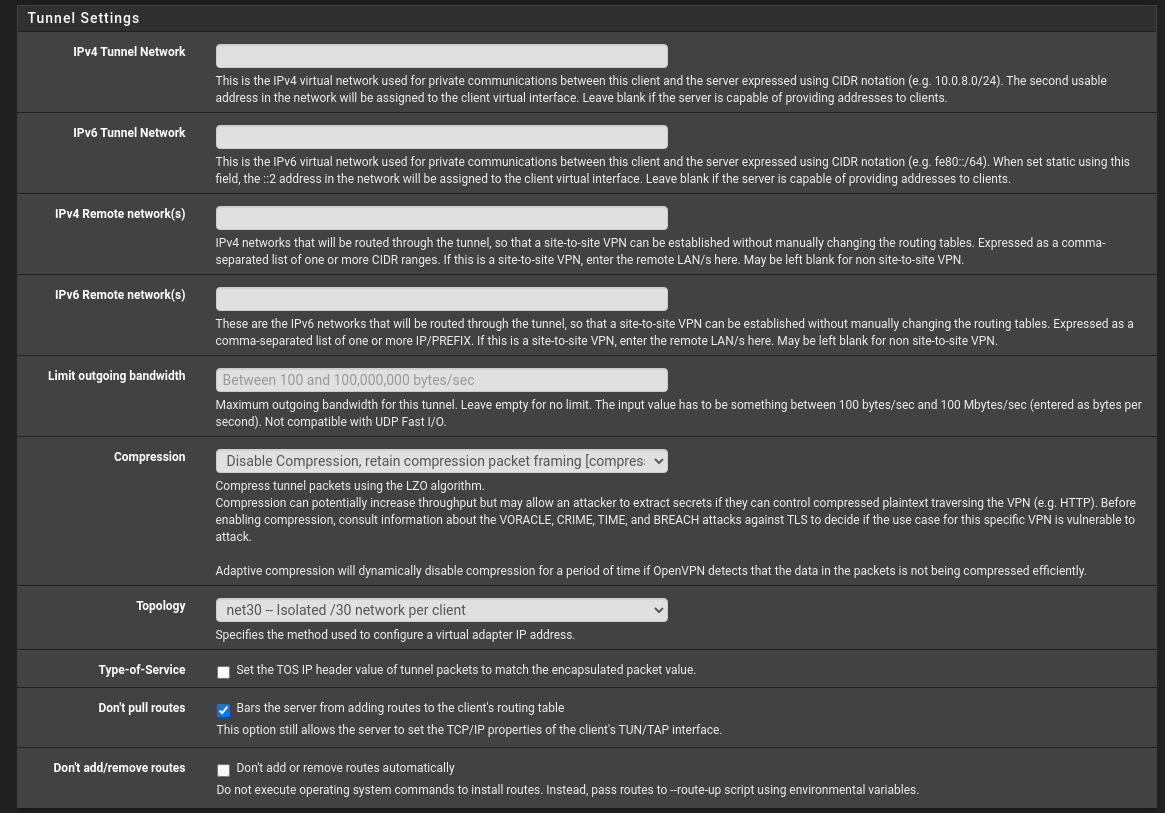
Tunnel Settings
There is just a few settings to change in this section and they are:
- Topology – net30
- Don’t pull routes – If you want all devices on your network to go through the VPN, leave this unchecked. If you want to selectively control which devices go through the VPN and which don’t, check this box.
That’s all we need to change for this particular setup, should look like this:
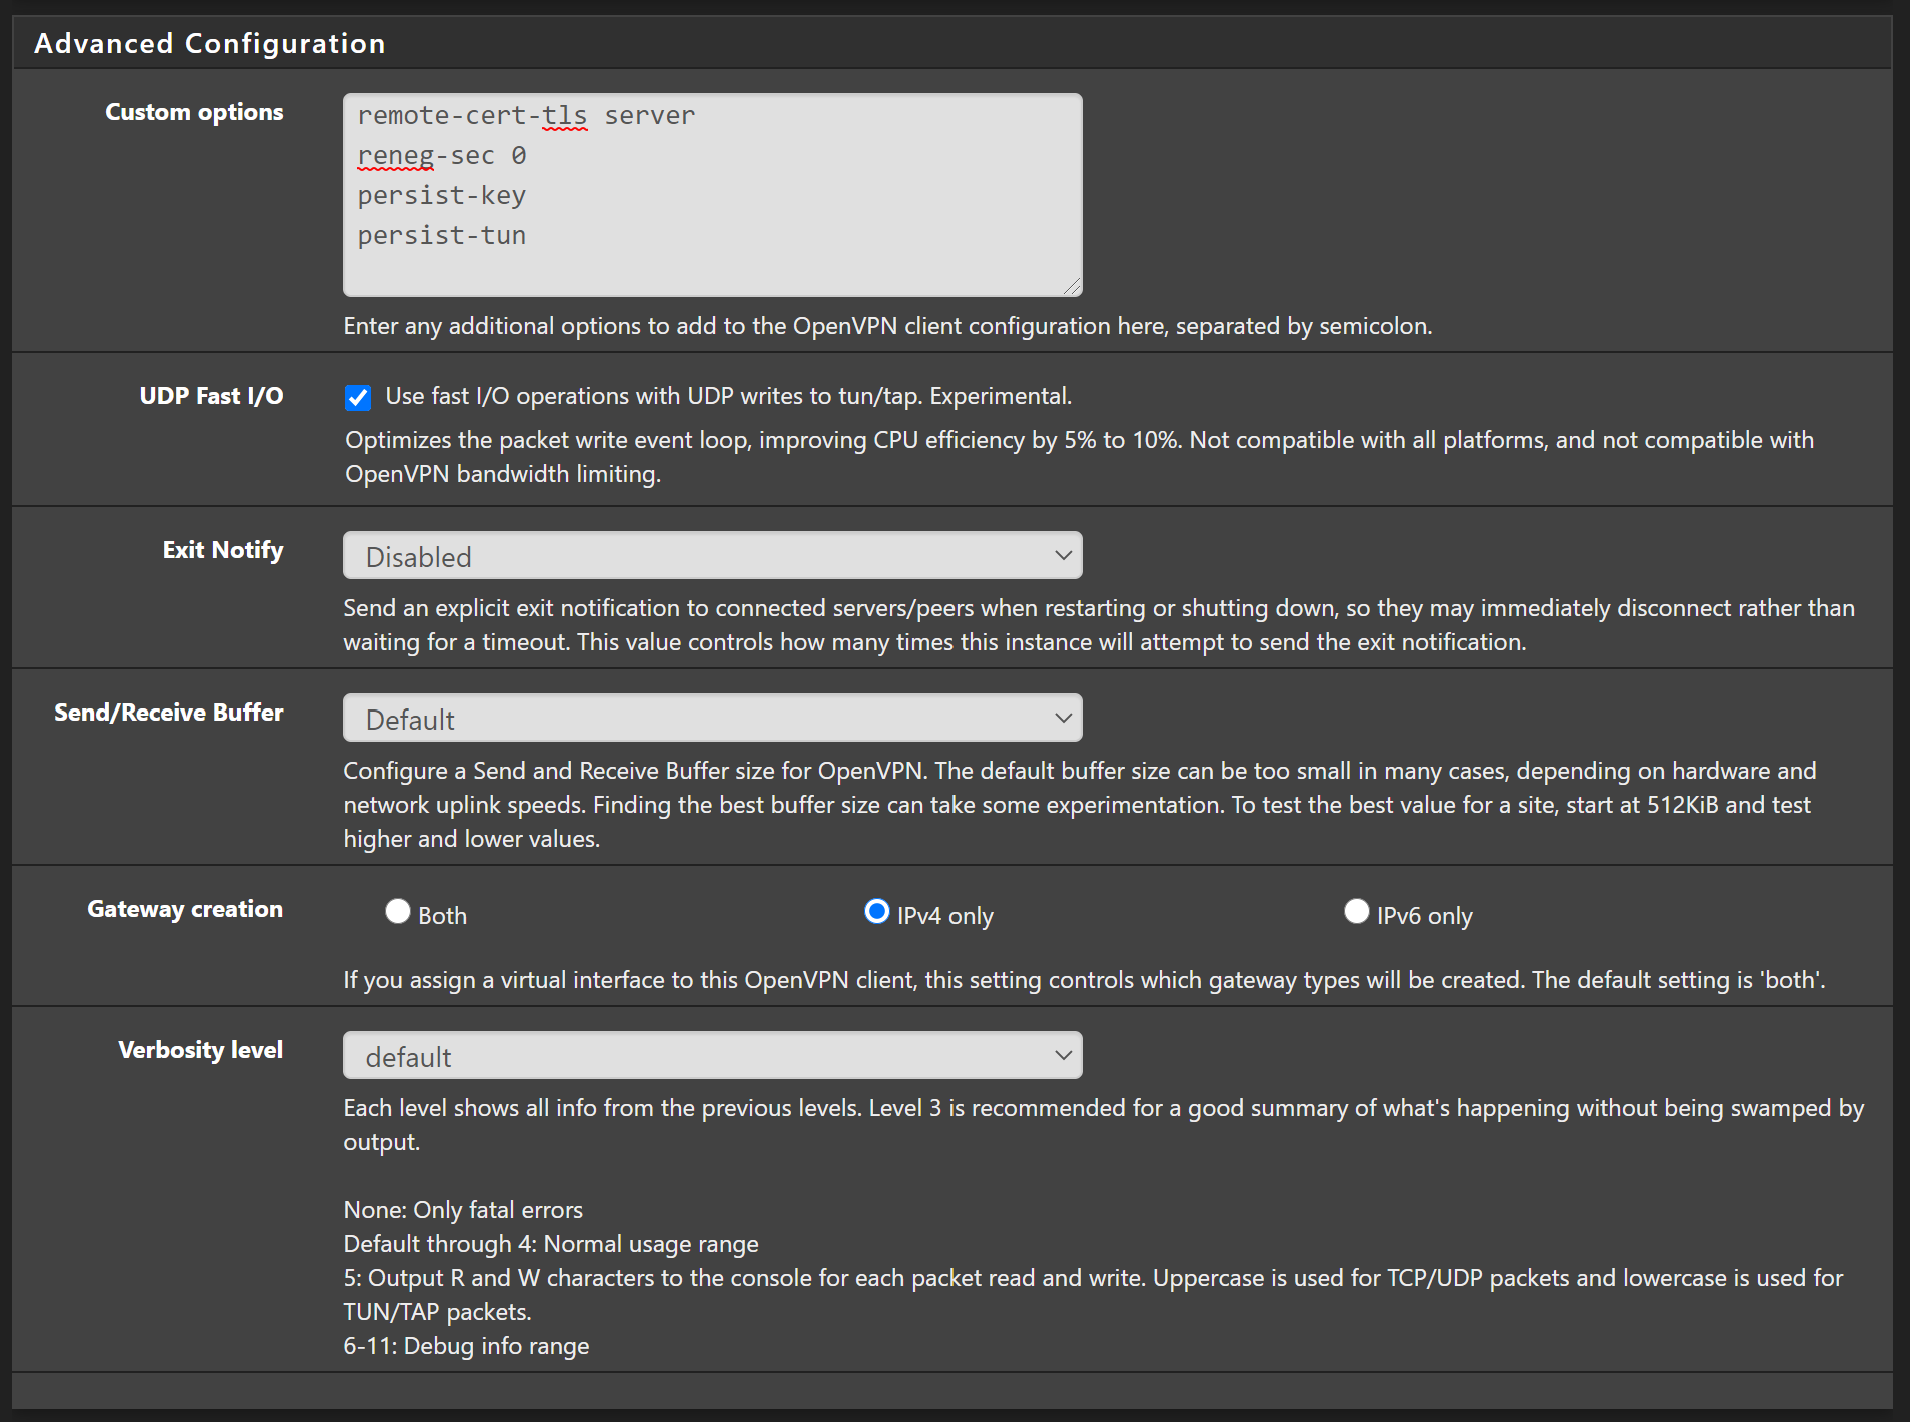
Advanced Configuration
Finally, in the Advanced Configuration, enter the following values:
remote-cert-tls server
persist-tun
persist-key
reneg-sec 0
Then set the following:
- UDP Fast I/O – check this to improve performance, you can come back and uncheck it later if you have issues.
- Send/Receive Buffer – You can play around with this setting, but I’ve always found 512 KiB setting to be pretty good. Tweak these settings later to see what gives you better speed.
- Gateway creation – IPv4
With the final settings looking like this:
Finally hit Save!
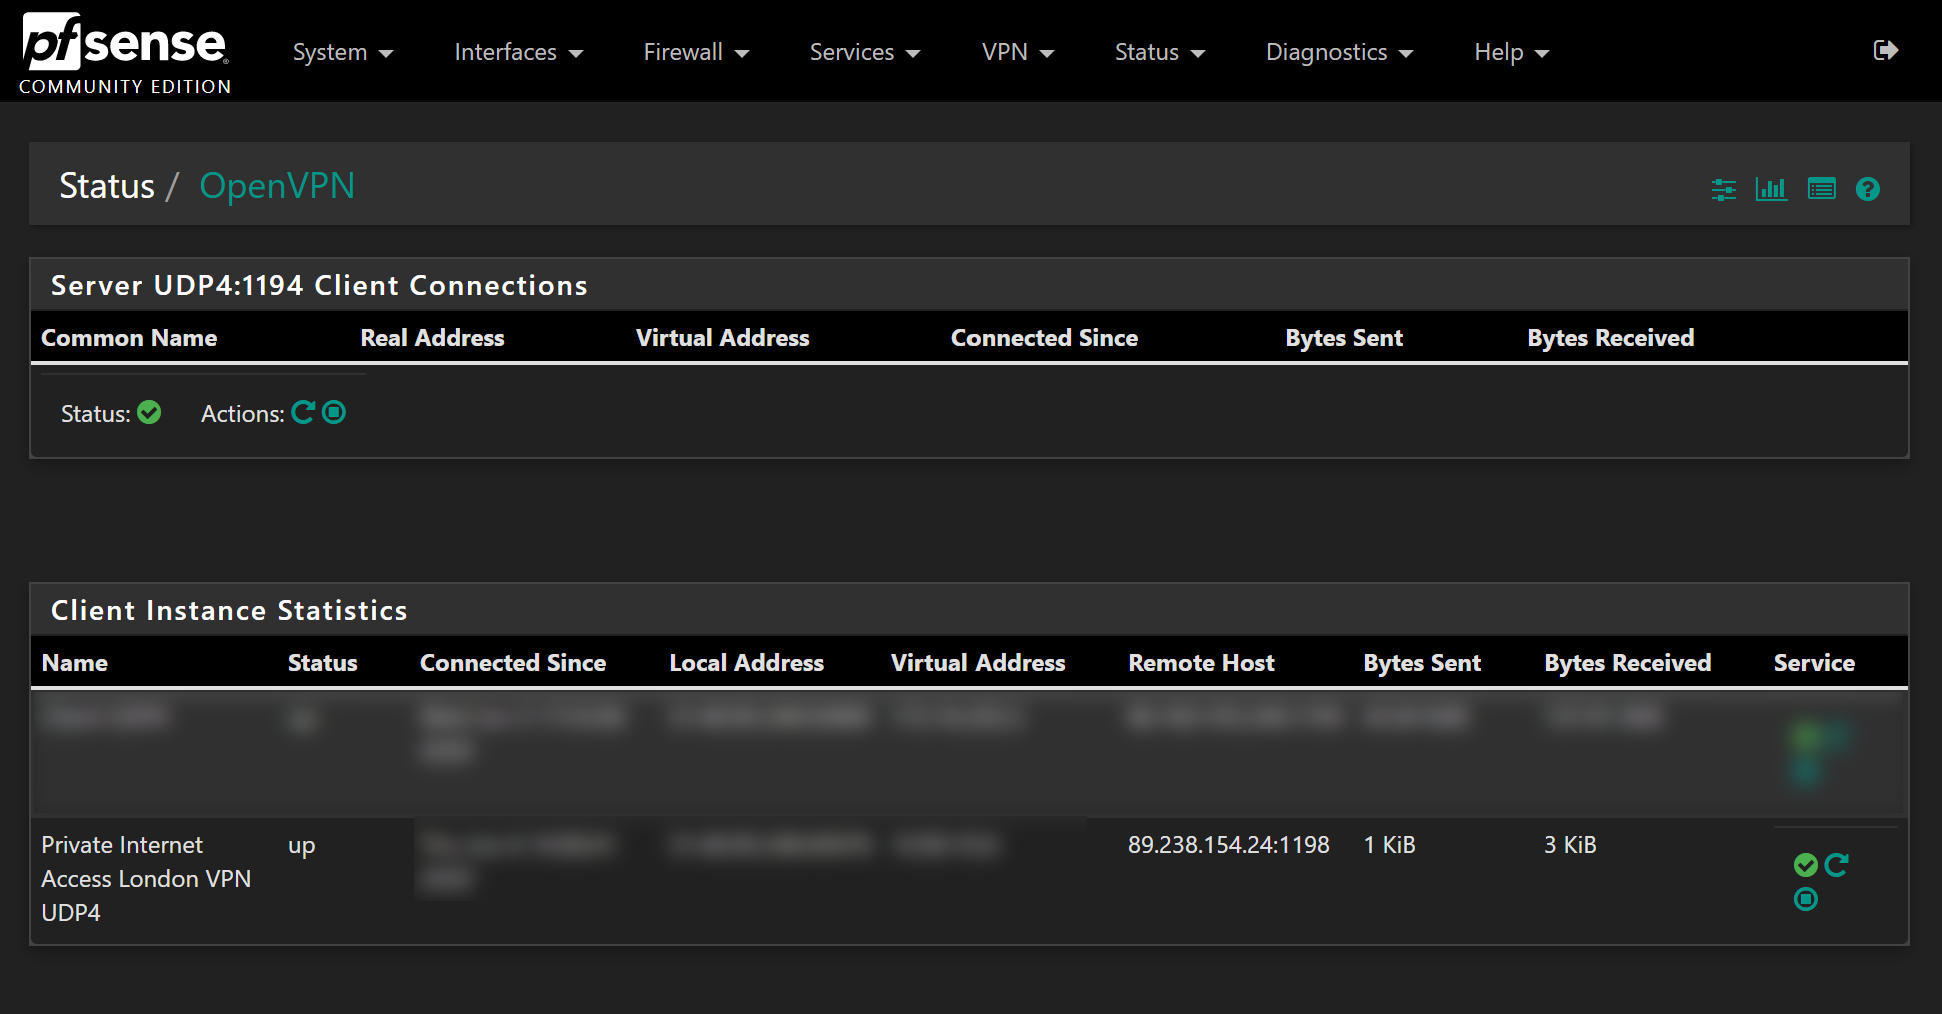
Checking status
We can now check that the VPN connection has been established, head over to Status > OpenVPN and under the Client Instance Statistics section you should see the VPN connection we just made. Look in the status box and confirm the status is “Up”:
So head over to Google and type “What is my IP” and you will see your IP address has changed to the PIA address right? Wrong.
We haven’t changed any of the routing within pfSense so it doesn’t yet know to send the traffic over VPN rather than the WAN. Let’s change that.
Creating Interfaces
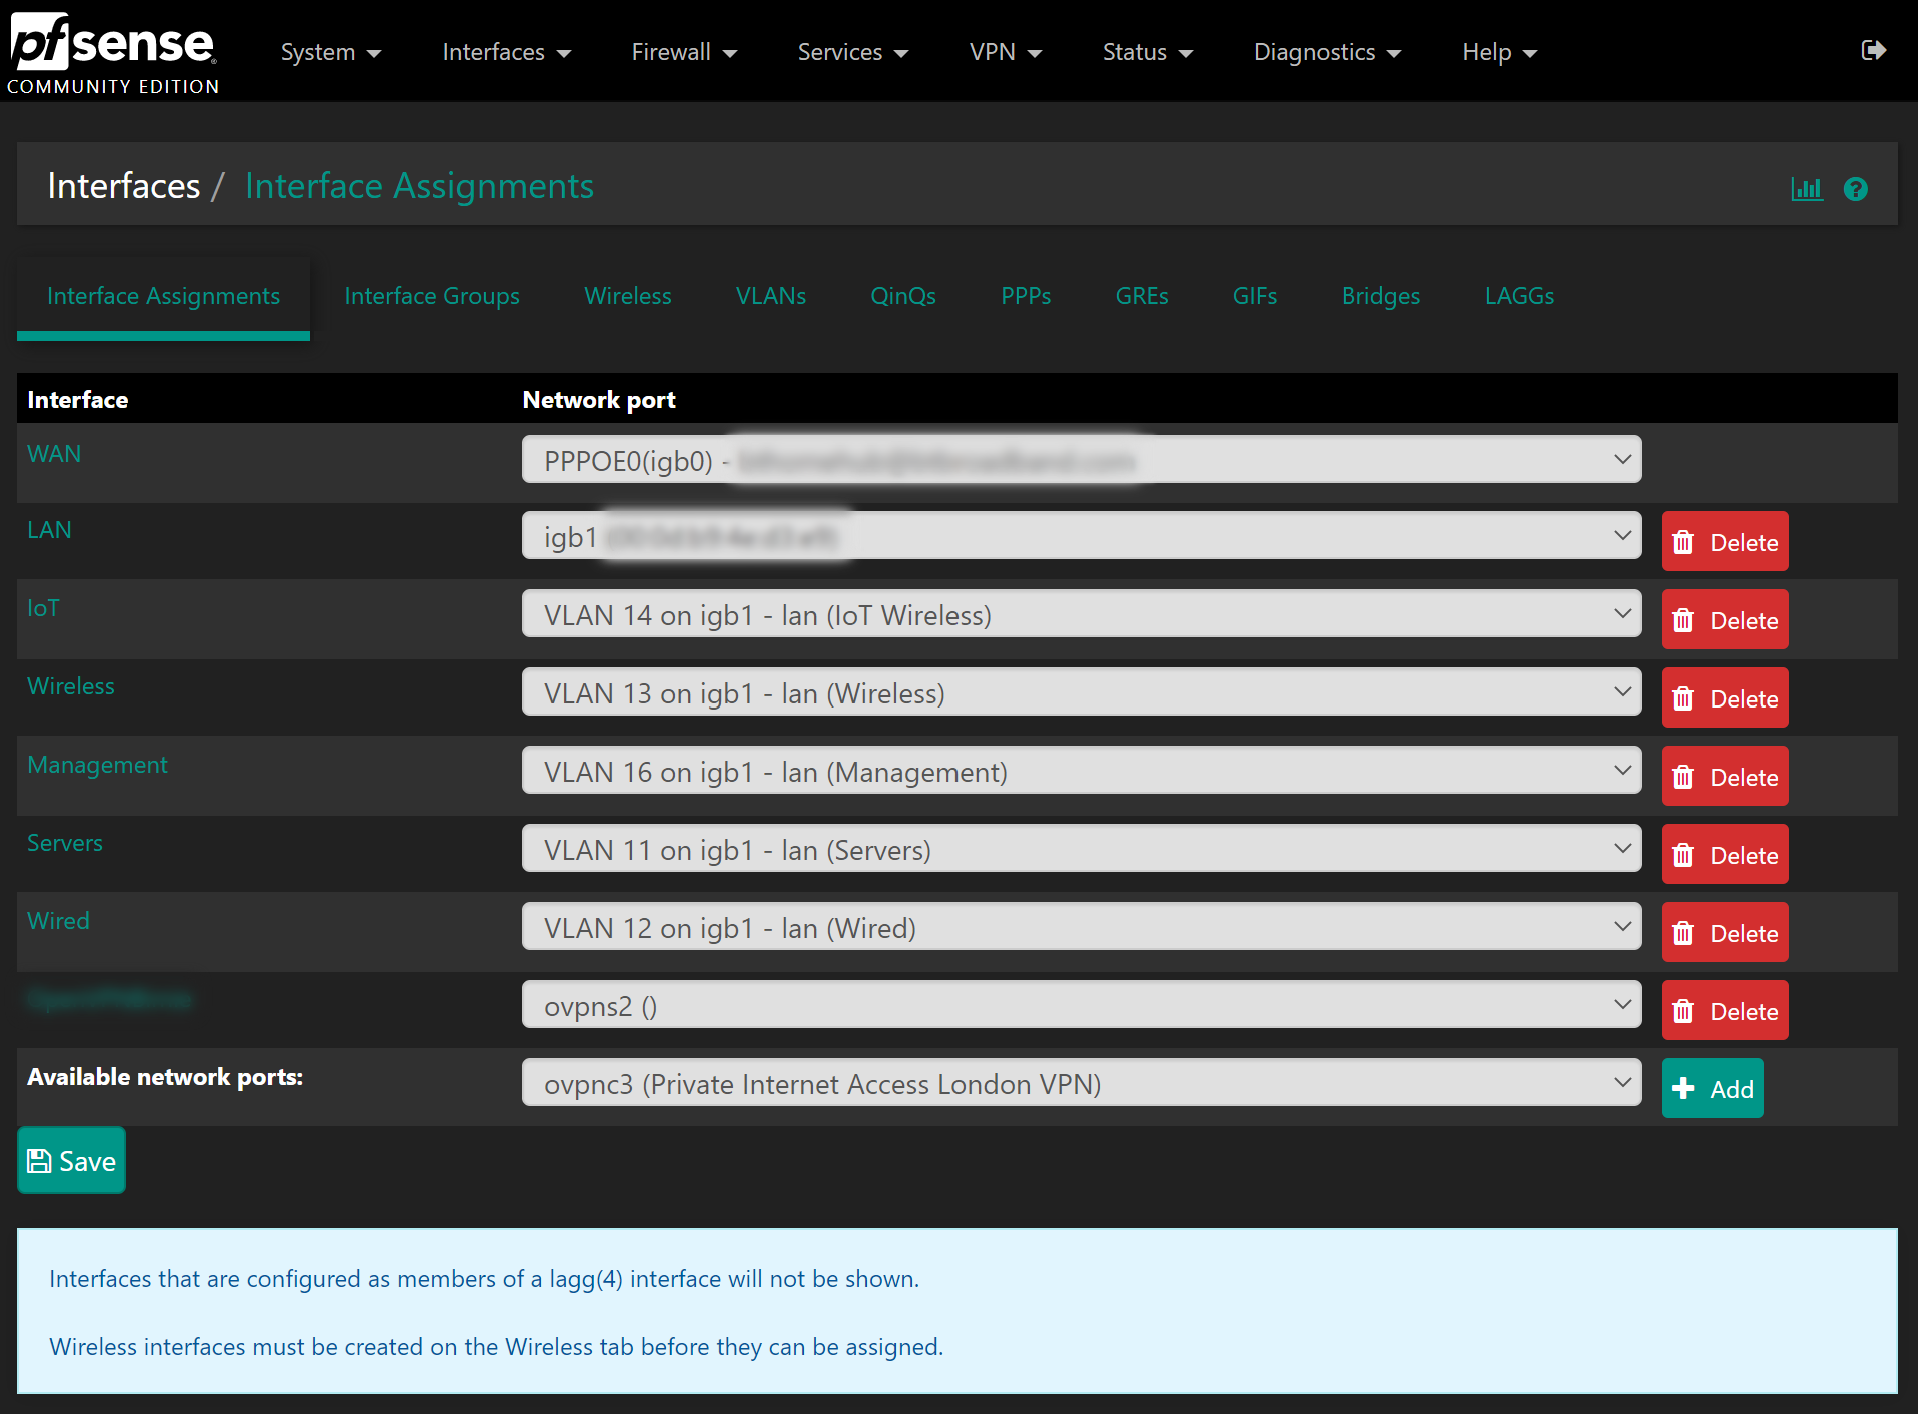
Its not required but I prefer to create an interface for the newly created VPN.
Go to Interfaces > Assignments. From there you will have a list of all the interface assignments you have on your system, don’t worry if you don’t have as many as me, you probably just have WAN and LAN. In the Available Network Ports drop down, select the PIA VPN option from the list, then press add:
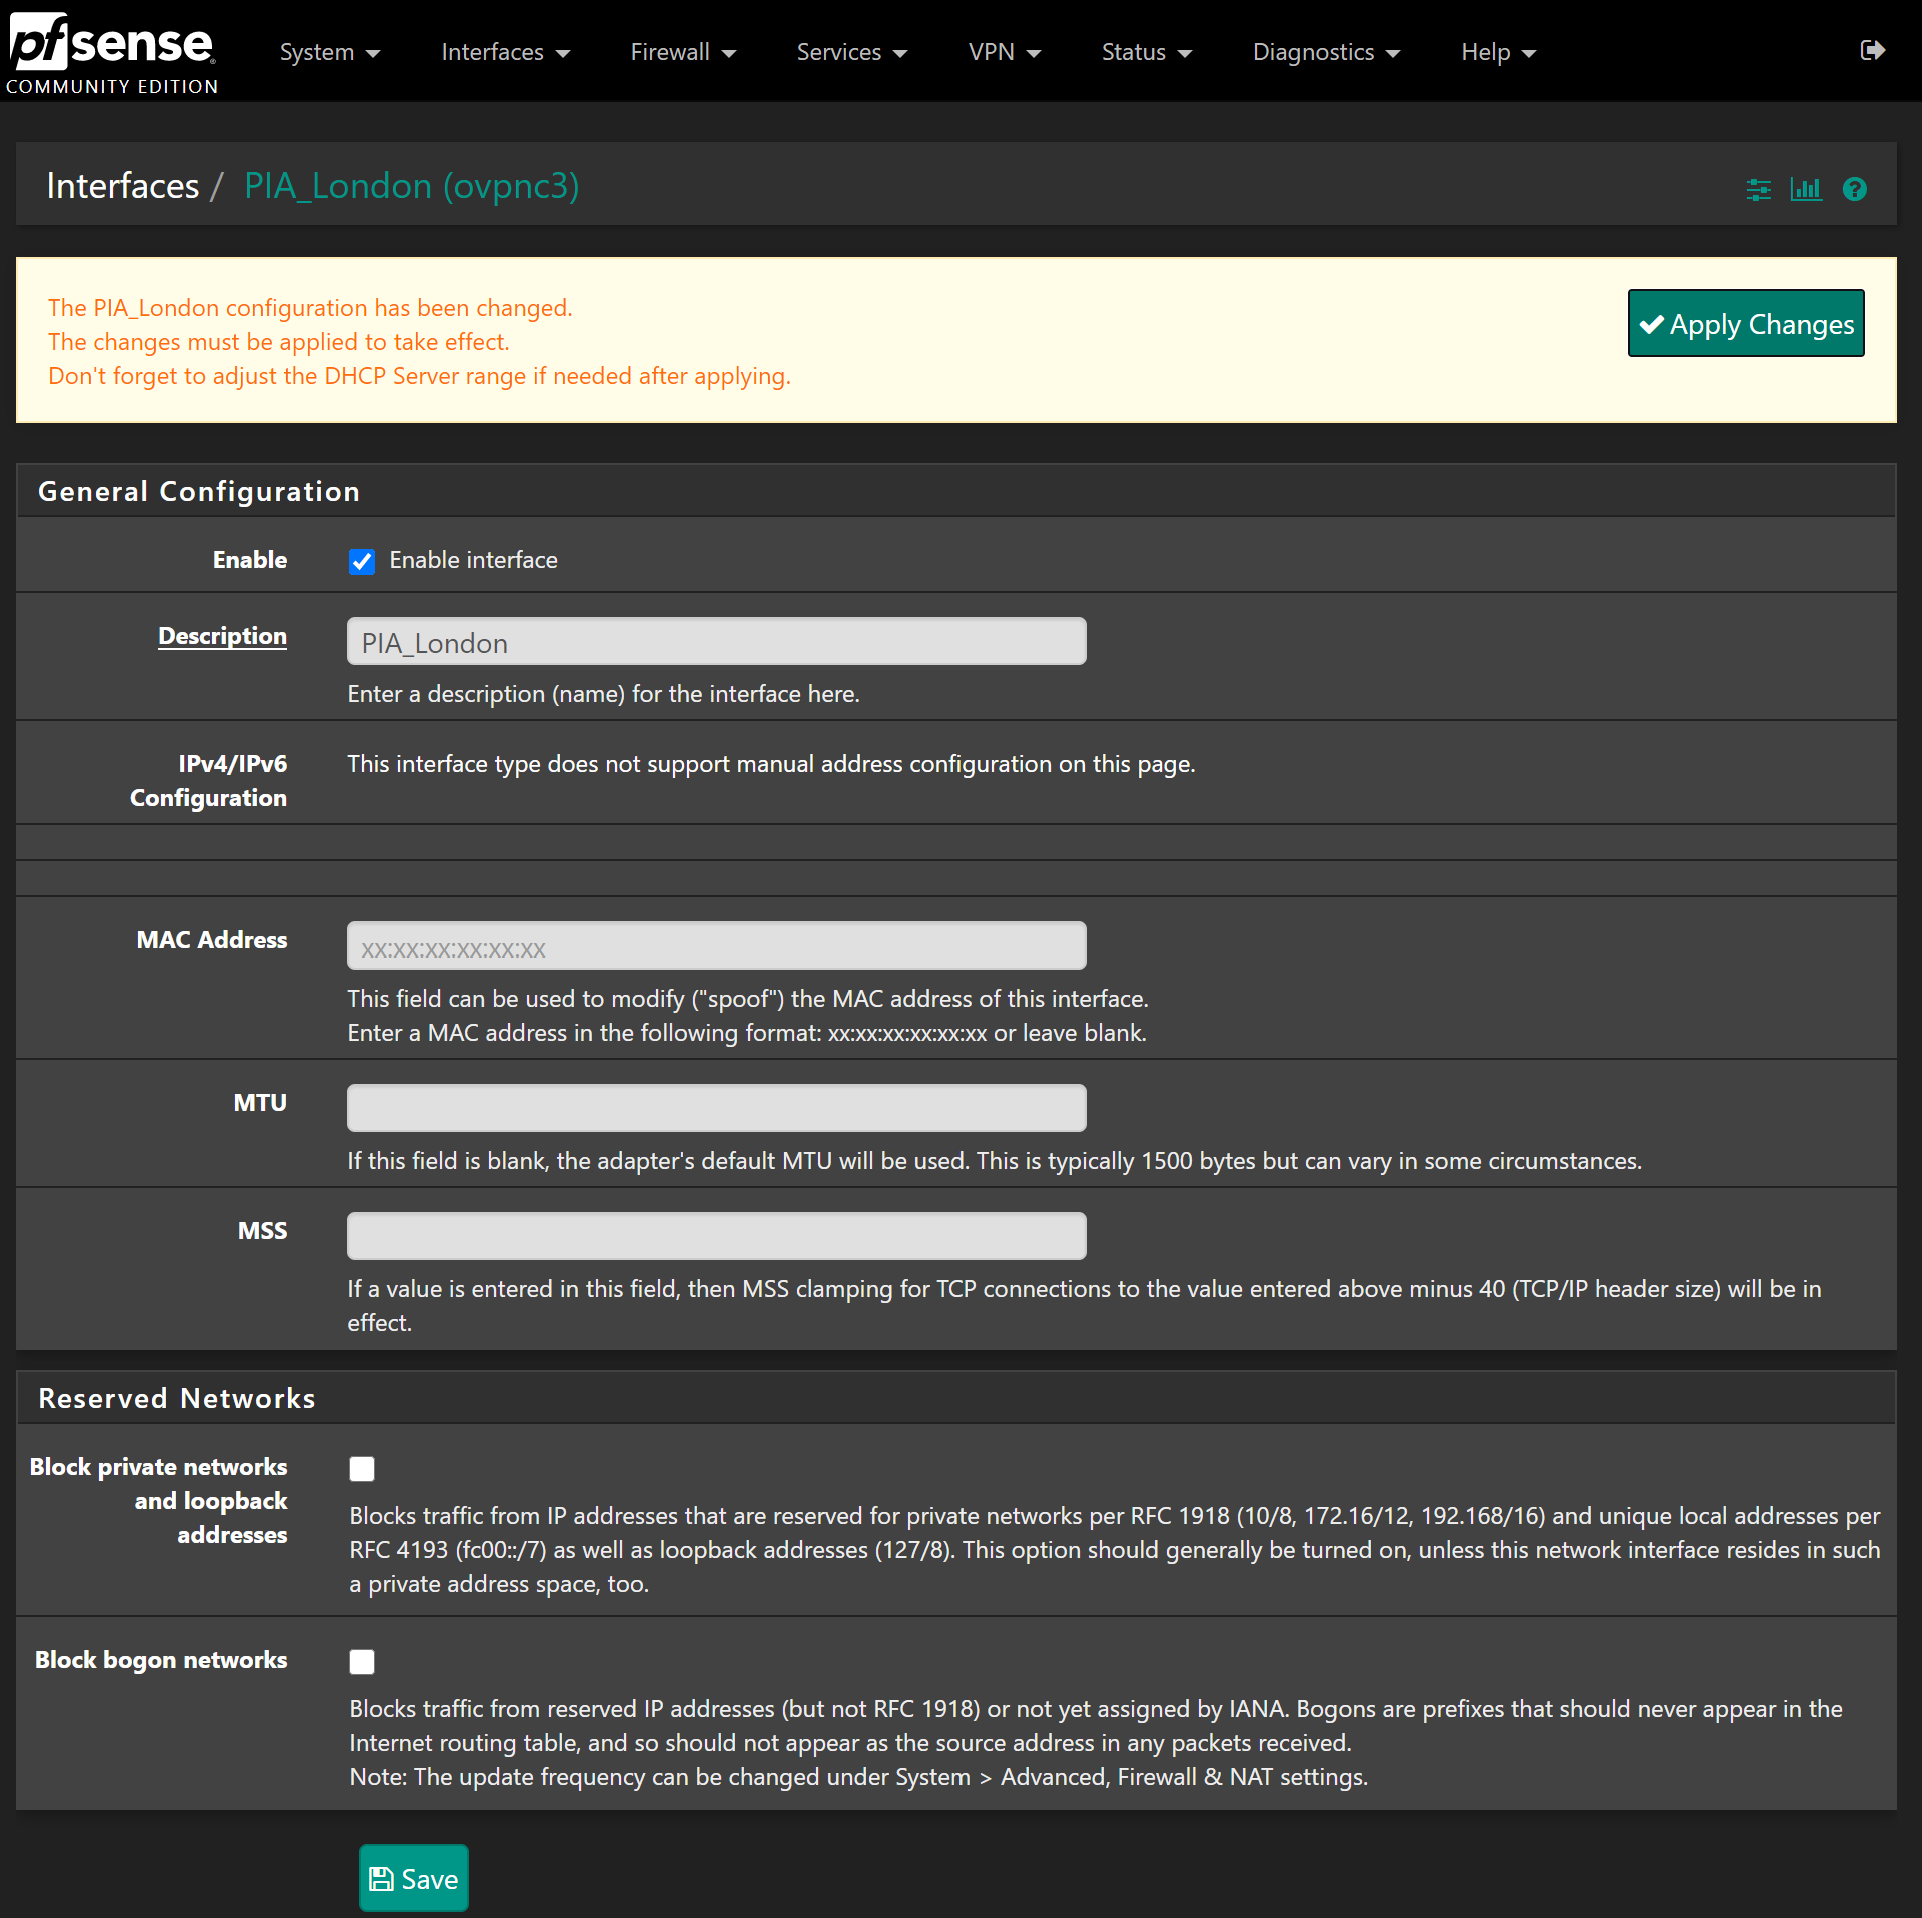
A new interface will have been created called OPTX, go ahead and click on this to edit it. From the edit page, check the enable box and change the description to something more suitable. Hit Save then press apply changes:
From here, go to Status > Gateways. Notice how it says Gateway down for the PIA gateway? We don’t need to correct this per say, but we should to save things flagging up as down in the logs:
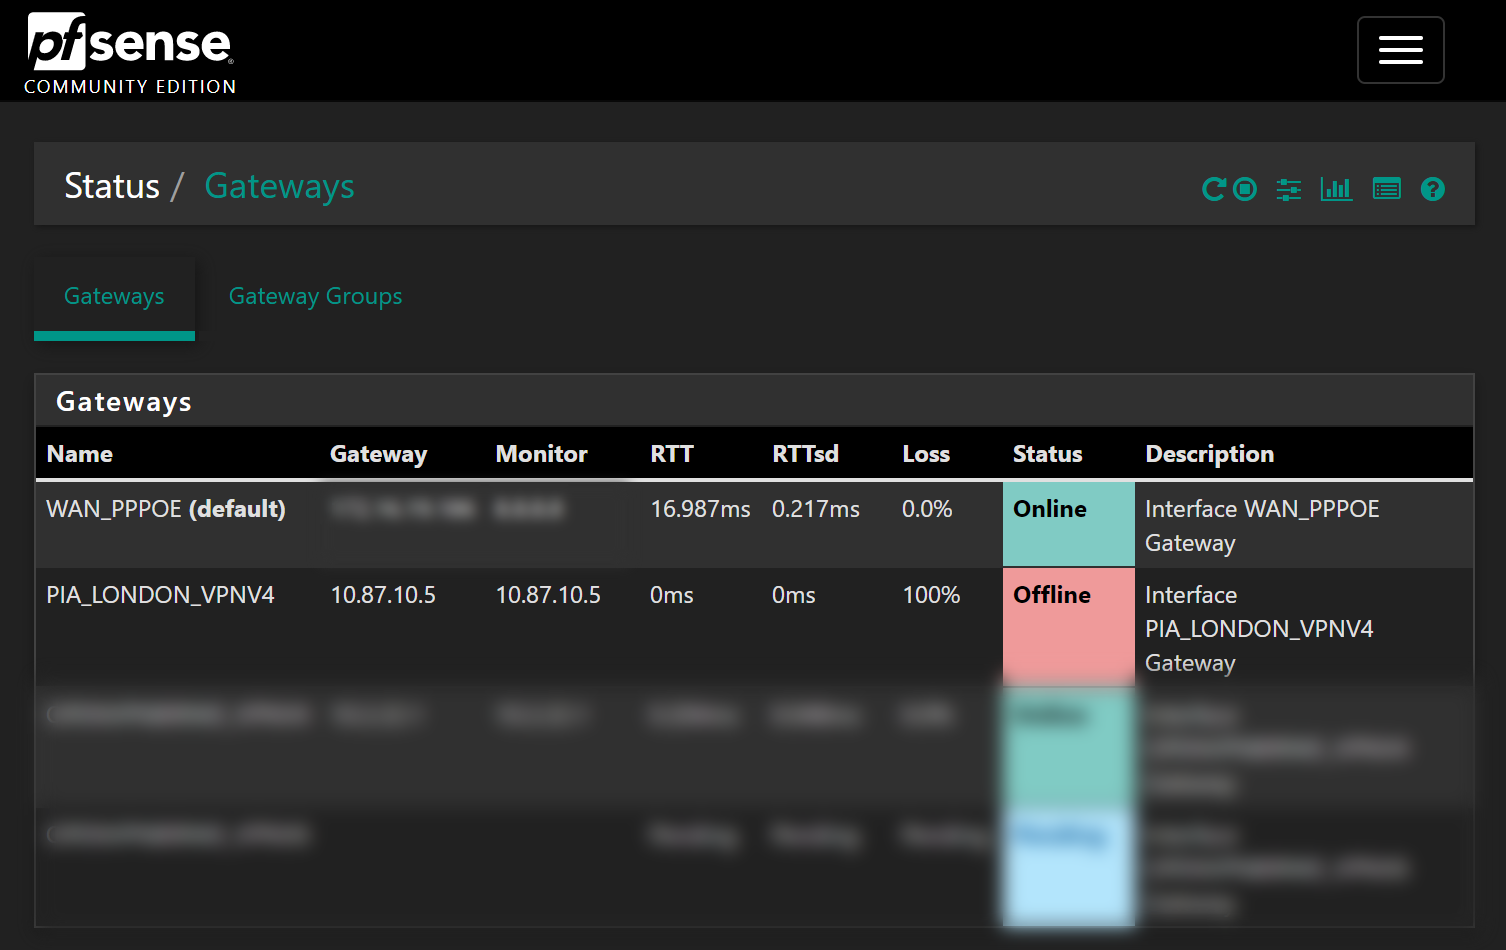
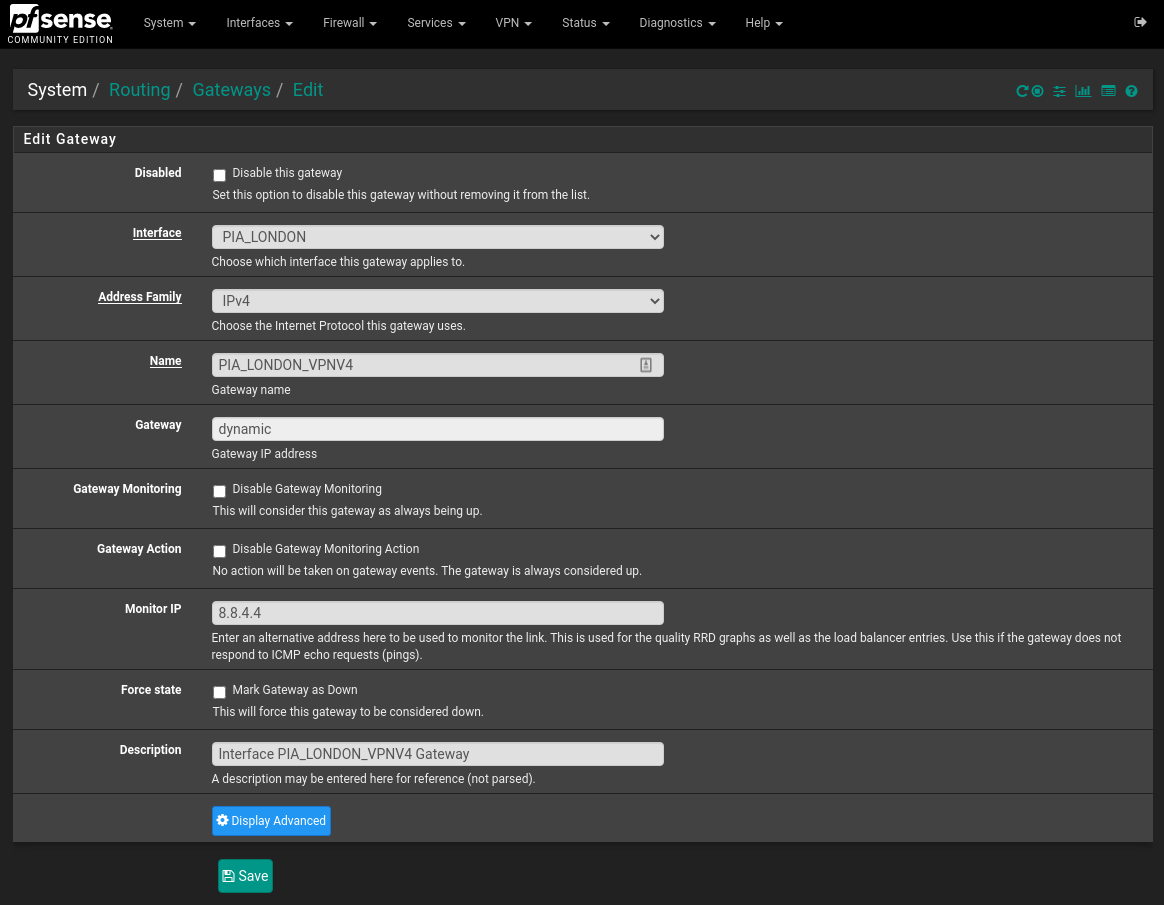
Go to System > Routing and edit the automatically created PIA gateway. In the Monitor IP, enter an IP to use as an alternative, I’m using 8.8.4.4 here:
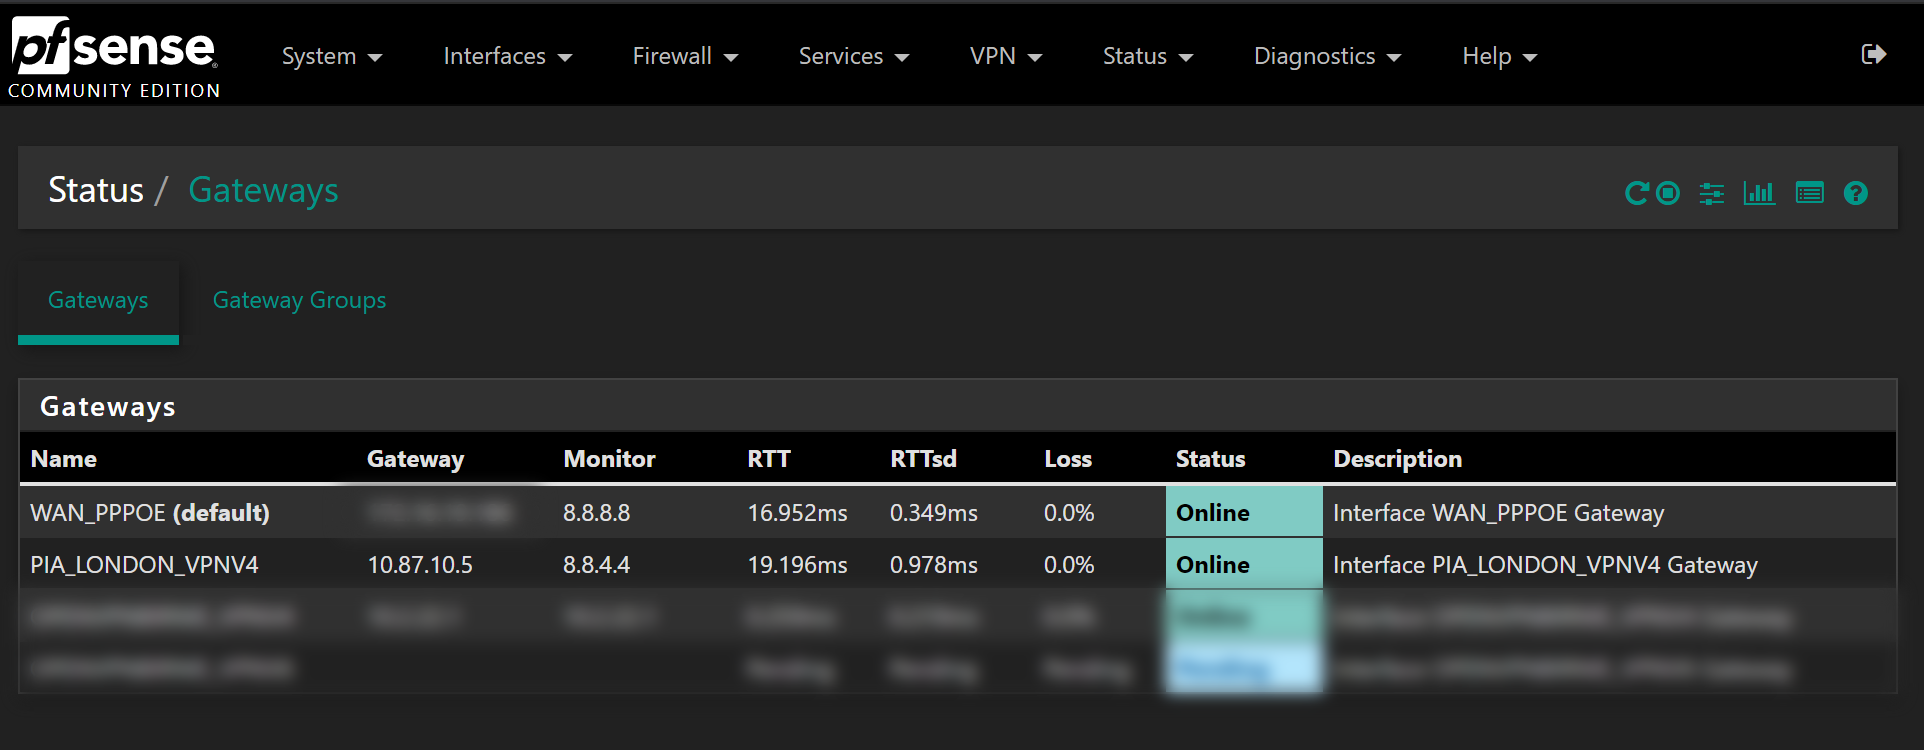
Now head back to Status > Gateways and confirm the PIA gateway is online:
Creating Aliases
An alias allows us to define groups of IP’s or networks together so that we can use one alias to quickly reference all networks we want to use instead of typing them out everytime.
Head to Firewall > Aliases and press add. Note at the top you have different types of Aliases – IP, Ports and URLs. We are just using the IP aliases for now.
Name this PIA_Traffic, give it a description and choose Networks as the type. Enter all the subnets/networks you want to go via PIA. You can enter individual IP addresses by using the /32 mask, which I will show you now:
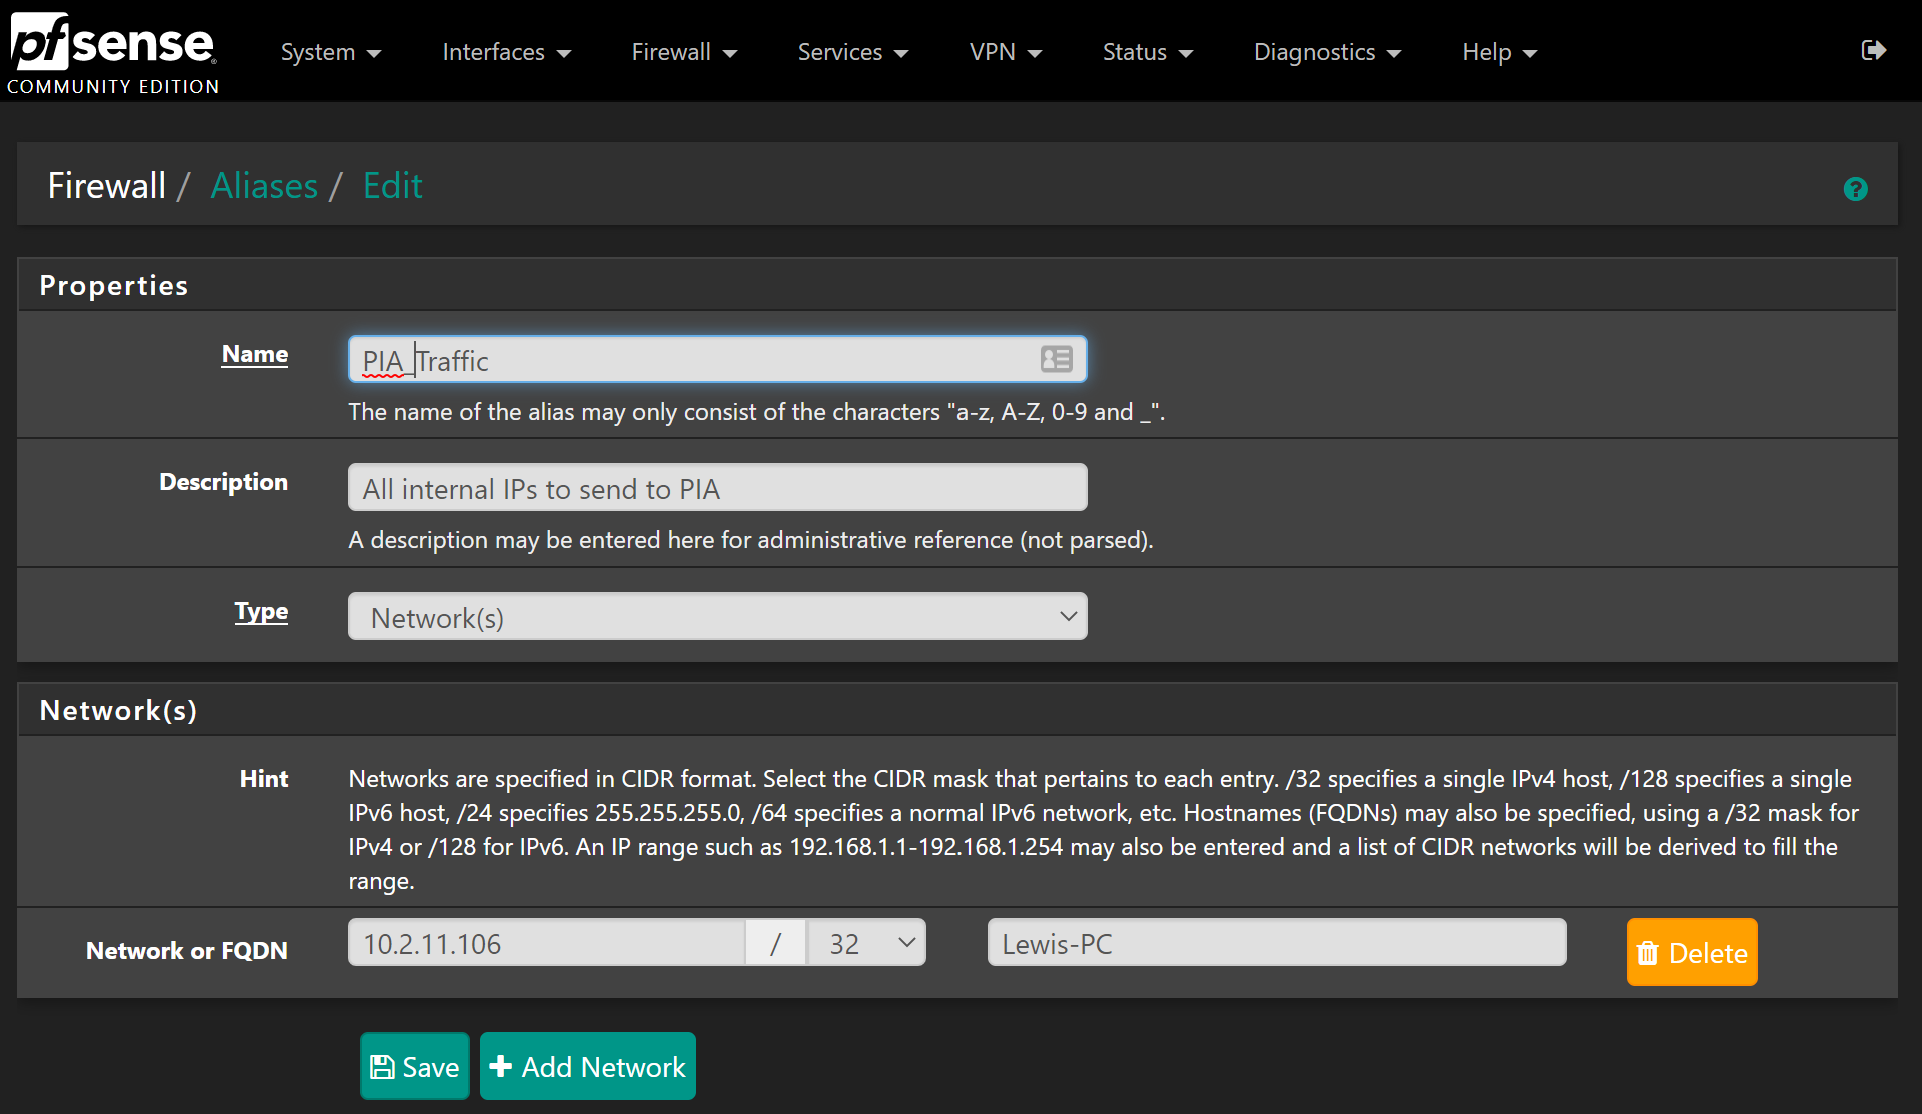
You can add as many as you want, I’m just adding one for this example, which does kind of defeat the purpose but I’d still advise it as it allows you to quickly add more in the future.
Hit save and then apply changes.
Outbound NATs
Network Address Translation or NAT is the process of remapping an IP address as the packets are in transit. The most common type of this probably happens without you realising – when you access the internet from your computer/laptop/phone all of these devices are exposed as one single public IP address.
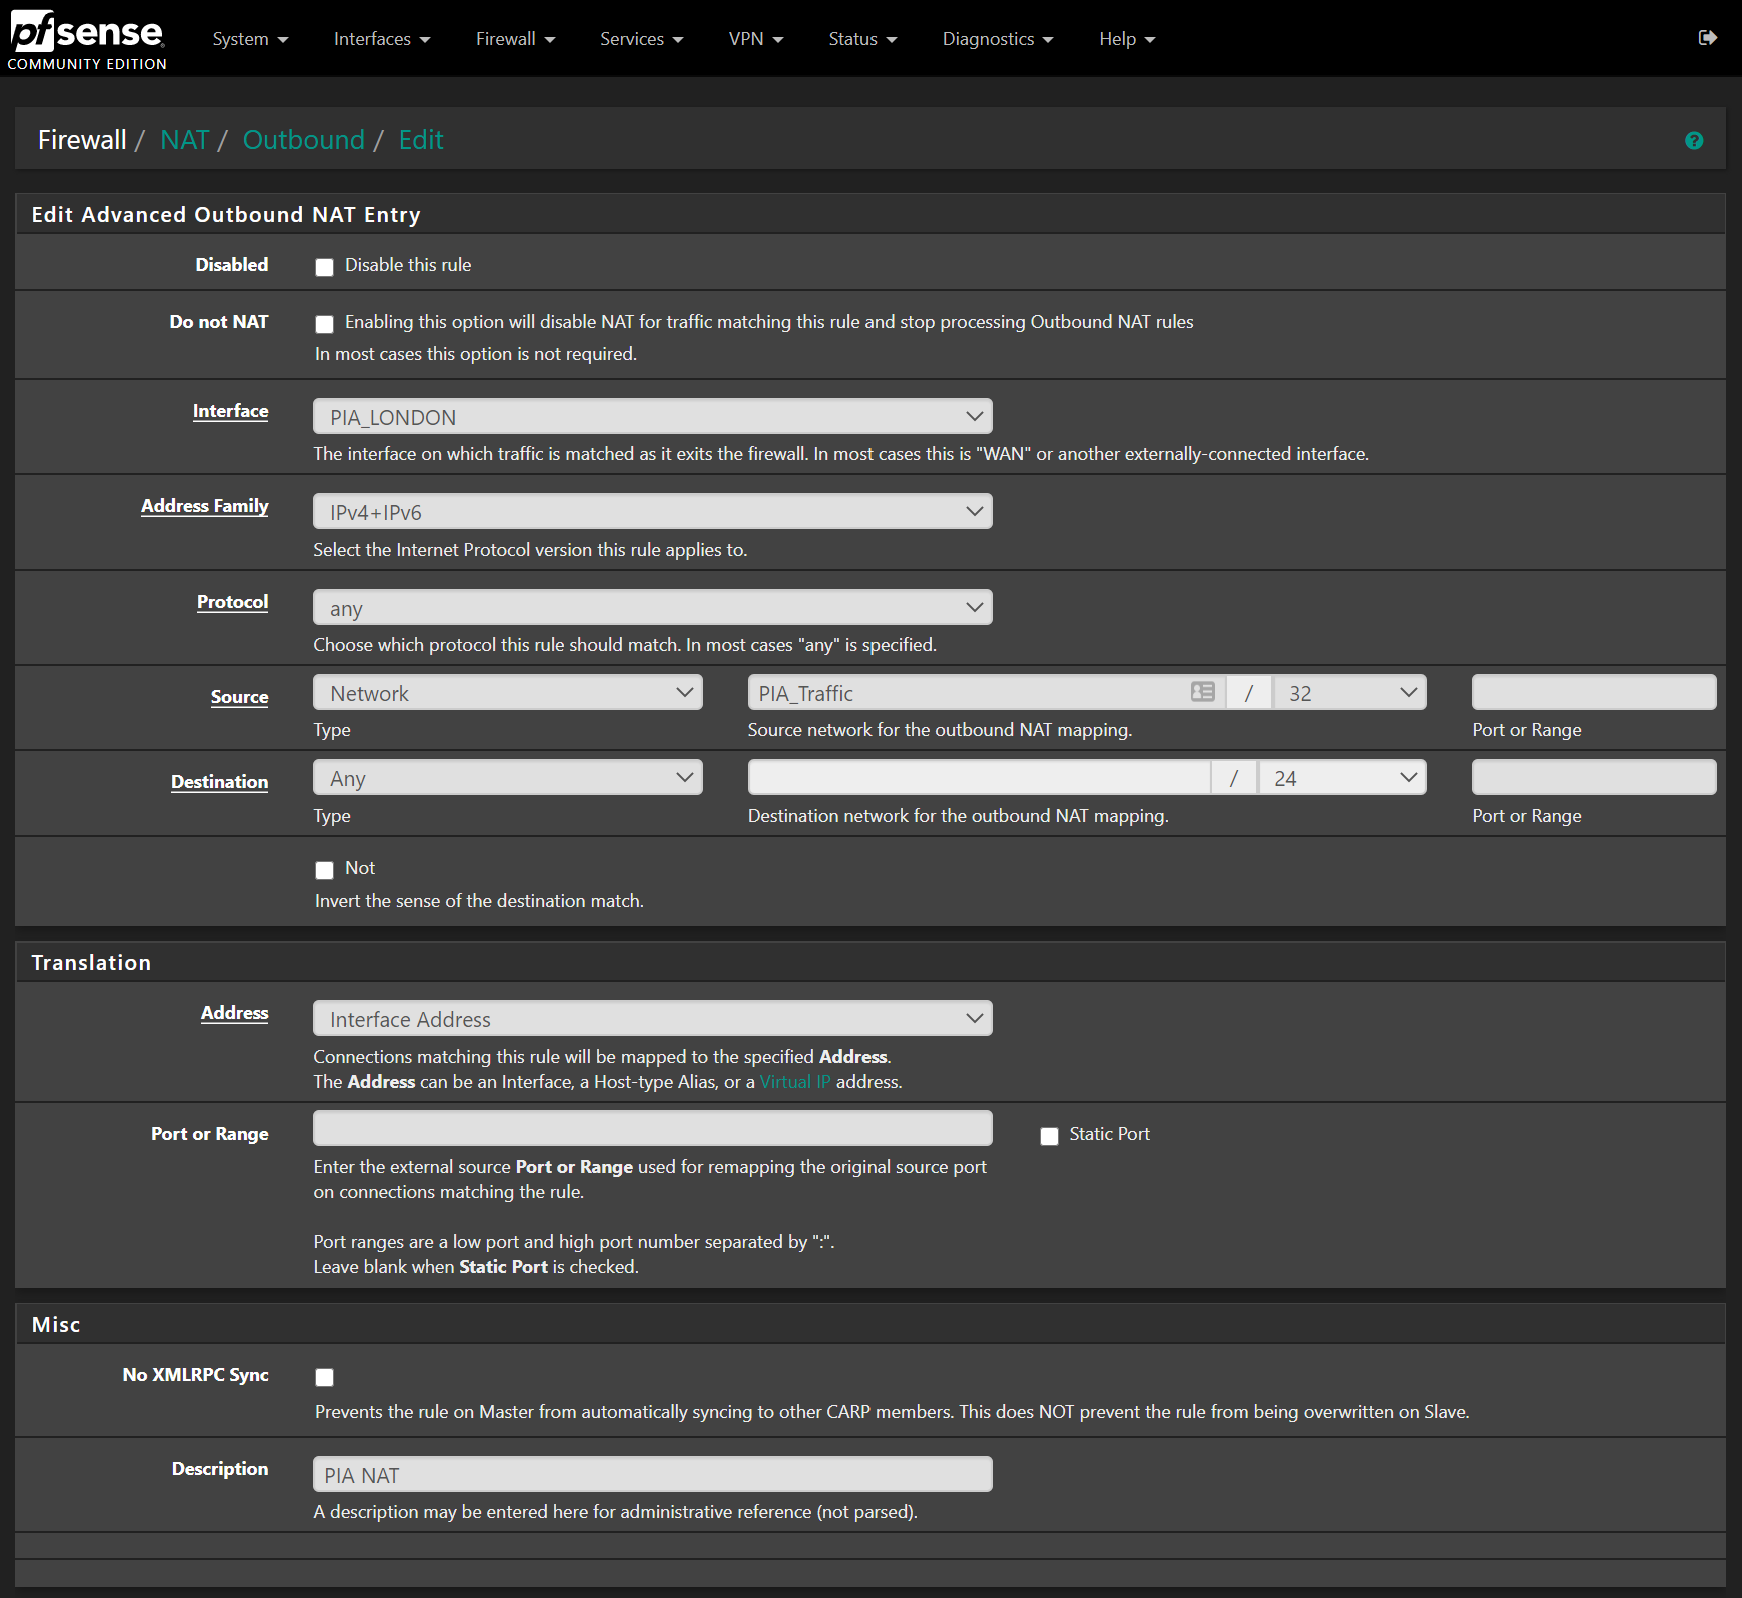
Anyways, we need to create an Outbound NAT in order to send traffic via the PIA VPN. Go to Firewall > NAT > Outbound and change the Outbound NAT mode from Automatic to Hybrid. You can use manual if you wish, but I prefer Hybrid for speed.
You will notice you now have a mappings section (which is blank) and an Automatic rules section which will have all the automatically generated rules for the WAN addresses. Go ahead and click add to add a new mapping.
Set the following:
- Interface – ensure to select the PIA interface we created earlier.
- Address Family – IPv4+IPv6
- Protocol – Any
- Source – Choose Network as the type, then type PIA into the source network box, and the Alias we created earlier will show up. Click to select it.
- Destination – any
- Description – PIA NAT
The rule will look like so:
Then create another with the same settings except this time we set a destination port like this:
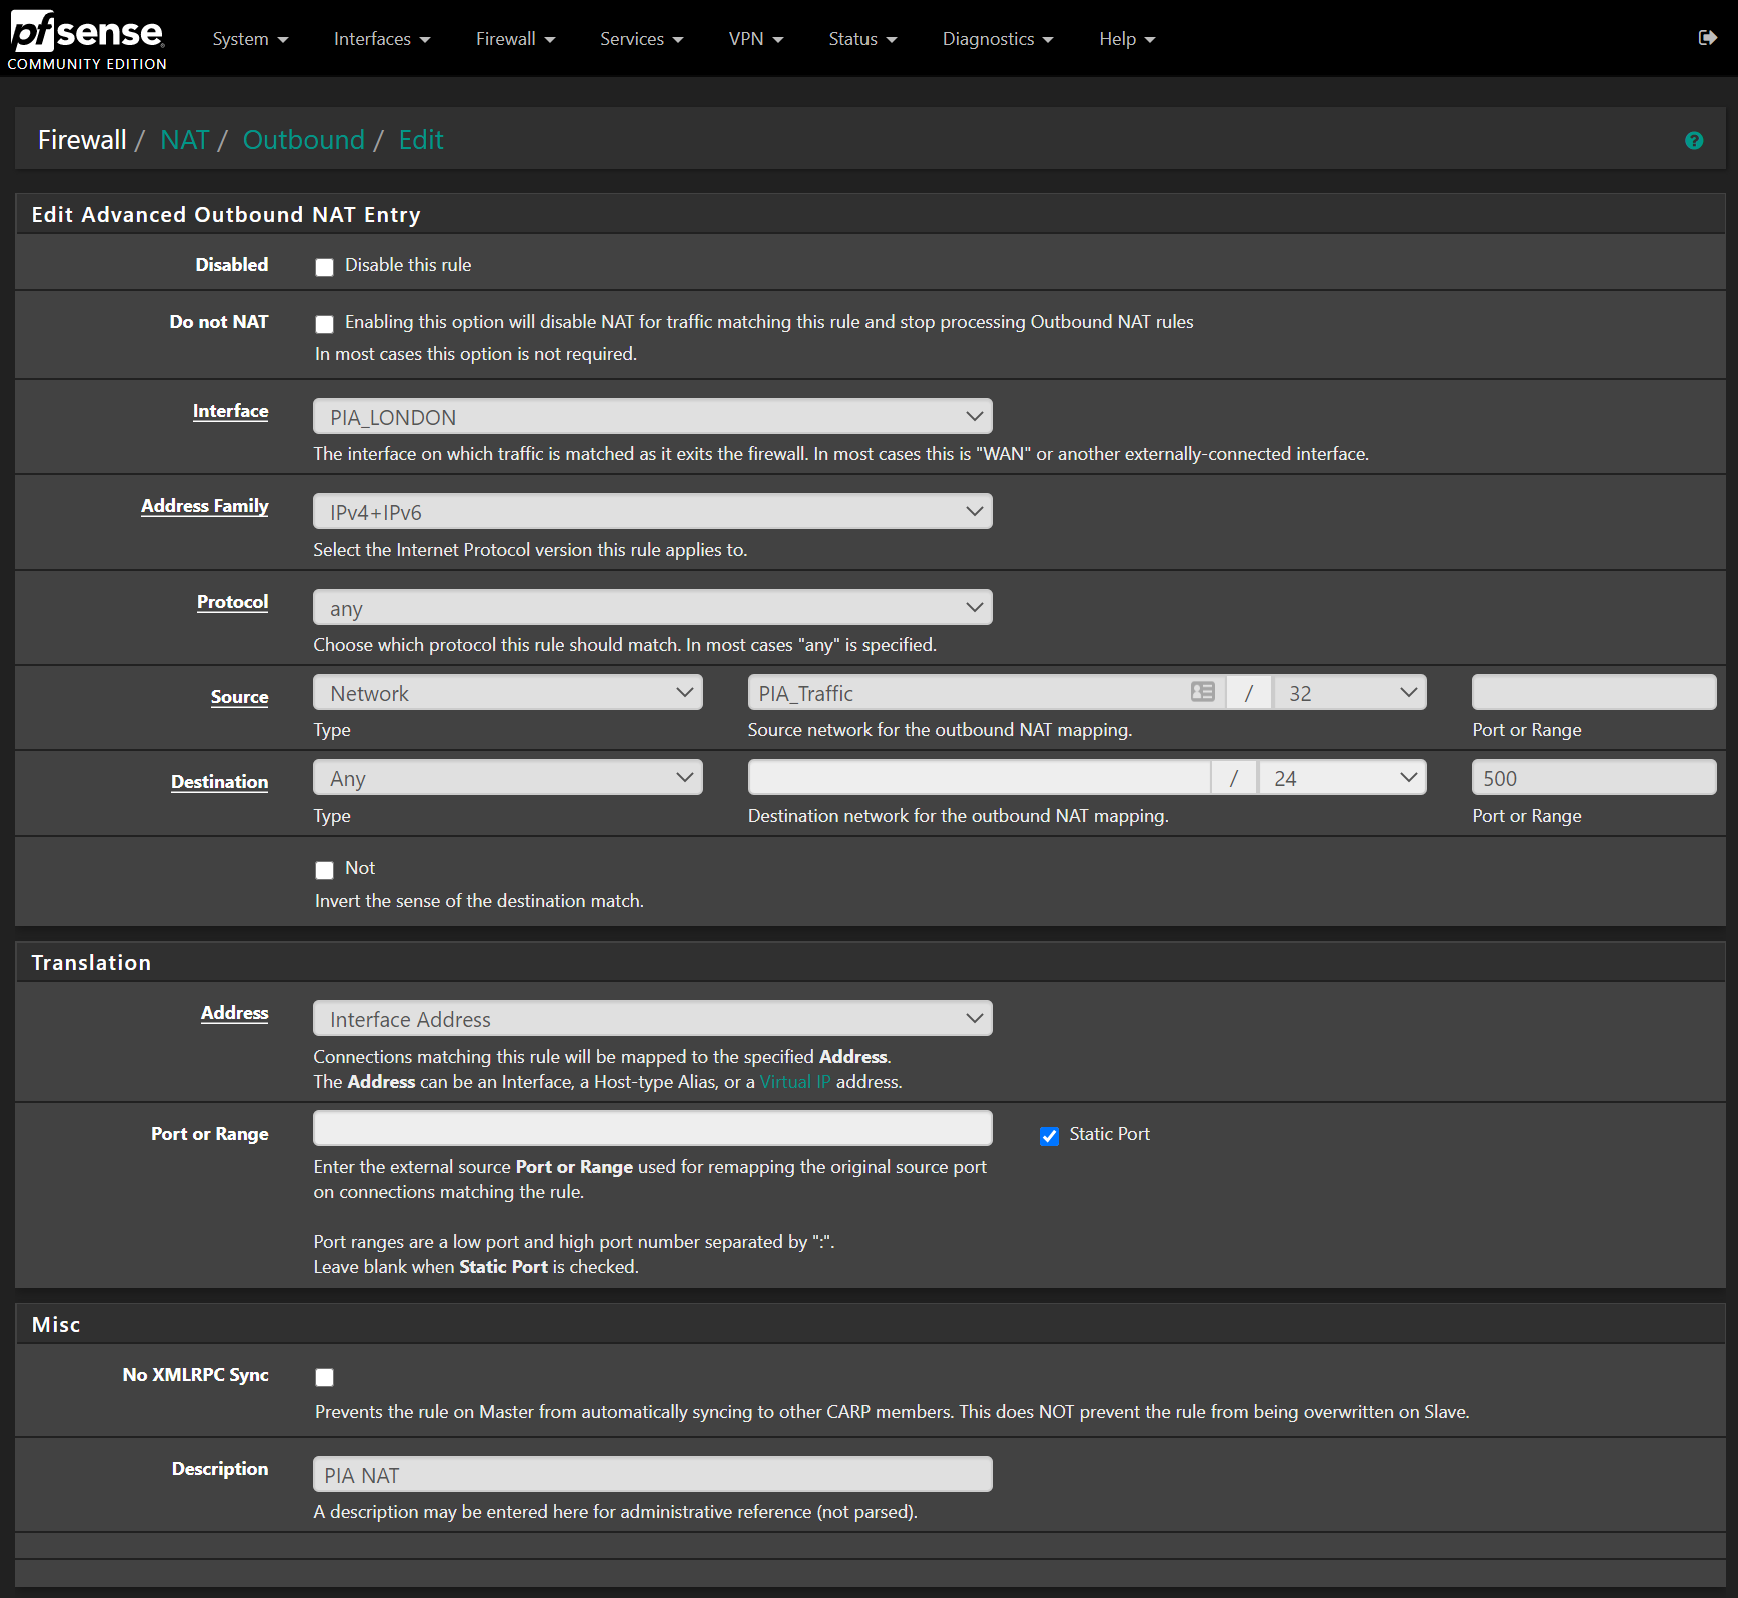
Note how the static port box is checked also.
Make sure the rules look like this on the Outbound NAT page:
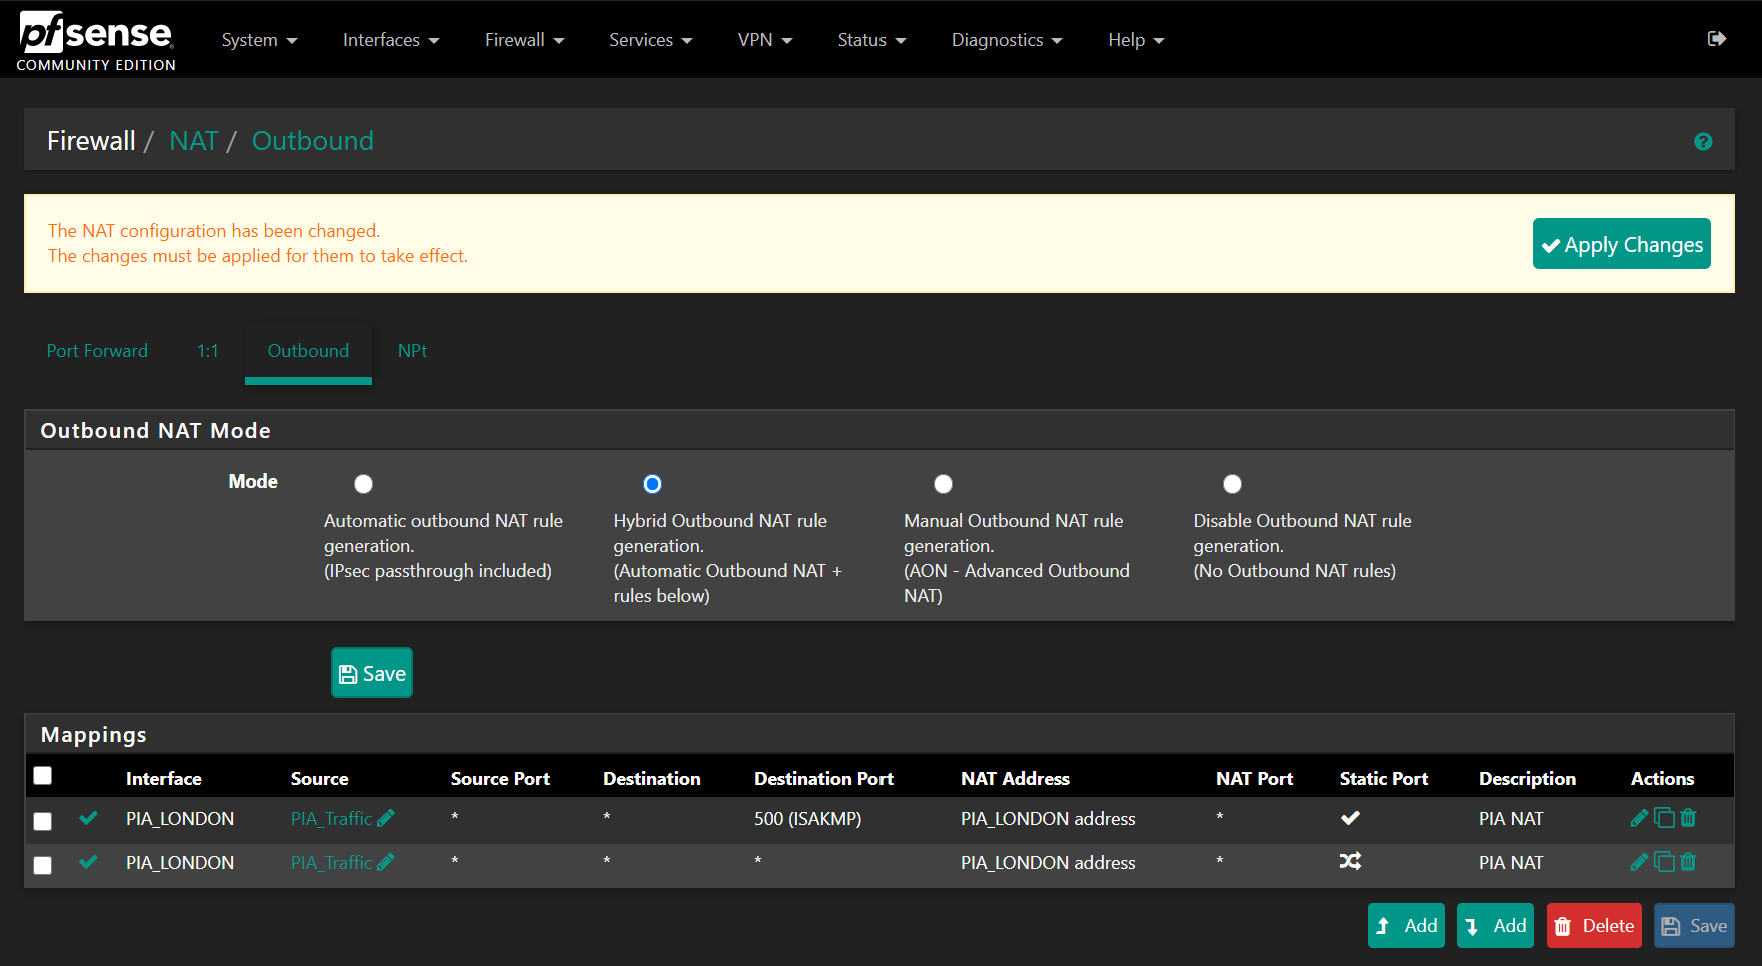
Go ahead and press apply changes.
Firewall Rules
We are almost there! This is the last step. Go to Firewall > Rules and select the interface(s) that your network resides on (probably LAN if you are unsure). We need to create 2 rules here, one that allows traffic from the PIA_Traffic aliases to the PIA gateway, and another just below it that denies it to all other traffic. This means if you lose connection to the VPN, traffic won’t start flowing through the regular WAN interface.
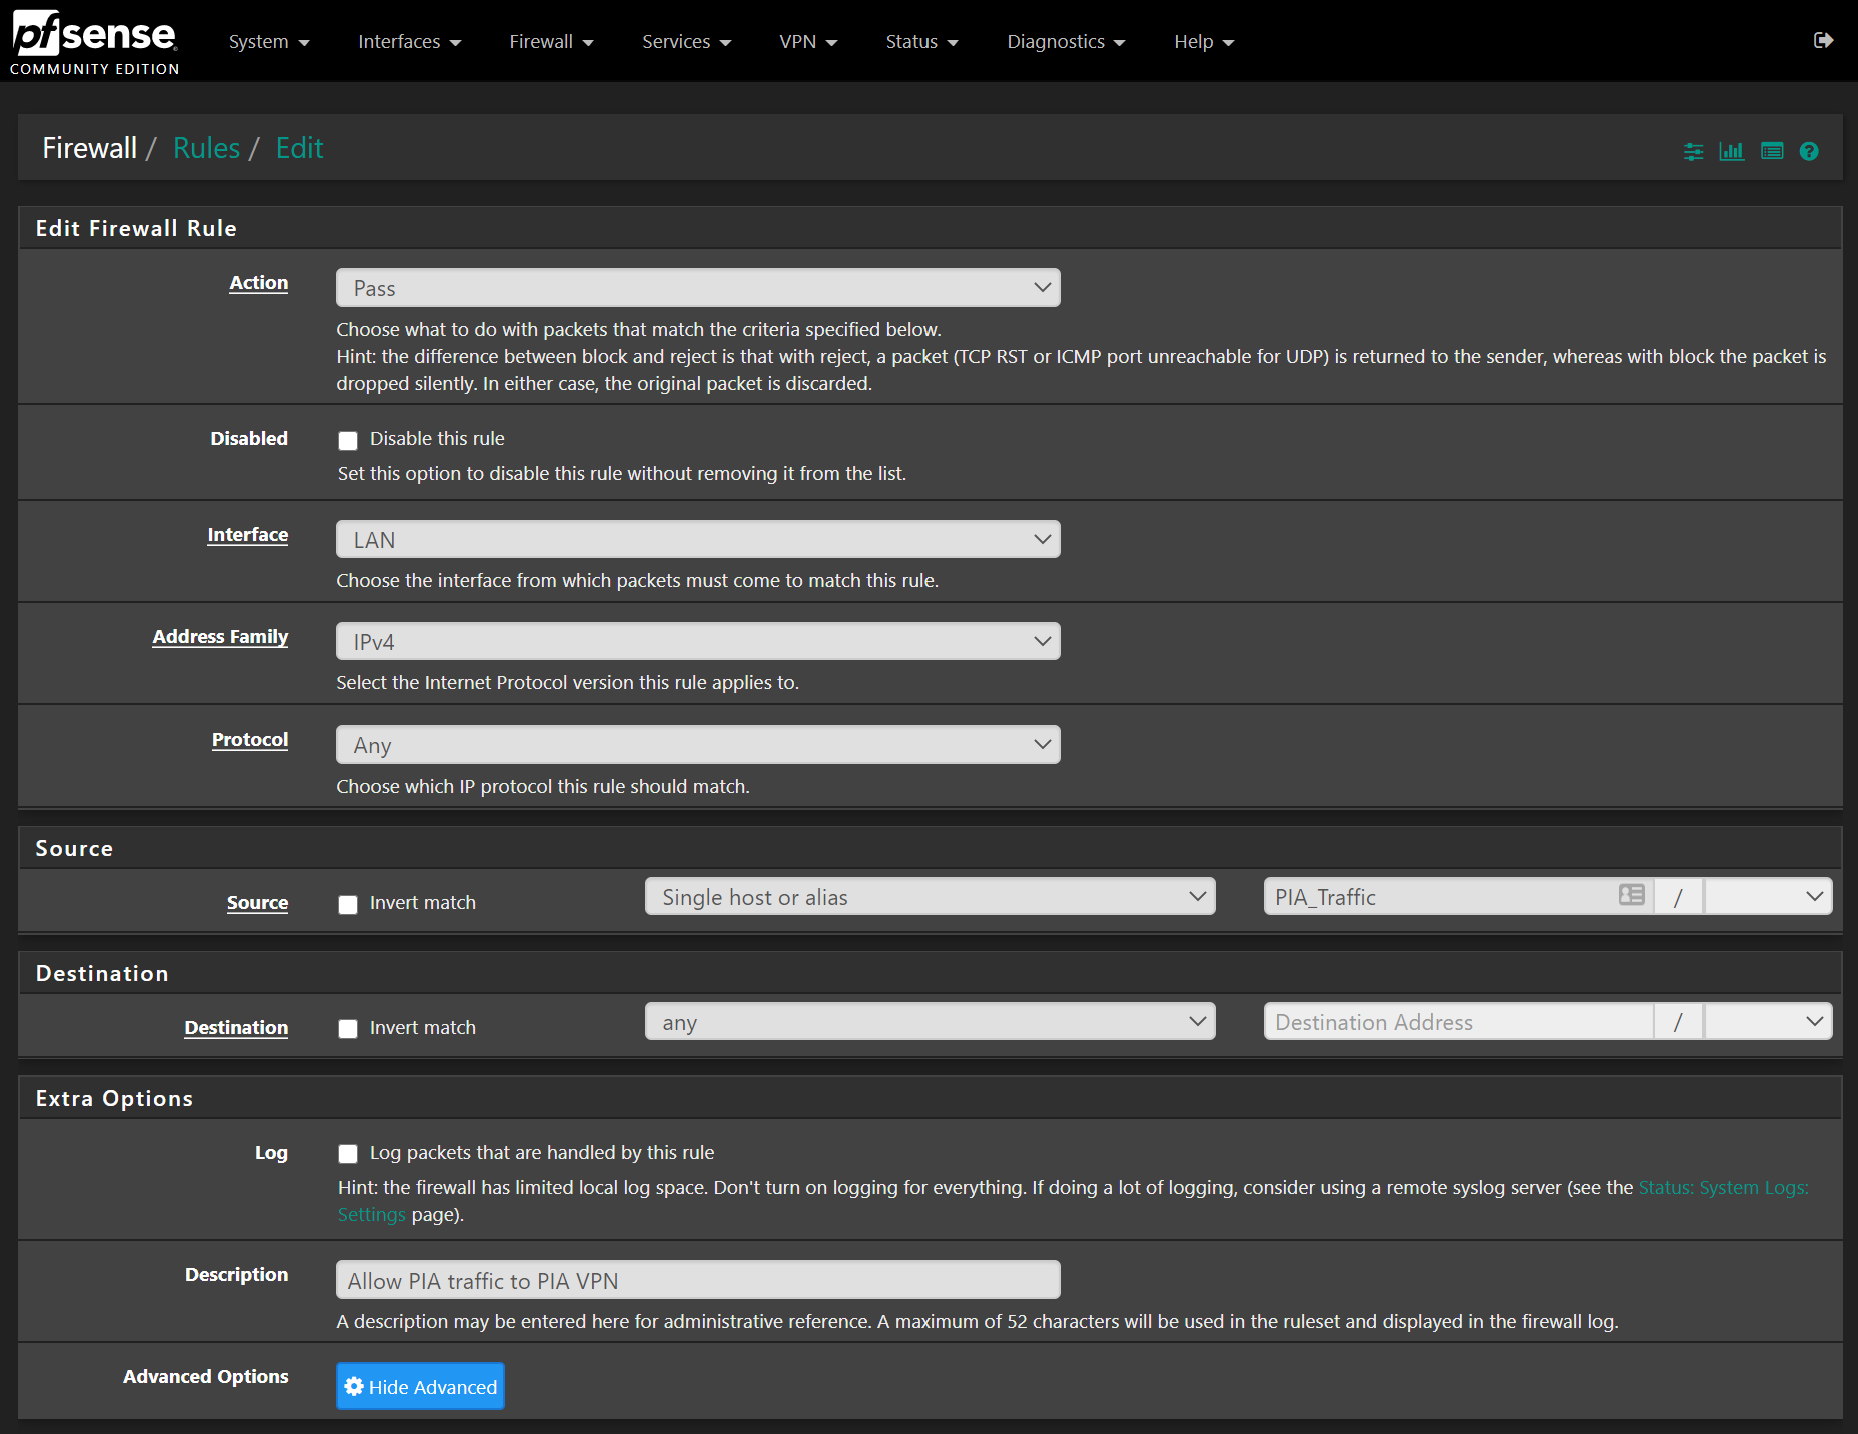
Press add and create a rule like so:
- Action – Pass
- Address Family – IPv4
- Protocol – Any
- Source – Single host or Alias, type PIA into the box and select the PIA_Traffic alias from earlier.
- Destination – Any
- Description – Allow PIA_Traffic to PIA VPN
Before saving, click Display Advanced and in the Gateway box set the PIA gateway:
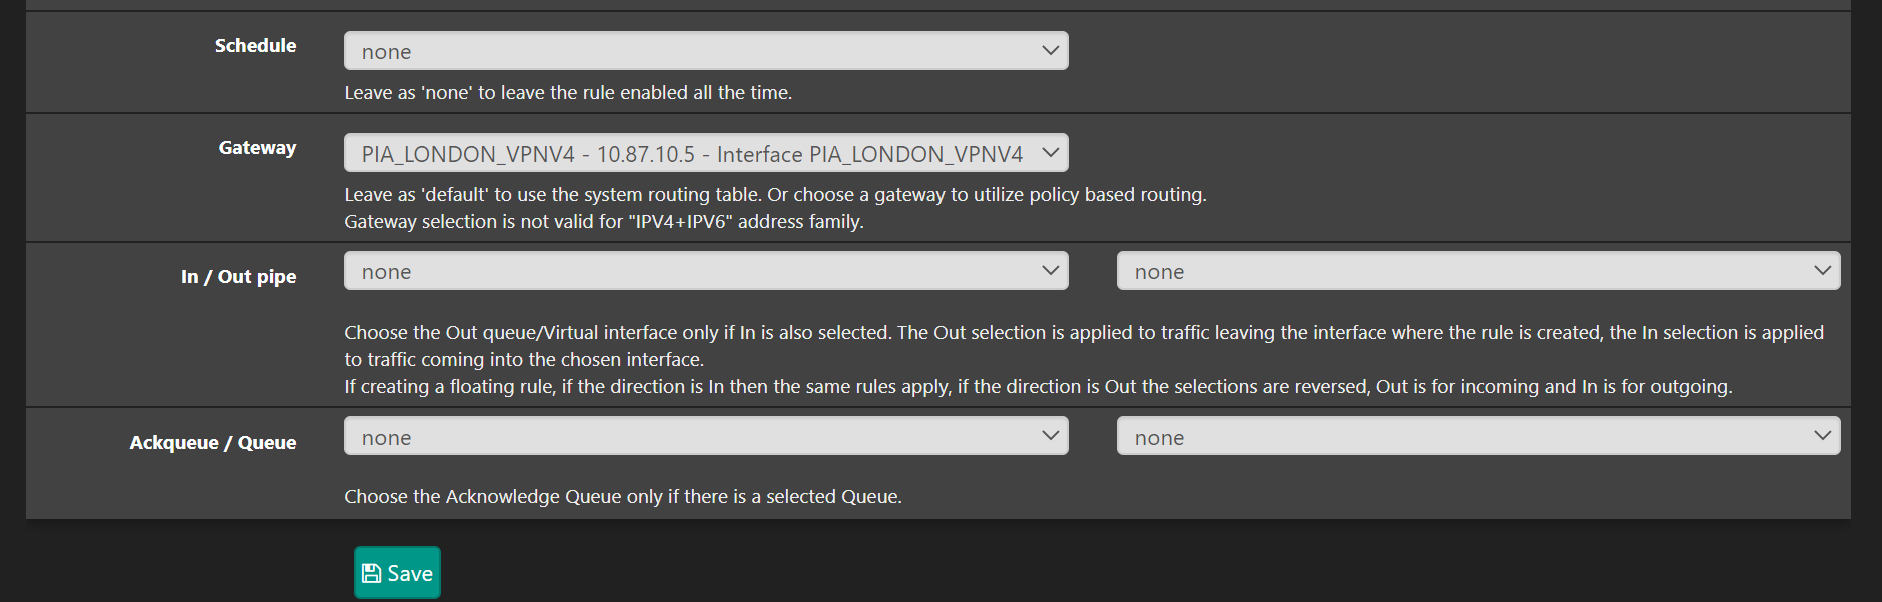
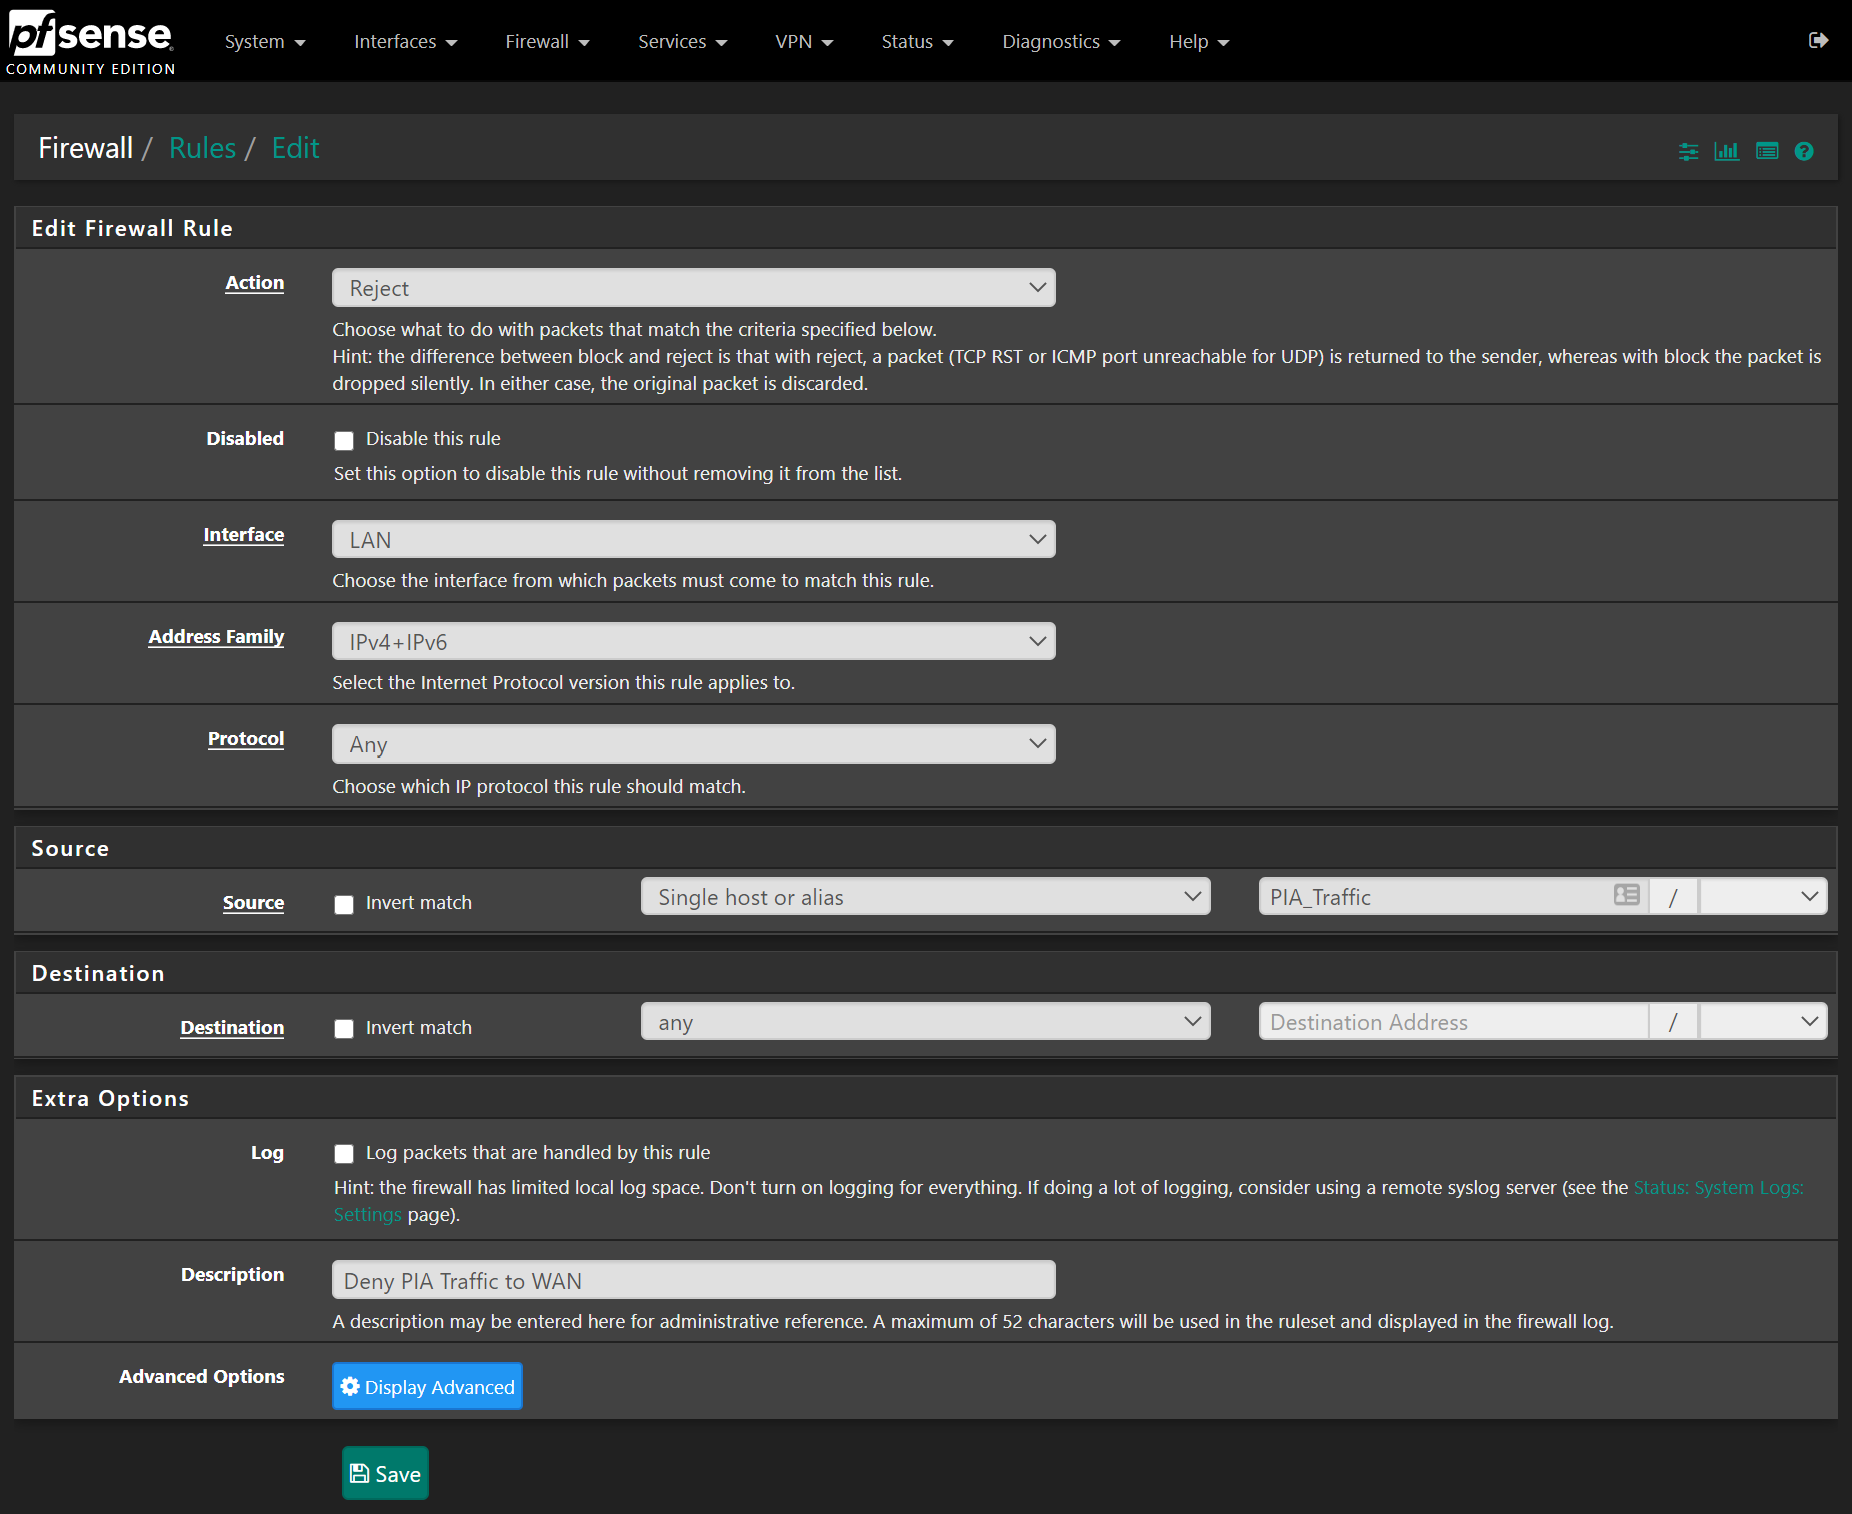
Press save, then create a second rule like this:
- Action – Reject/Block
- Address Family – IPv4 + IPv6
- Protocol – Any
- Source – Single host or Alias, type PIA into the box and select the PIA_Traffic alias from earlier.
- Destination – Any
- Description – Deny PIA_Traffic to WAN
No need to set the gateway this time:
Press save. Make sure the rules are configured like so, I am using pfBlockerNG so I have an extra block rule (the second one) but otherwise the PIA Accept rule should be the first of those 2, PIA block rule directly below that, followed by the other rules. Should look something like this:
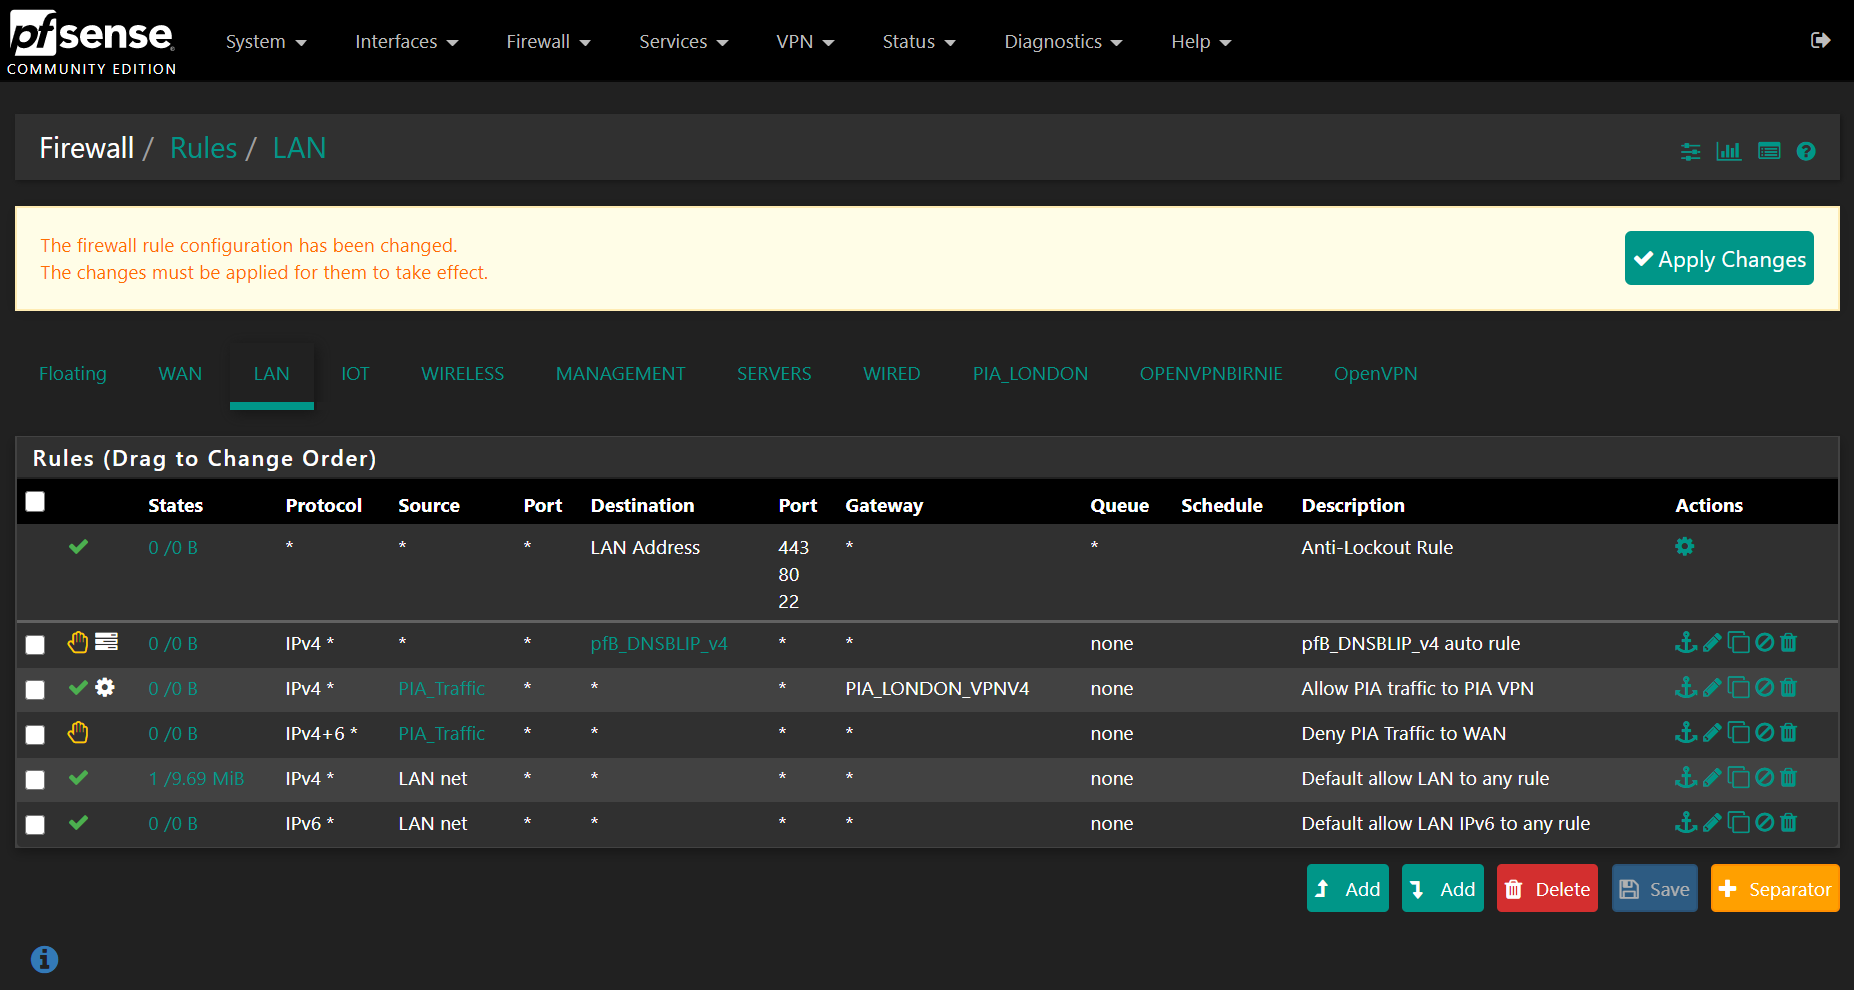
Make sure to hit apply changes once you are happy.
And that’s everything you’ll be glad to know!
Testing
Go ahead and give it a test out by going to Google and typing what is my IP – it should be one of the PIA ones and not your normal one.
I’d also recommend running a speed test and making sure you are getting the correct speeds you would normally expect. Then you can tweak with some of the VPN settings if required.
Further Steps
A few things to consider are ensuring that you are using the PIA DNS servers if you are routing all traffic via the VPN, or if you are doing it on a per device basis consider setting the DNS servers to the PIA ones on these devices. Ensure you are using DNS over TLS to make sure you are getting DNS leak protection.
Additionally you may want to repeat the steps above to create different VPNs so you can have access to different countries if you so require it.
Final Words
I hope you managed to get everything working create a PIA VPN with pfSense, whether it be for getting additional shows through Netflix, bypassing ISP restrictions or just increasing your privacy online.
Make sure to subscribe below to get notified instantly of the next topic, and as always be sure to let me know if you have any requests for topics.