Getting Started with Home Assistant – Part 4 – Automations and Templates

Welcome to part 4 of the Getting Started with Home Assistant series – Automations and Templates.
This series aims to help teach you about the basic configuration and functionality of Home Assistant.
This part follows on from part 3, although it assumes you have now added some more devices/entities to Home Assistant.
In this part, we are going to learn about creating more advanced automations and templates within Home Assistant. The scenarios we are going to look at will mostly be around lighting since it is probably the most common smart device most people will have.
Although I may be using different types of entities/devices to what you may have available, the concepts and principles will carry over and be applicable to your scenario. It is less about the actual devices and more about the concepts of automations and templates. If you want to follow along exactly, make sure you have at least 1 light entity available along with a motion sensor and a chromecast or media player.
Let’s get into adding some Automations and Templates into Home Assistant!
Prerequisites
This part of the guide assumes you have the following:
- Home Assistant installed and configured as per part 1-3
- (Optional) SSH access if you want to follow the config file version
- (Optional) A light entity available if you want to follow along exactly
- (Optional) A motion sensor entity available if you want to follow along exactly
- (Optional) A chromecast or other media player
We will build the automation up gradually, so you can leave it at any point, if you don’t have a motion sensor available for example but you do have a light.
Guide
Firstly let’s get the names of our entities we are working with. Within Home Assistant, head over to Developer Tools then States page and grab the names of our entities. Write these down so that we can use them within our automations and don’t need to keep checking back. You can see I have the following:
- 2 device tracker entities which are linked to our people entities as we configured in part 3
- 1 light entity called living_room_light
- 1 binary sensor called living_room_motion which is a motion sensor.
- 1 media player entity called “media_player.living_room_tv”
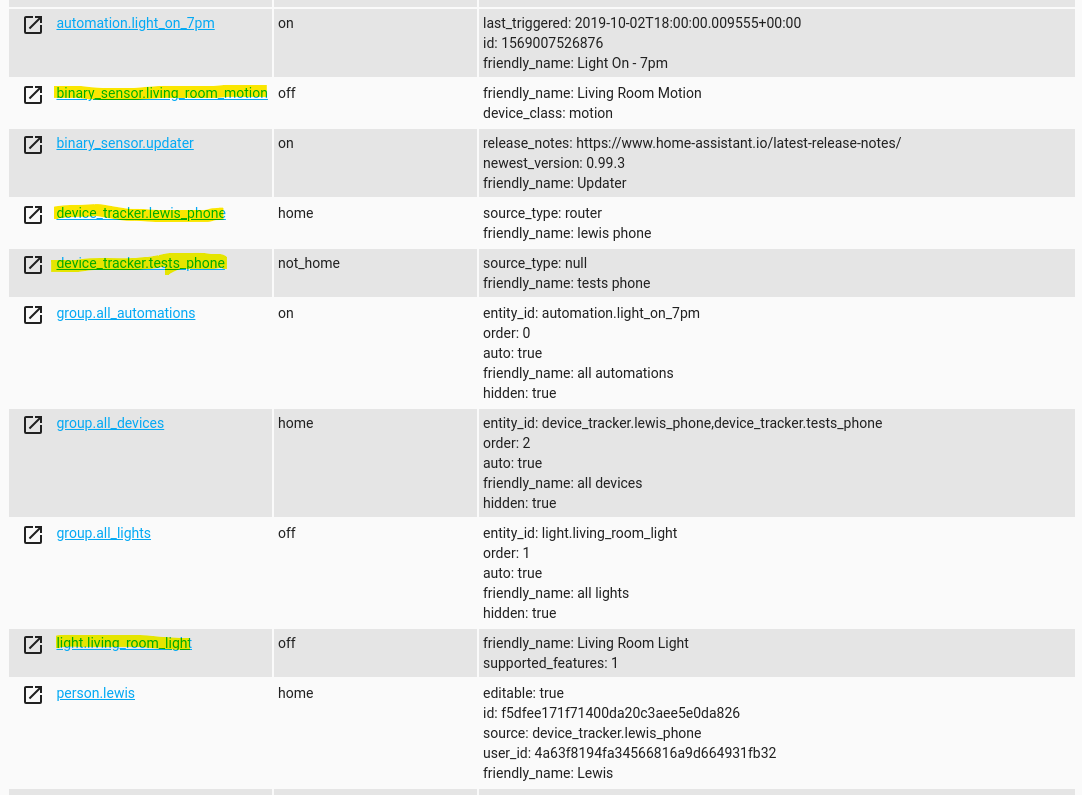
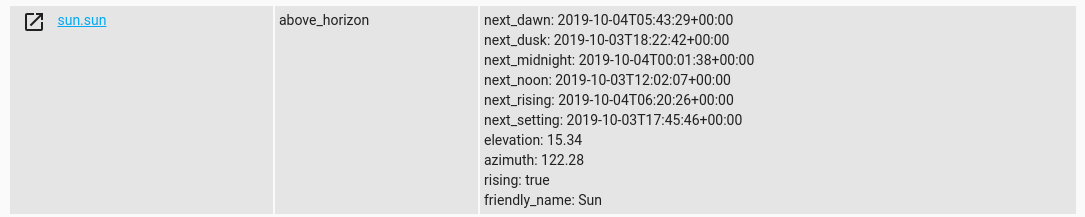
Please also take note of the sun entity and just glance at the attributes that it has.
Now that we have the entities we need, we can start building up our Home Assistant automations. I’ll show you how to do this via Lovelace or via config files so feel free to follow whichever method you prefer. The 2 parts are exactly the same, just with minor changes where appropriate.
Lovelace
Creating an automatic smart light
Head over to Configuration then Automation. If you followed part 3, you will have a previously created automation, let’s get rid of this and delete it to keep things tidy.
The first automation we are going to create is an automatic light that is a bit smarter than the one we created in part 3.
In part 3, we created a light that came on at a certain time of night. This is fine but has a couple of issues:
- Having it come on at certain time works great for the day you created it, however as time goes on, it’s going to be less or more dark at that time so you will probably want the light to come on earlier or later. For example, if the sun starts going down at 7.30pm you might have set the light to come on at 7pm. However 2 months down the line, the sun might now be setting at 6pm so really you need the light coming on at 5:30pm. This means you’ll have to go in and adjust your automation…not very “automatic” is it?
- The light will come on regardless if you are home or not and is a little wasteful.
- The light would stay on indefinitely, again a bit wasteful.
The second and third issues are easily fixable with presence detection entities, but what about the first?
One solution is to have an additional ambient light sensor which can tell us how dark the room is, this is probably the most ideal solution but would require having one in every room you want to have smart lights in which makes it much less appealing.
The solution we are going use is our sun entity. Home Assistant by default pulls in data about the sun which is great. If we take a look at the sun entity, we have quite a few attributes:

There is 2 ways we could go here, we could use the “next_rising” and “next_setting” attributes and offset the times a bit, or we could use the “elevation”. I’m going to go with the latter since I feel it is a bit easier to work with.
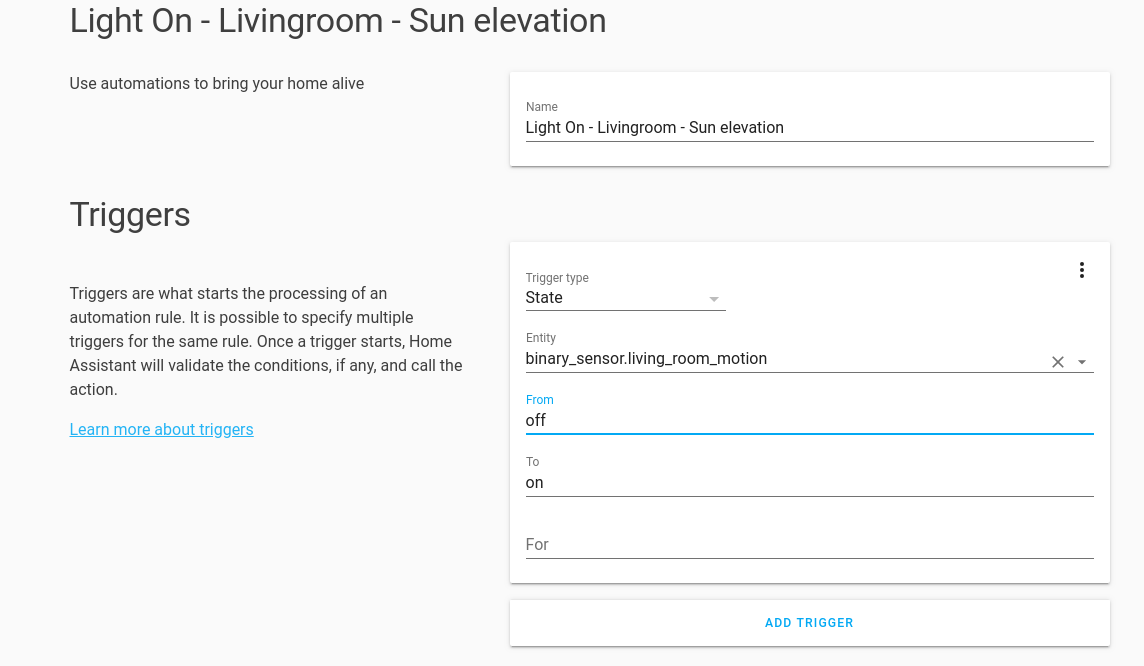
Let’s finally create a new automation using the orange plus button. Go ahead and give it a name. When I create automations, I tend to try and follow a standard naming convention so that I can quickly find what I’m looking for. When you start building up automations they can quickly get disorganised and be hard to find. So I tend to name like this: “Function – Entity – Description if applicable” which translates to: “Light On – Livingroom – Sun elevation” for example.
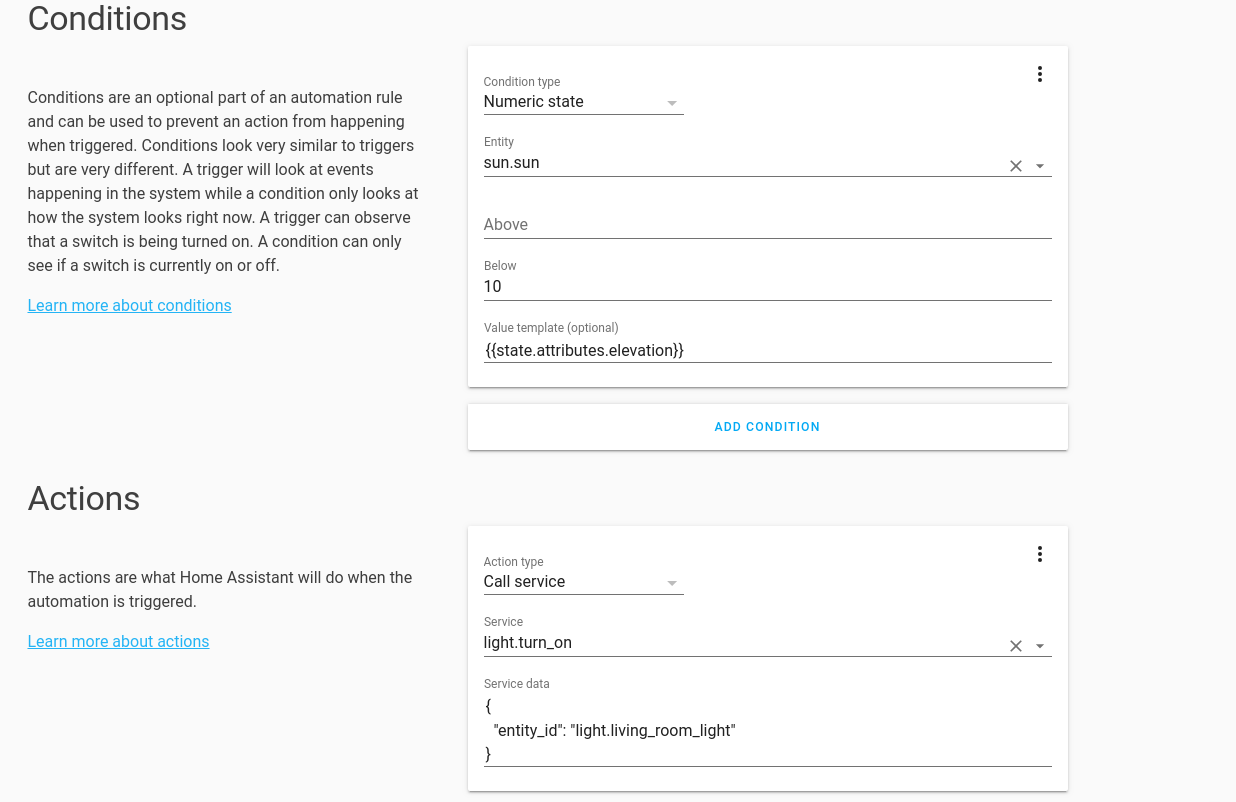
Select “numeric_state” from the drop down as the trigger type. Numeric state allows us to take values from sensors and add triggers when the value is above or below a certain threshold. Perfect!
Select “sun.sun” as the entity, and in the below box enter 10. If we left it like this, the automation would fail because it would look at the “state” of the sun rather than the attribute. The state of the sun is “above_horizon” currently so that makes no sense.
To fix this, in the template box we are going to instruct the automation to extract the elevation attribute instead of using the state. To do that we use the template syntax, so enter the following in the template box:
{{state.attributes.elevation}}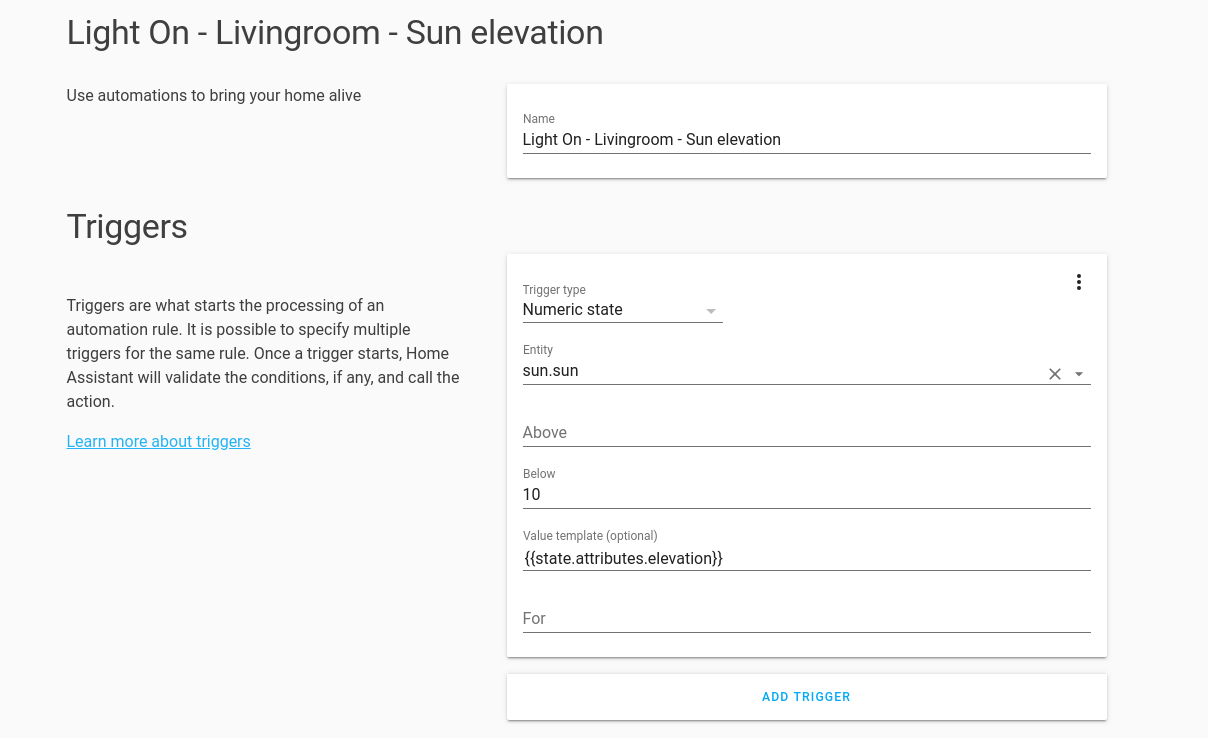
We can skip the conditions for now.
In the action box we simply add our light. Go ahead and select light.turn_on and in the service data box add:
{
  "entity_id": "light.living_room_light"
}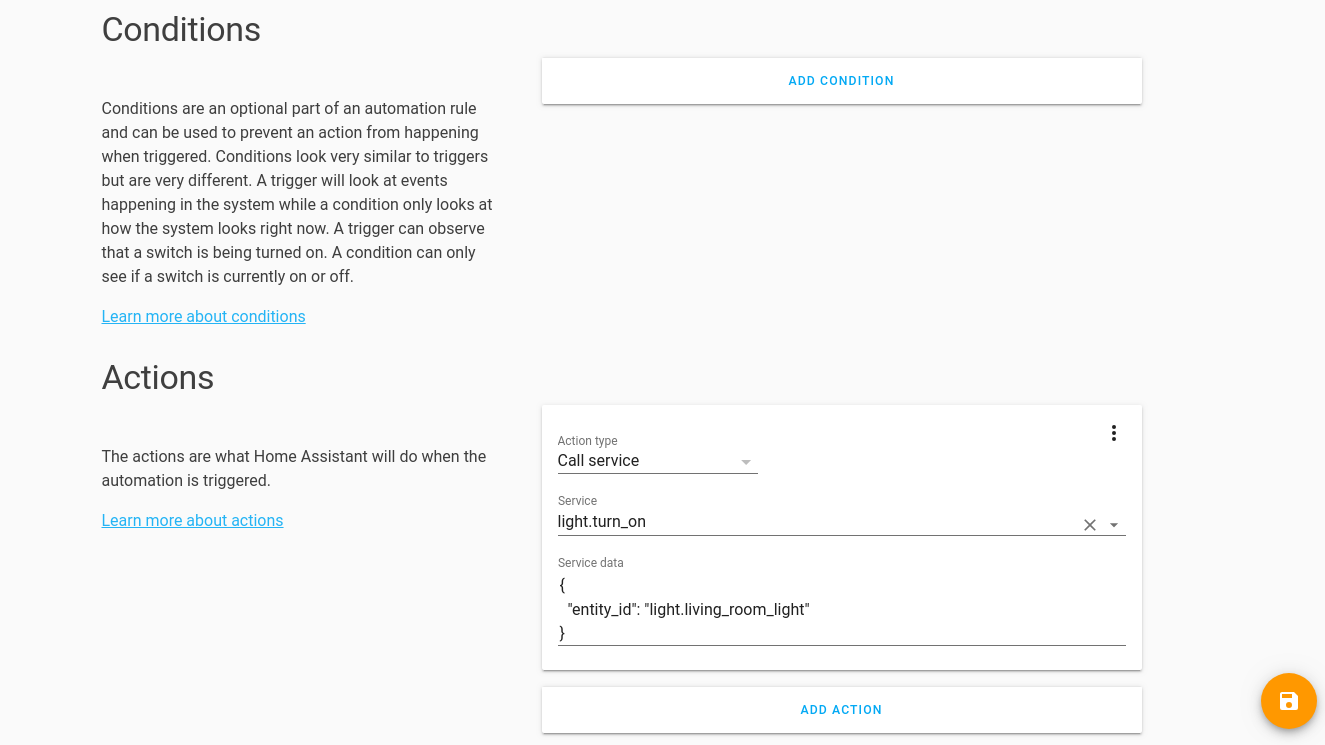
And hit save. We now have a simple light automation that whenever the sun elevation gets below a value of 10 will trigger the light to turn on. Give it a test, change the value of 10 to something just below your current elevation then wait a few minutes to see if it triggers. Change back to 10 when done (10 seems to be a good value but change to whatever you prefer).
So that takes care of issue 1 above, but not issue 2 or 3.
Creating a smarter smart light
Let’s make this even smarter, go ahead and edit the automation. This time we are going to add a single condition. Choose “state” as the type and under entity, select your person entity. Then set the state as “home”:
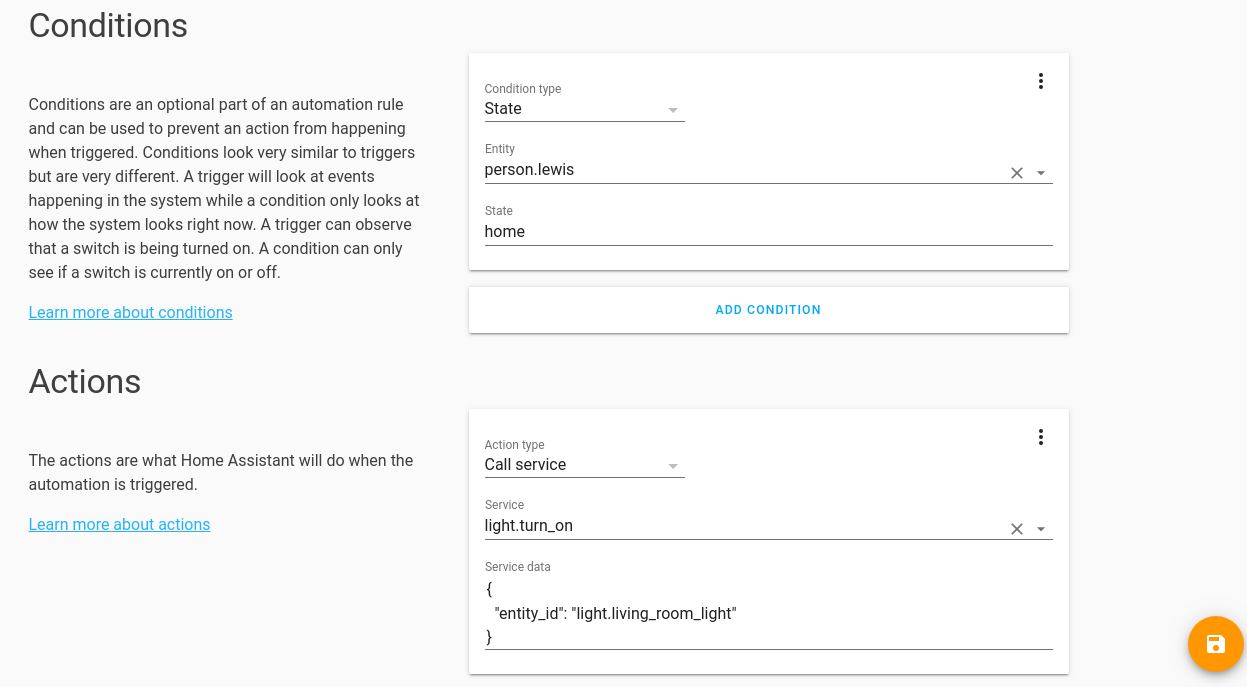
So what does this do? Now the automation will now be triggered once the sun elevation is below 10, but only if the state of the “person.lewis” entity is “home”. If “person.lewis” is not home, the automation will still trigger when the sun elevation is below 10, but the action will not be performed.
You may be asking “but what about houses where there is more than 1 person?!” – a very valid question. Let’s tackle that. Edit the automation once again and we can see that we can add multiple conditions, so we simply add the second person to the condition and all done right? Unfortunately not! You can have multiple conditions, however they must all be true for it to work. Conditions use “AND” rather than “OR”.
So lets use a template condition instead which allows us to do more advanced things. Let’s test out a template, head over to Developer Tools then templates.
Clear out anything in that box. To start, we need to create a new “if” statement. This is done by using the following syntax:
{% if (states to check) %}
  true
{% else %}
  false
{% endif %}
Using “{%” indicates a statement, using “{{” indicates an expression.
In the template box, enter the following:
{% if (is_state('person.lewis', 'home') or is_state('person.test', 'home')) %}
true
{% else %}
false
{% endif %}
What does this do? Let me try and explain it simply:
Start a new if statement, inside the normal brackets we are saying "if the state of person.lewis is home OR the state of person.test is true, return true.
else
return false, since neither are home
end if statement.
This should return “true” on the right hand side. Right click and copy this template.
Back to our automation.
Edit the current condition and choose “template” then in the template box paste the template you just created:
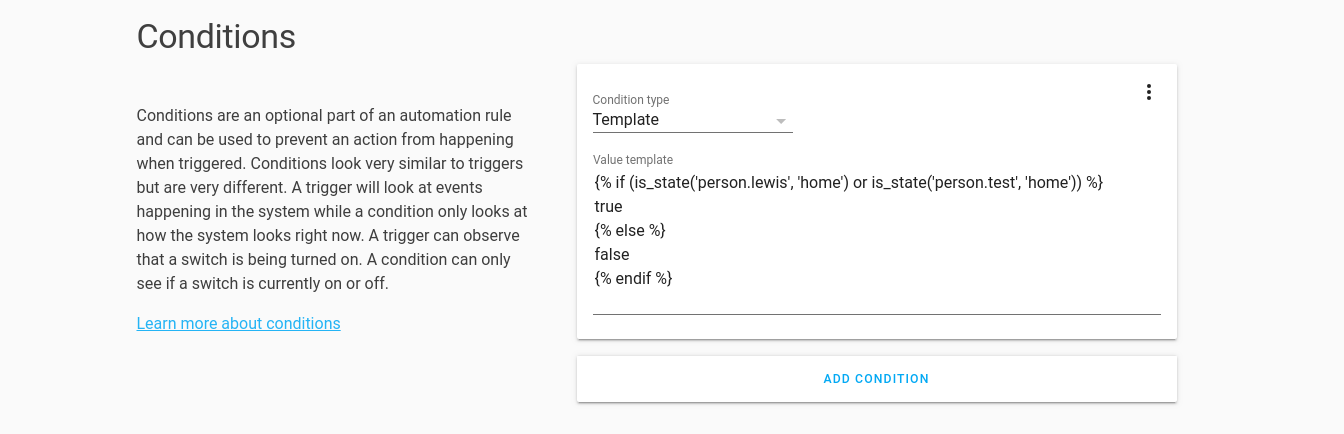
Go ahead and save. Now we have an automation that triggers when the sun elevation is below 10, and will only execute the action if “person.lewis” is home OR “person.test” is home.
This works really nicely, but how could we expand it even further? Motion sensors are a superb way to finish this setup.
As you saw above, I have a motion sensor entity which is a binary sensor. Binary sensors only have 2 states, on or off which is perfect for motion.
So lets add our motion sensor to the mix.
We need to add the motion sensor as a trigger rather than a condition, and move the sun elevation as a condition.
Under triggers, change the type to “state” and select the motion sensor as the entity. In the from box enter “off” and in the to box enter “on”, leaving “for” blank (we can actually leave off blank but for the sake of completeness we’ve filled it in):
Then add a new condition, create the sun elevation like we had before. Now you should have 2 conditions:

So what to we have now? Well, we have a light that will turned on if the motion sensor is triggered, but only if the elevation of the sun is below 10 AND either “person.lewis” is home OR “person.test” is home.
You might be wondering if having the person home condition is redundant if using motion, well yes and no. One reason you might want to leave this on is to stop any pets potentially triggering all the lights while you are out.
Now we have a pretty smart, smart light. Apart from the fact that currently it will stay on indefinitely. That’s easy to fix!
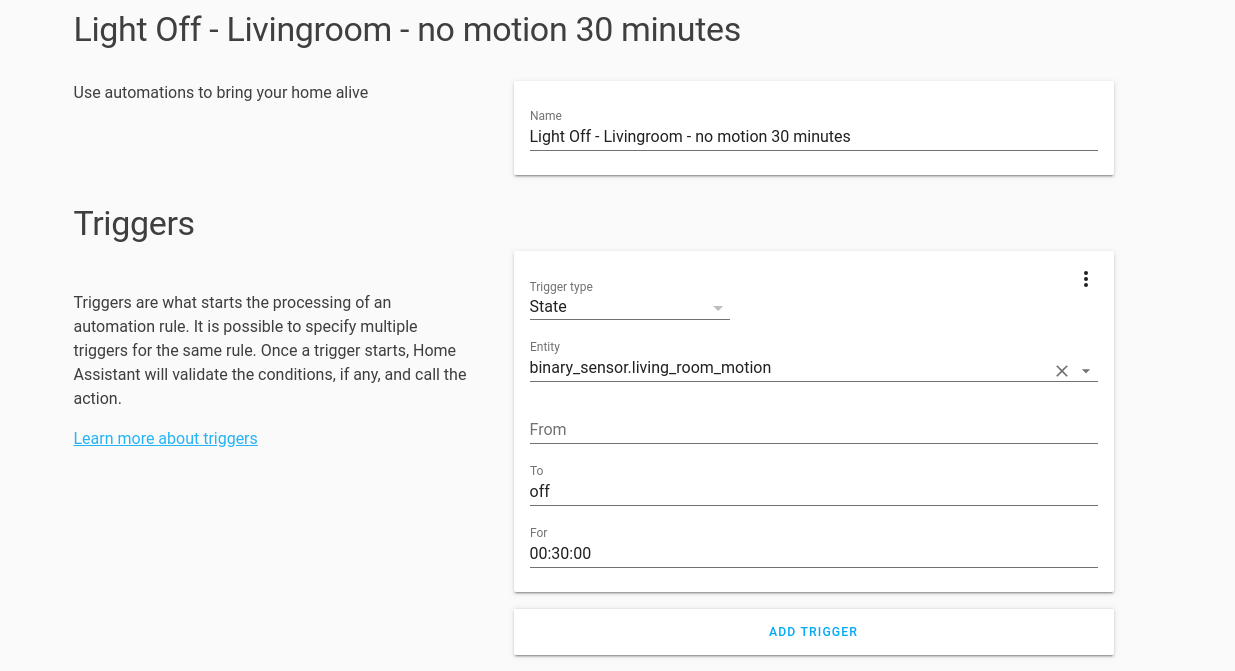
Add a new automation and give it a name. For the trigger, we want to turn off the lights if there has been no motion for 30 minutes. We could assume that the person has left the room at that point. Choose the motion sensor as the entity and in the to box, enter “off”. This time we are going to use the for box, so enter the time you want in the format hh:mm:ss so 30 minutes is 00:30:00:
We don’t need any conditions in this instance and go ahead and add the light to the action as we did before but this time using “light.turn_off” service.
Nice, we have just created an automation to turn on light that comes on via motion when its dark, and one that turns it off when no one is in the room!
Creating movie mode lights
So we have a light that is controlled via motion which is great. Let’s take a look at another template example and another scenario.
How can we switch off lights automatically when we start watching something on Netflix or Amazon Prime or Plex for the best TV watching experience? Easy!
First lets take another look at the media_player entity (which is a Chromecast Ultra), take a look at the attributes if I start playing something from Netflix:

You can see it gives us the application name in the attributes – excellent! This means we can create automations based on the application name. For example I can automatically switch the lights off when I start playing something from Netflix, Amazon Prime or Plex since these are usually things I want to watch without distraction. However if playing from YouTube I want to keep the lights on since I often have YouTube on in the background.
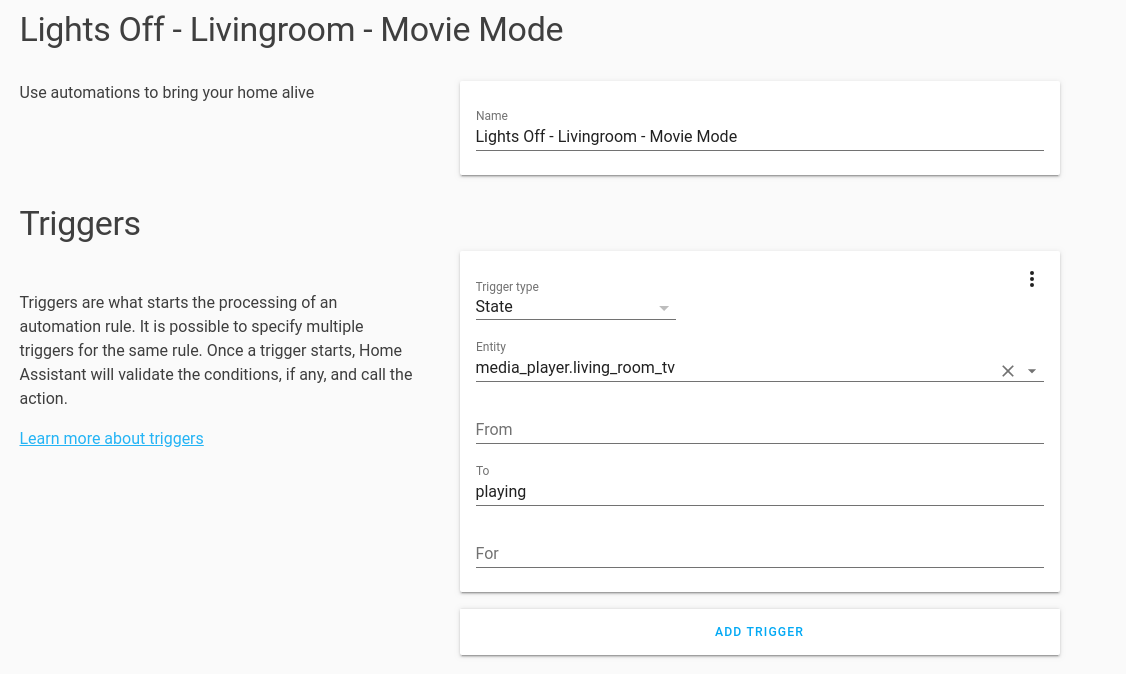
Create a new automation and this time the trigger is going to be when the media player goes to “playing” state:
Add a condition that checks if the state of the light is already on – no point doing anything if the light is already off for example.
Then add a second condition, this time we are going to add a condition that checks if the application name is either Netflix, Amazon Prime or Plex. We do that using similar syntax to before, except this time we use the “is_state_attr” instead of “is_state”, basically we are checking the attribute of an entity rather than its state:
{% if
(is_state_attr('media_player.living_room_tv', 'app_name', 'Prime Video') or is_state_attr('media_player.living_room_tv', 'app_name', 'Netflix') or is_state_attr('media_player.living_room_tv', 'app_name', 'Plex')) %}
true
{% endif %}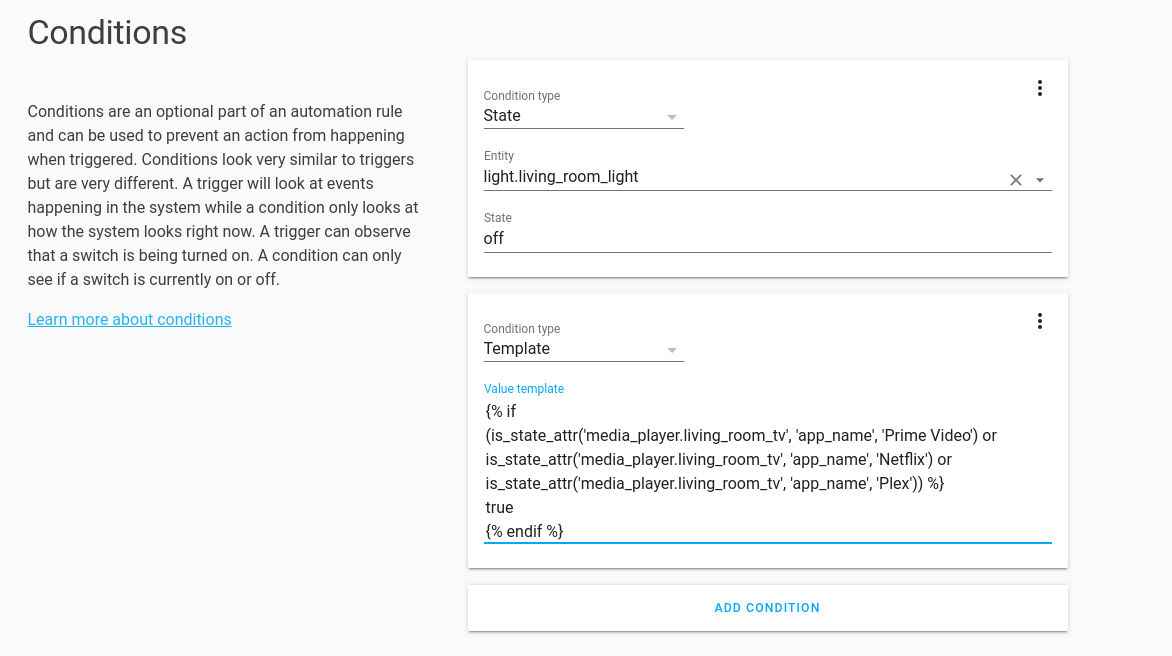
Then we add our usual light.turn_off service:
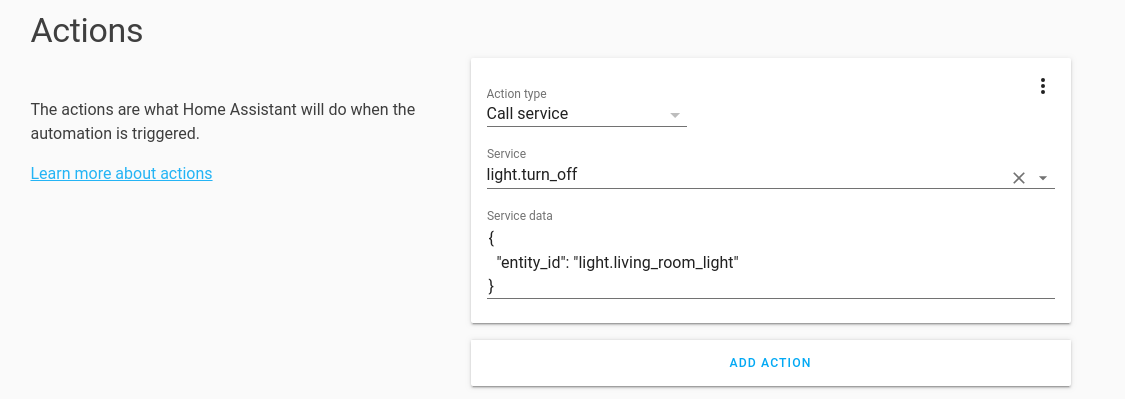
Give it a try! Everytime you hit the play button, the light will now turn off!
Let’s create our final automation which will do the reverse, if the film is paused or stopped, the light will come back on:
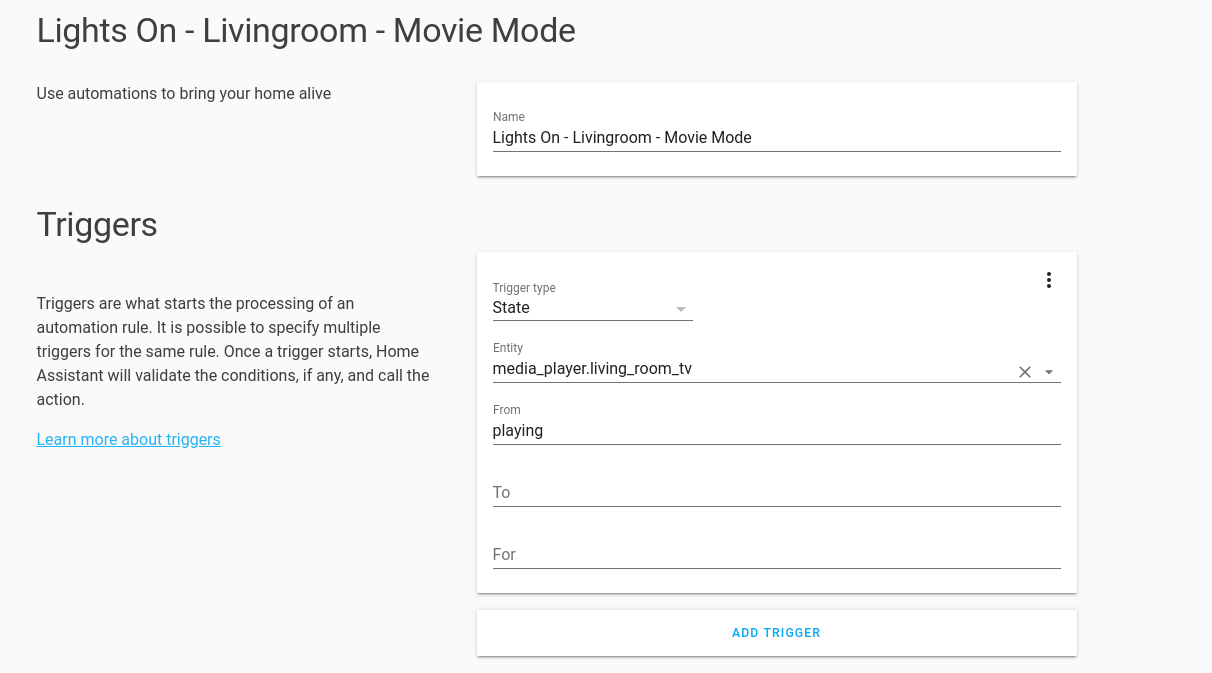
You can see in the second image we had the sun condition again, since we don’t want the light to come on in the middle of the day.
Of course, you can add whichever streaming services you use to the automation to suit your house.
Now we have a fully functioning smart light setup!
Look out for part 5 where we will cover notifications in detail, that should be coming very soon!
Config file
Creating an automatic smart light
Firstly, SSH into your server as usual and navigate to the config directory.
The first automation we are going to create is an automatic light that is a bit smarter than the one we created in part 3.
In part 3, we created a light that came on at a certain time of night. This is fine but has a couple of issues:
- Having it come on at certain time works great for the day you created it, however as time goes on, it’s going to be less or more dark at that time so you will probably want the light to come on earlier or later. For example, if the sun starts going down at 7.30pm you might have set the light to come on at 7pm. However 2 months down the line, the sun might now be setting at 6pm so really you need the light coming on at 5:30pm. This means you’ll have to go in and adjust your automation…not very “automatic” is it?
- The light will come on regardless if you are home or not and is a little wasteful.
- The light would stay on indefinitely, again a bit wasteful.
The second and third issues are easily fixable with presence detection entities, but what about the first?
One solution is to have an additional ambient light sensor which can tell us how dark the room is, this is probably the most ideal solution but would require having one in every room you want to have smart lights in which makes it much less appealing.
The solution we are going use is our sun entity. Home Assistant by default pulls in data about the sun which is great. If we take a look at the sun entity, we have quite a few attributes:
There is 2 ways we could go here, we could use the “next_rising” and “next_setting” attributes and offset the times a bit, or we could use the “elevation”. I’m going to go with the latter since I feel it is a bit easier to work with.
Go ahead and edit the automations.yaml file:
nano automations.yamlIt should be blank. Let’s add a couple of lines then take a look at what they mean. I’d like to just give a gentle reminder about indentation here so just make sure to adhere to the scheme. We are going to build up the first one nice and slowly so we can see exactly how it works:
- alias:
  trigger:
  condition:
  action:
Breaking this down, the very first thing we have is the hyphen (-), which defines a new “section”. You might want to think of this as the “root” section (the most top level of this config file). Within this root section, we divide this “root” section into 4 sub-sections, alias, trigger, condition and action. Each of these can also have their own sub-sections and so on. These sections are easily identifiable when you see a hyphen, a colon and indentation.
Hopefully that makes sense, it should become much clearer as we start to build up the config.
With in mind, lets take a look at the 4 main sections of an automation:
- alias – a simple name given to the automation to make it identifiable. I tend to try and follow a standard naming convention so that I can quickly find what I’m looking for. When you start building up automations they can quickly get disorganised and be hard to find. So I tend to name like this: “Function – Entity – Description if applicable” which translates to: “Light On – Livingroom – Sun elevation” for example.
- trigger – what causes the automation to start firing or be “triggered”
- condition – a condition that must be met in order for the automation to carry out its action. If a condition is not met, the automation will still trigger, but the action will not be fired.
- action – essentially it is the “output” of the automation, what you actually want the automation to do i.e turn on a light, turn off a TV, send a notification etc etc.
Pretty straight forward right? Let’s add an alias and a trigger
- alias:
    Lights On - Livingroom - Sun elevation
  trigger:
  - platform: numeric_state
    entity_id: sun.sun
    value_template: '{{state.attributes.elevation}}'
    below: '10'
  condition:
  action:
Alias is pretty straight forward. Let’s look at trigger, within the trigger section you can see we have added a subsection as denoted by the hyphen and indentation:
- We are then stating that the “platform” we want to use for the trigger is a numeric_state.
- Then we say that the entity we want to use for that trigger is “sun.sun”
- We say that we want to use the elevation attribute as the value by adding a value_template.
- Finally we say that we want the trigger to occur when the value is below 10.
To find out the available platforms, check here.
You can have multiple triggers in the automation by simply adding a new subsection using a hyphen to the trigger. Triggers are used in an “OR” context meaning that if any of them trigger it will start the automation.
We aren’t going to add any conditions right now, so lets go ahead and add an action:
- alias:
    Lights On - Livingroom - Sun elevation
  trigger:
  - platform: numeric_state
    entity_id: sun.sun
    value_template: '{{state.attributes.elevation}}'
    below: '10'
  condition:
  action:
  - service:
      light.turn_on
    data:
      entity_id: light.living_room_light
You can find a list of actions here. We are going to call a service which is the most common action.
We define a new section/action with the hypen, and we put “service” to state that we are calling a service which is “light.turn_on” – list of available services and syntaxes are under Developer tools then services.
Finally we define the data section and enter our entity_id with the light we want to turn on.
Save the file and exit. Go into Lovelace, Configuration and Server Control. Press the check configuration button and if you get a valid message, press the “reload automations” button or restart server.
Once reloaded go into Configurations then Automations and you should see the one you just created listed, press the toggle switch to enable it:
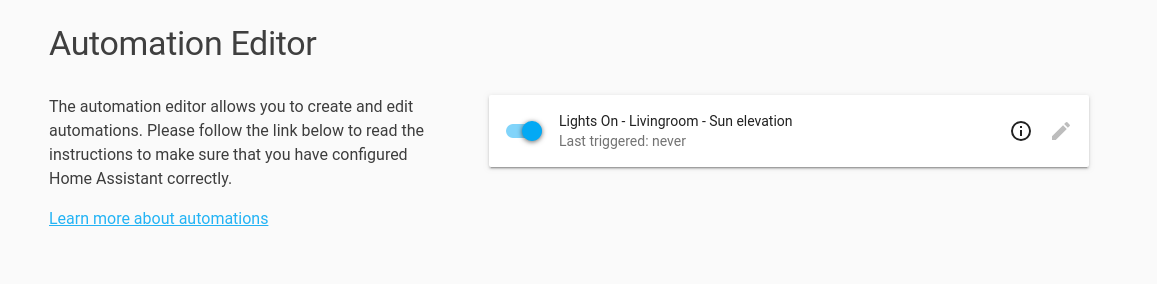
Notice how the pencil icon is greyed out because we created this automation manually.
Well done, we just successfully created our first automation! However, this only takes care of issue 1 above, but not issue 2 or 3.
Creating a smarter smart light
Let’s make this even smarter, go ahead and edit the automation config file. This time we are going to add a single condition that checks that someone is home first:
- alias:
    Lights On - Livingroom - Sun elevation
  trigger:
  - platform: numeric_state
    entity_id: sun.sun
    value_template: '{{state.attributes.elevation}}'
    below: '10'
  condition:
  - condition: state
    entity_id: person.lewis
    state: 'home'
  action:
  - service:
      light.turn_on
    data:
      entity_id: light.living_room_light
So what does this do? Now the automation will now be triggered once the sun elevation is below 10, but only if the state of the “person.lewis” entity is “home”. If “person.lewis” is not home, the automation will still trigger when the sun elevation is below 10, but the action will not be performed because the condition has not been met.
You may be asking “but what about houses where there is more than 1 person?!” – a very valid question. Let’s tackle that. Edit the automation once again and we can see that we can add multiple conditions, so we simply add the second person to the condition and all done right? Unfortunately not! You can have multiple conditions, however they must all be true for it to work. Conditions use “AND” rather than “OR”.
So lets use a template condition instead which allows us to do more advanced things. Let’s test out a template, head over to Developer Tools then templates.
Clear out anything in that box. To start, we need to create a new “if” statement. This is done by using the following syntax:
{% if (states to check) %}
  true
{% else %}
  false
{% endif %}
Using “{%” indicates a statement, using “{{” indicates an expression.
In the template box, enter the following:
{% if (is_state('person.lewis', 'home') or is_state('person.test', 'home')) %}
true
{% else %}
false
{% endif %}
What does this do? Let me try and explain it simply:
Start a new if statement, inside the normal brackets we are saying "if the state of person.lewis is home OR the state of person.test is true, return true.
else
return false, since neither are home
end if statement.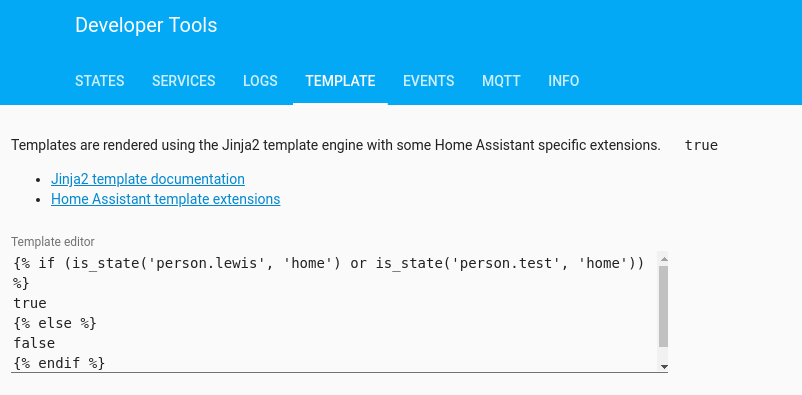
This should return “true” on the right hand side. Right click and copy this template.
Back to our config file.
Edit your automation to look like this:
- alias:
    Lights On - Livingroom - Sun elevation
  trigger:
  - platform: numeric_state
    entity_id: sun.sun
    value_template: '{{state.attributes.elevation}}'
    below: '10'
  condition:
  - condition: template
    value_template:
      '{% if (is_state("person.lewis", "home") or is_state("person.test", "home")) %}
        true
      {% else %}
        false
      {% endif %}'
  action:
  - service:
      light.turn_on
    data:
      entity_id: light.living_room_light
Go ahead and save and reload. Now we have an automation that triggers when the sun elevation is below 10, and will only execute the action if “person.lewis” is home OR “person.test” is home.
This works really nicely, but how could we expand it even further? Motion sensors are a superb way to finish this setup.
As you saw above, I have a motion sensor entity which is a binary sensor. Binary sensors only have 2 states, on or off which is perfect for motion.
So lets add our motion sensor to the mix.
We need to add the motion sensor as a trigger rather than a condition, and move the sun elevation as a condition.
We do this like so:
- alias:
    Lights On - Livingroom - Sun elevation
  trigger:
  - platform: state
    entity_id: binary_sensor.living_room_motion
    from: 'off'
    to: 'on'
  condition:
  - condition: template
    value_template:
      '{% if (is_state("person.lewis", "home") or is_state("person.test", "home")) %}
        true
      {% else %}
        false
      {% endif %}'
  - condition: numeric_state
    entity_id: sun.sun
    value_template: '{{state.attributes.elevation}}'
    below: '10'
  action:
  - service:
      light.turn_on
    data:
      entity_id: light.living_room_light
Reload the config again.
So what to we have now? Well, we have a light that will turned on if the motion sensor is triggered, but only if the elevation of the sun is below 10 AND either “person.lewis” is home OR “person.test” is home.
You might be wondering if having the person home condition is redundant if using motion, well yes and no. One reason you might want to leave this on is to stop any pets potentially triggering all the lights while you are out.
Now we have a pretty smart, smart light. Apart from the fact that currently it will stay on indefinitely. That’s easy to fix!
We are going to add a new automation to the file by adding a new section. The trigger is going to be when the motion sensor moves to state ‘off’ and this time we are going to use the “for” option, which allows us to say that an entity must have had that state for a certain period of time, in our case 30 minutes. The automation on its own should look like this:
- alias:
    Lights Off - Livingroom - no motion 30 minutes
  trigger:
  - platform: state
    entity_id: binary_sensor.living_room_motion
    to: 'off'
    for: 00:30:00
  condition:
  action:
  - service:
      light.turn_off
    data:
      entity_id: light.living_room_light
And the full config with our previous automation will look like this:
- alias:
    Lights On - Livingroom - Sun elevation
  trigger:
  - platform: state
    entity_id: binary_sensor.living_room_motion
    from: 'off'
    to: 'on'
  condition:
  - condition: template
    value_template:
      '{% if (is_state("person.lewis", "home") or is_state("person.test", "home")) %}
        true
      {% else %}
        false
      {% endif %}'
  - condition: numeric_state
    entity_id: sun.sun
    value_template: '{{state.attributes.elevation}}'
    below: '10'
  action:
  - service:
      light.turn_on
    data:
      entity_id: light.living_room_light
- alias:
    Lights Off - Livingroom - no motion 30 minutes
  trigger:
  - platform: state
    entity_id: binary_sensor.living_room_motion
    to: 'off'
    for: 00:30:00
  condition:
  action:
  - service:
      light.turn_off
    data:
      entity_id: light.living_room_light
We don’t need any conditions in this instance and go ahead and add the light to the action as we did before but this time using “light.turn_off” service.
Make sure to reload then go into Automations in Configuration and click the toggle switch to enable it.
Nice, we have just created an automation to turn on light that comes on via motion when its dark, and one that turns it off when no one is in the room!
Creating movie mode lights
So we have a light that is controlled via motion which is great. Let’s take a look at another template example and another scenario.
How can we switch off lights automatically when we start watching something on Netflix or Amazon Prime or Plex for the best TV watching experience? Easy!
First lets take another look at the media_player entity (which is a Chromecast Ultra), take a look at the attributes if I start playing something from Netflix:

You can see it gives us the application name in the attributes – excellent! This means we can create automations based on the application name. For example I can automatically switch the lights off when I start playing something from Netflix, Amazon Prime or Plex since these are usually things I want to watch without distraction. However if playing from YouTube I want to keep the lights on since I often have YouTube on in the background.
Create a new automation and this time the trigger is going to be when the media player goes to “playing” state.
Add a condition that checks if the state of the light is already on – no point doing anything if the light is already off for example.
Then add a second condition, this time we are going to add a condition that checks if the application name is either Netflix, Amazon Prime or Plex. We do that using similar syntax to before, except this time we use the “is_state_attr” instead of “is_state”, basically we are checking the attribute of an entity rather than its state:
{% if
(is_state_attr('media_player.living_room_tv', 'app_name', 'Prime Video') or is_state_attr('media_player.living_room_tv', 'app_name', 'Netflix') or is_state_attr('media_player.living_room_tv', 'app_name', 'Plex')) %}
true
{% endif %}
Then we add our usual light.turn_off service. The full automation entry should look like this:
- alias:
    Lights Off - Livingroom - Movie Mode
  trigger:
  - platform: state
    entity_id: media_player.living_room_tv
    to: playing
  condition:
  - condition: state
    entity_id: light.living_room_light
    state: 'off'
  - condition: template
    value_template:
      '{% if (is_state_attr("media_player.living_room_tv", "app_name", "Prime Video") or is_state_attr("media_player.living_room_tv", "app_name", "Netflix") or is_state_attr("media_player.living_room_tv", "app_name", "Plex")) %}
        true
      {% endif %}'
  action:
  - service:
      light.turn_off
    data:
      entity_id: light.living_room_light
Save and reload, then give it a try! Everytime you hit the play button, the light will now turn off!
Let’s create our final automation which will do the reverse, if the film is paused or stopped, the light will come back on:
- alias:
    Lights On - Livingroom - Movie Mode
  trigger:
  - platform: state
    entity_id: media_player.living_room_tv
    from: 'playing'
  condition:
  - condition: numeric_state
    entity_id: sun.sun
    value_template: '{{state.attributes.elevation}}'
    below: '10'
  action:
  - service:
      light.turn_on
    data:
      entity_id: light.living_room_light
You can see in the second image we had the sun condition again, since we don’t want the light to come on in the middle of the day.
Here is the full configuration file for this entire guide, should look something a little like this:
- alias:
    Lights On - Livingroom - Sun elevation
  trigger:
  - platform: state
    entity_id: binary_sensor.living_room_motion
    from: 'off'
    to: 'on'
  condition:
  - condition: template
    value_template:
      '{% if (is_state("person.lewis", "home") or is_state("person.test", "home")) %}
        true
      {% else %}
        false
      {% endif %}'
  - condition: numeric_state
    entity_id: sun.sun
    value_template: '{{state.attributes.elevation}}'
    below: '10'
  action:
  - service:
      light.turn_on
    data:
      entity_id: light.living_room_light
- alias:
    Lights Off - Livingroom - no motion 30 minutes
  trigger:
  - platform: state
    entity_id: binary_sensor.living_room_motion
    to: 'off'
    for: 00:30:00
  condition:
  action:
  - service:
      light.turn_off
    data:
      entity_id: light.living_room_light
- alias:
    Lights Off - Livingroom - Movie Mode
  trigger:
  - platform: state
    entity_id: media_player.living_room_tv
    to: playing
  condition:
  - condition: state
    entity_id: light.living_room_light
    state: 'off'
  - condition: template
    value_template:
      '{% if (is_state_attr("media_player.living_room_tv", "app_name", "Prime Video") or is_state_attr("media_player.living_room_tv", "app_name", "Netflix") or is_state_attr("media_player.living_room_tv", "app_name", "Plex")) %}
        true
      {% endif %}'
  action:
  - service:
      light.turn_off
    data:
      entity_id: light.living_room_light
- alias:
    Lights On - Livingroom - Movie Mode
  trigger:
  - platform: state
    entity_id: media_player.living_room_tv
    from: 'playing'
  condition:
  - condition: numeric_state
    entity_id: sun.sun
    value_template: '{{state.attributes.elevation}}'
    below: '10'
  action:
  - service:
      light.turn_on
    data:
      entity_id: light.living_room_light
Of course, you can add whichever streaming services you use to the automation to suit your house.
Now we have a fully functioning smart light setup!
Look out for part 5 where we will cover notifications in detail, that should be coming very soon!