Automating Washing Machine Reminders with Home Assistant
Automate reminders so you never forget to empty the washing machine again!
Intro
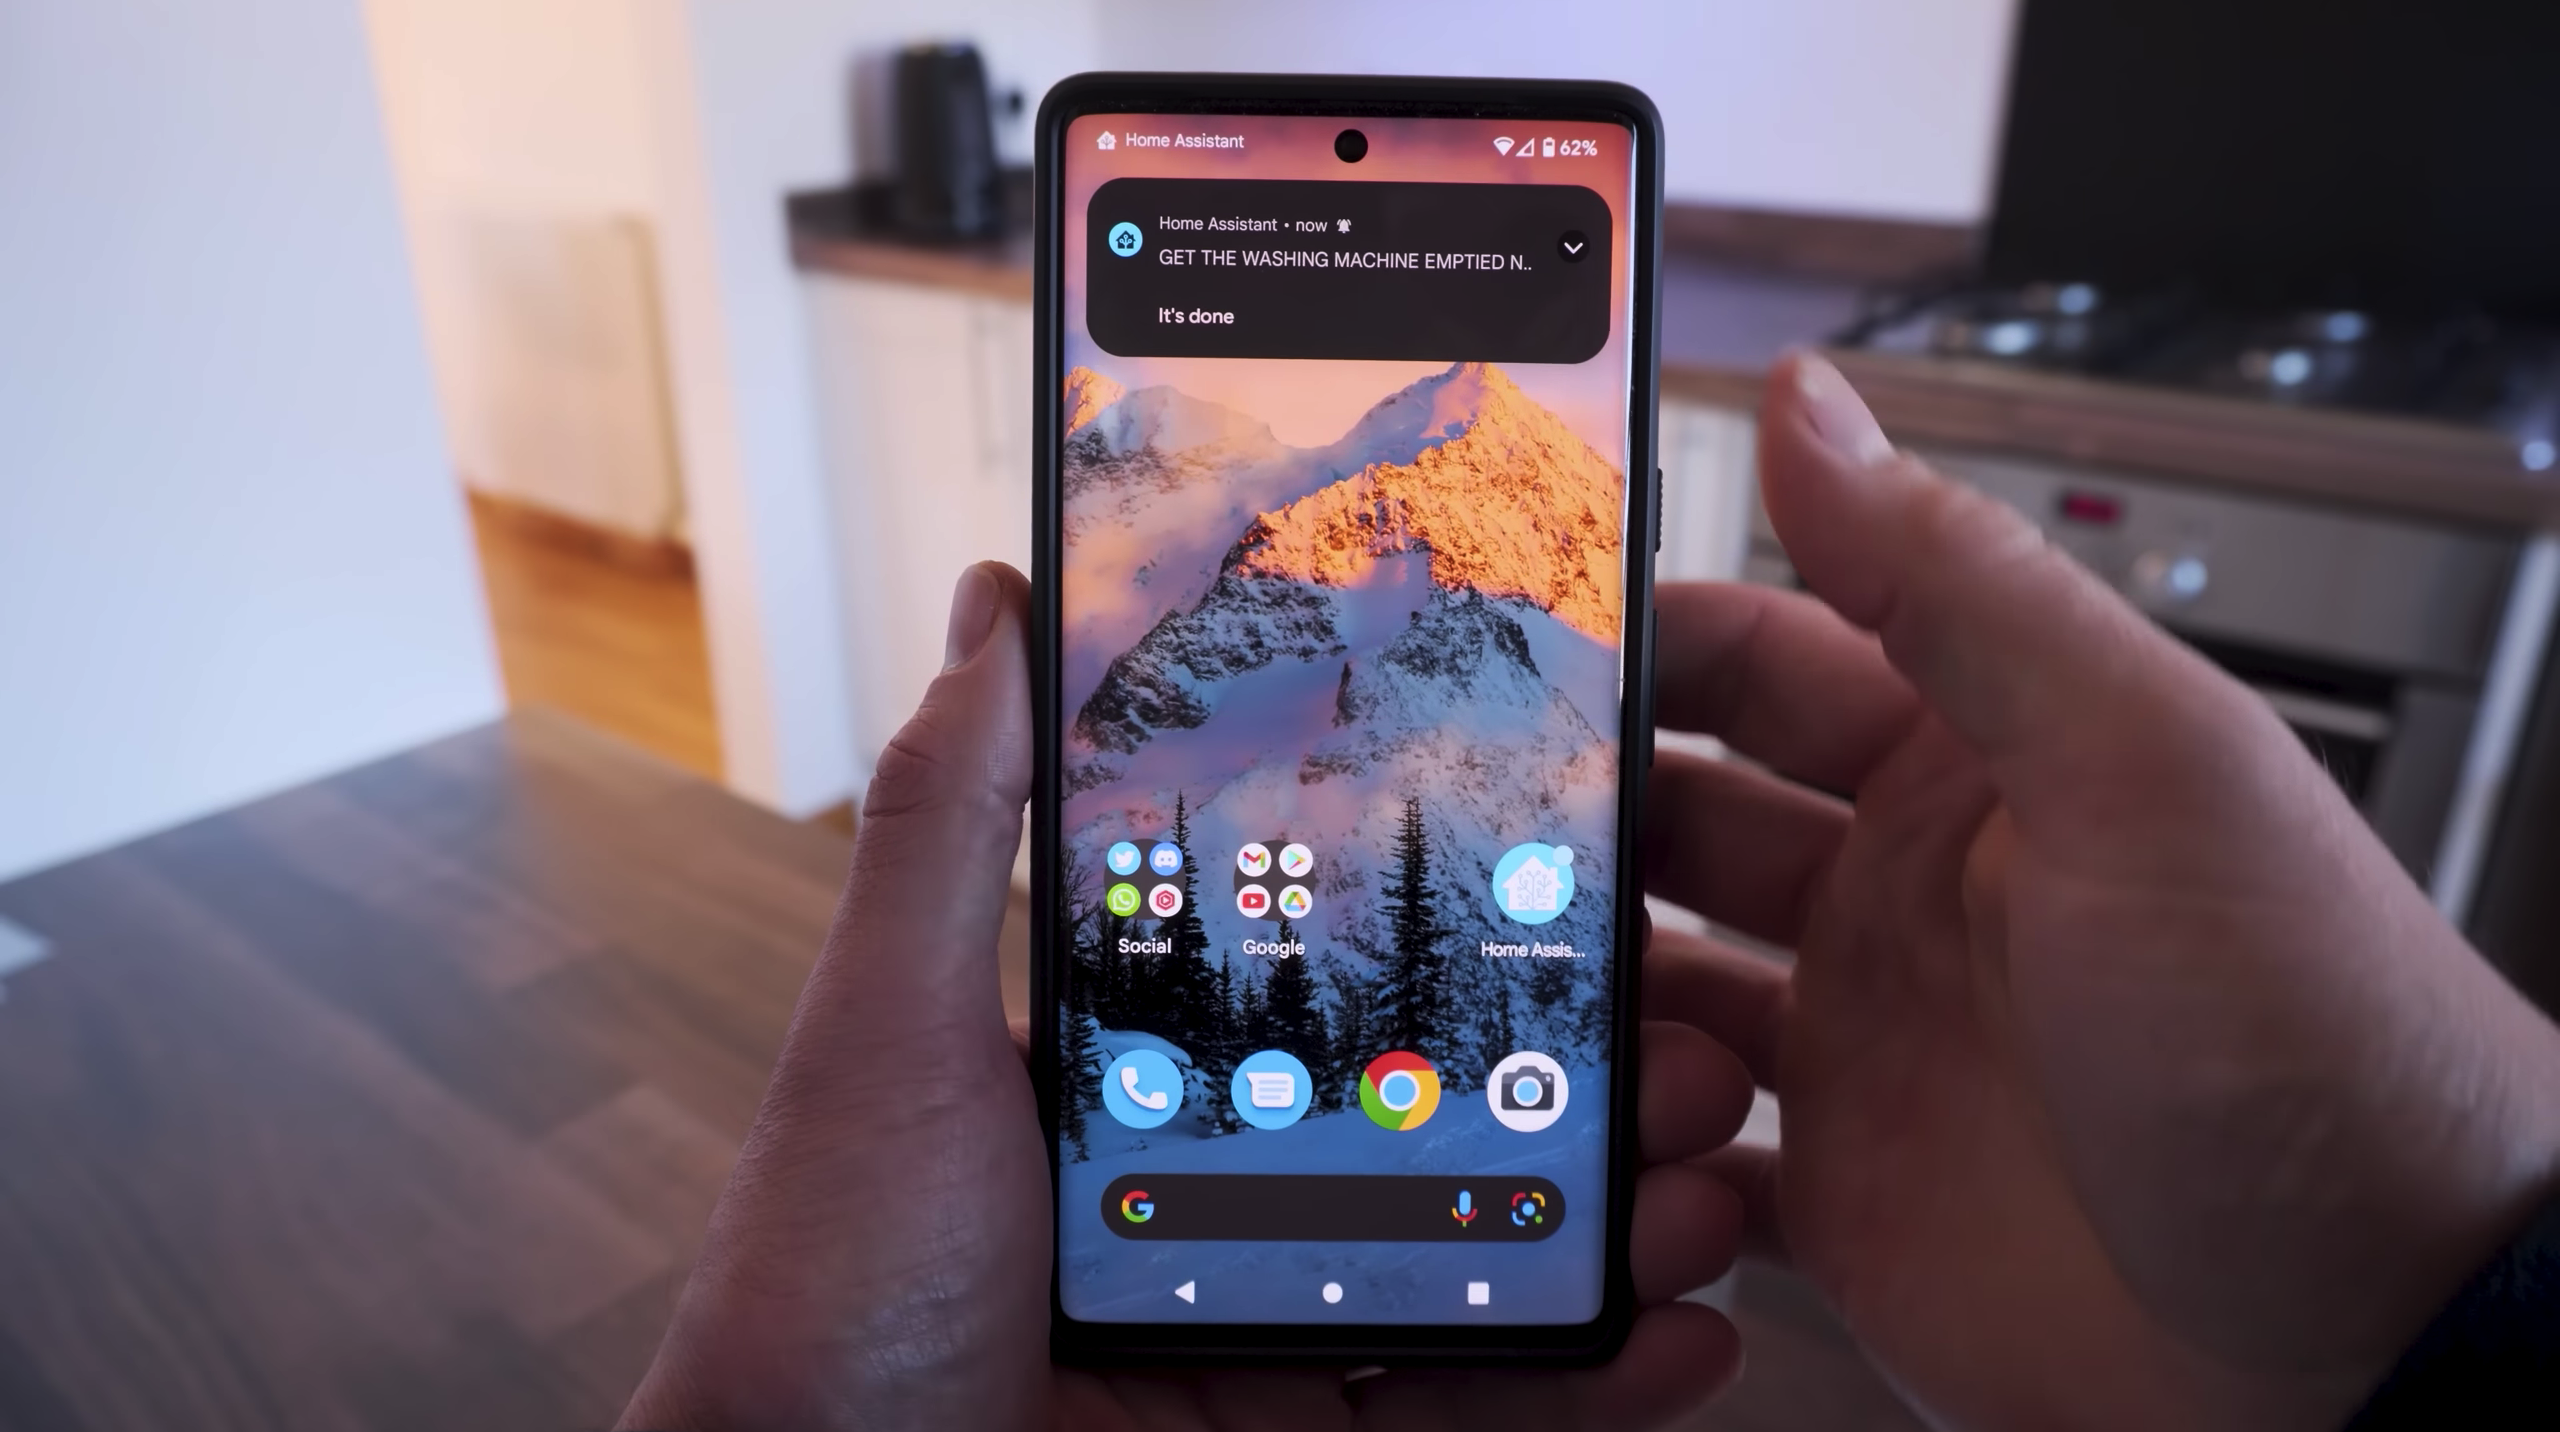
Washing machine reminders are for notifications that let you know when the washing machine is finished running so you don’t forget to empty it (if you've never forgotten to empty it in a timely manner then kudos!)
Little reminder that while I use this on my washing machine, it can be used for your dishwasher, tumble dryer, etc.
The common approach to this is to use vibration sensors stuck to the side of the machine; essentially when vibration stops, that is usually an indicator that it's finished.
However, I prefer to use a Smart Energy Plug attached to the machine and I like to send persistent reminders that can't swipe away until you've pressed the button to say that the jobs complete. I had to implement this due to some "accidental" swiping and I can confirm that is has been quite effective!
Let's get started then, shall we?
Scroll right to the bottom for the YAML code 👇🏼
How It's Done
Requirements:
- A smart plug or device like a Shelly that has energy/power monitoring connected to Home Assistant - make sure it can support the amount of watts that a washing machine or dryer can output.
- I'm using a Zigbee smart plug from Develco - it's really nice and compact, if a little expensive.
- Ajax also have a Zigbee plug that works - there was a problem with some of the original ones where the relay would turn off after a few minutes but they say this is fixed.
- The Shelly 1PM - works incredibly well, but involves a little more work than a smart plug.
- A smart phone setup in Home Assistant with the companion app for notifications
Input Helpers
The first thing we are going to do is create two input helpers - one that tracks the cycle of the washing machine and one that tracks if the machine has been emptied or not for our annoying persistent notification.
Head over to Settings, Devices and Services and select the Helpers tab.
Create a new input helper and choose the "Dropdown" type. Give it a name of "Washing machine status" and then add the following options:
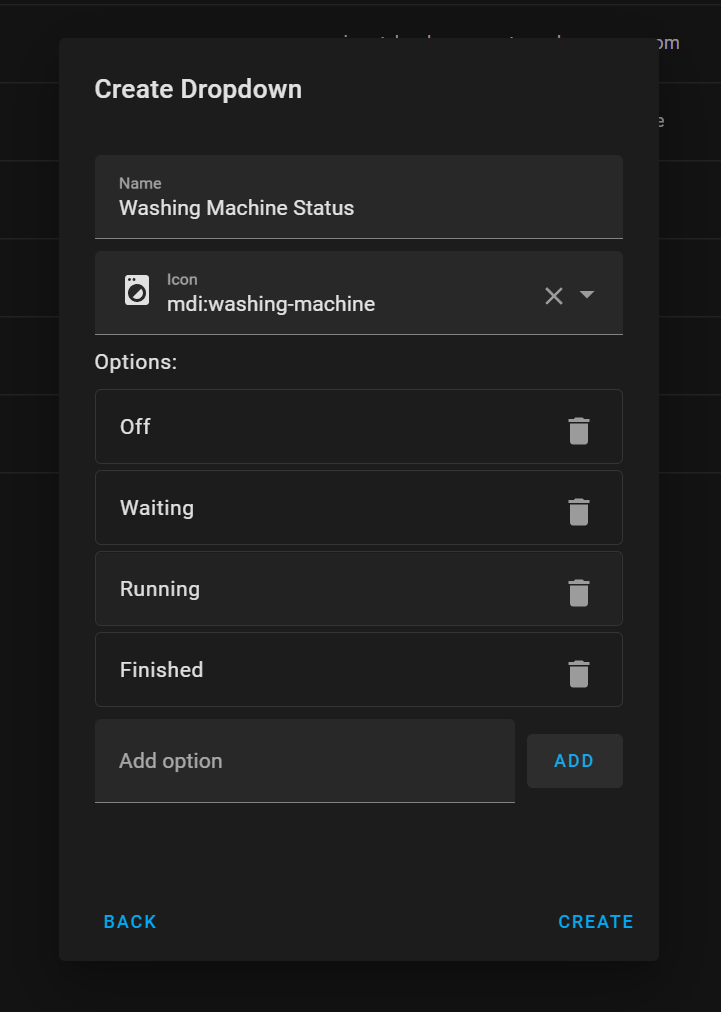
Hit the create button to save this helper.
Add a second input helper and this time select "Toggle" as the type. Enter a name of "Washing machine emptied" and then hit create to save:
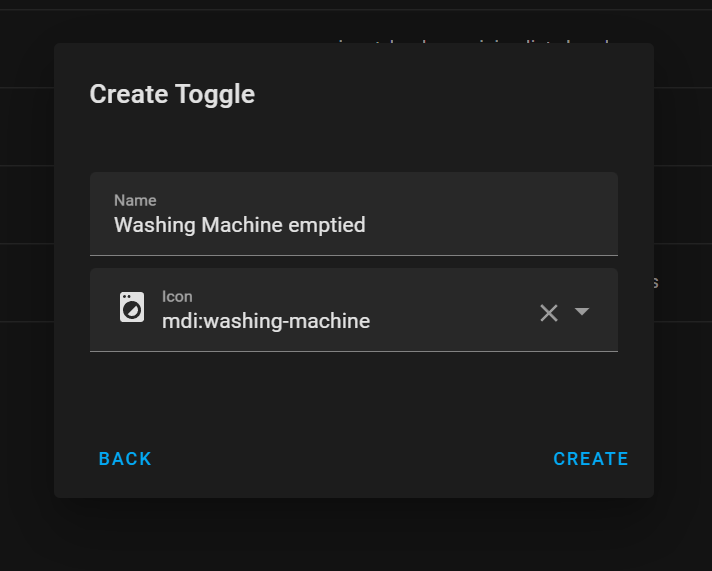
Both input helpers are now created and we can now move onto the automations!
The First Automation - Setting status
We are going to create 3 automations (although its possible to condense these):
- One that sets the status of the washing machine as it goes through various states
- One that sends the persistent notification when the machine is finished
- One that handles the action when the machine has been emptied
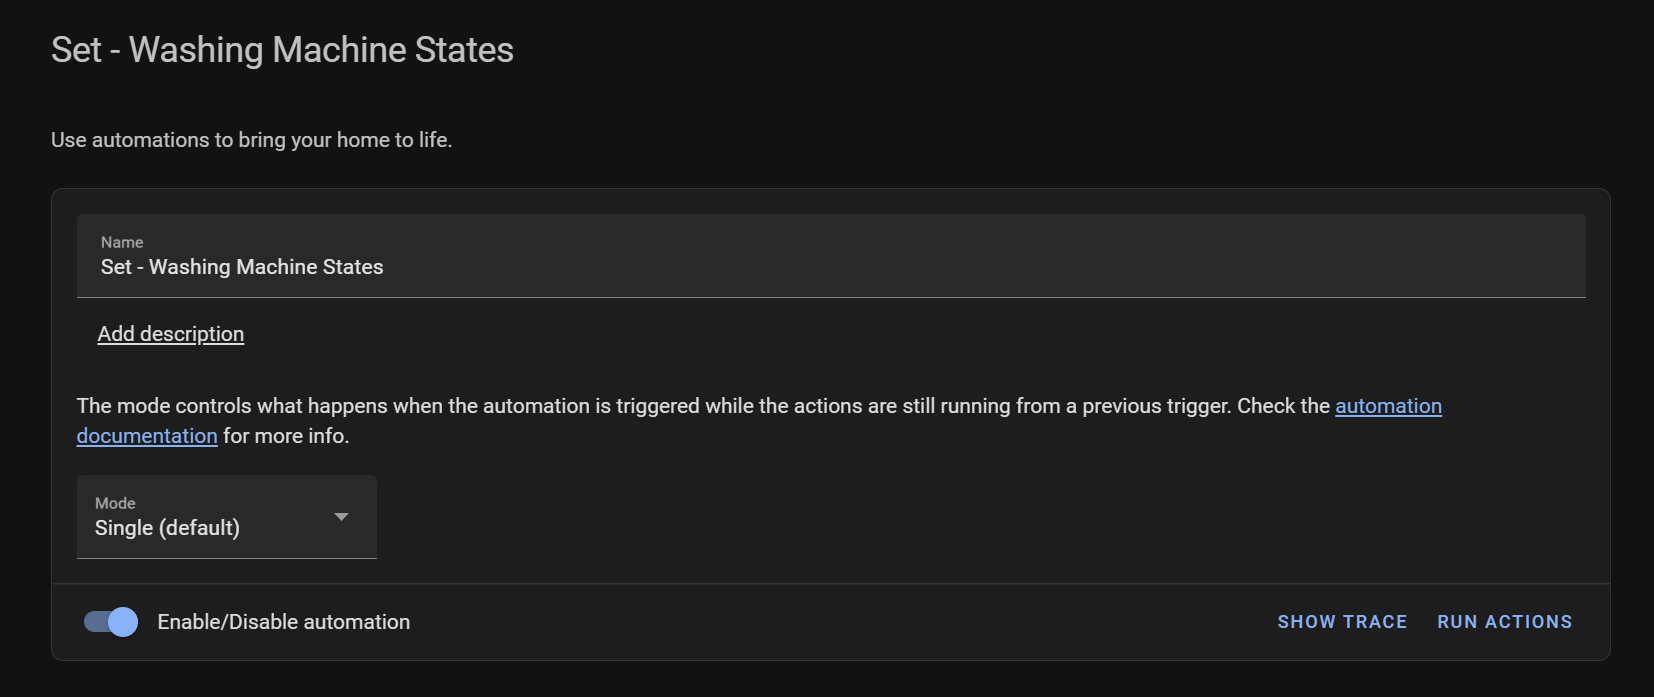
Head over to Configuration, Automations and Scripts and create a new blank automation. Give this a name:
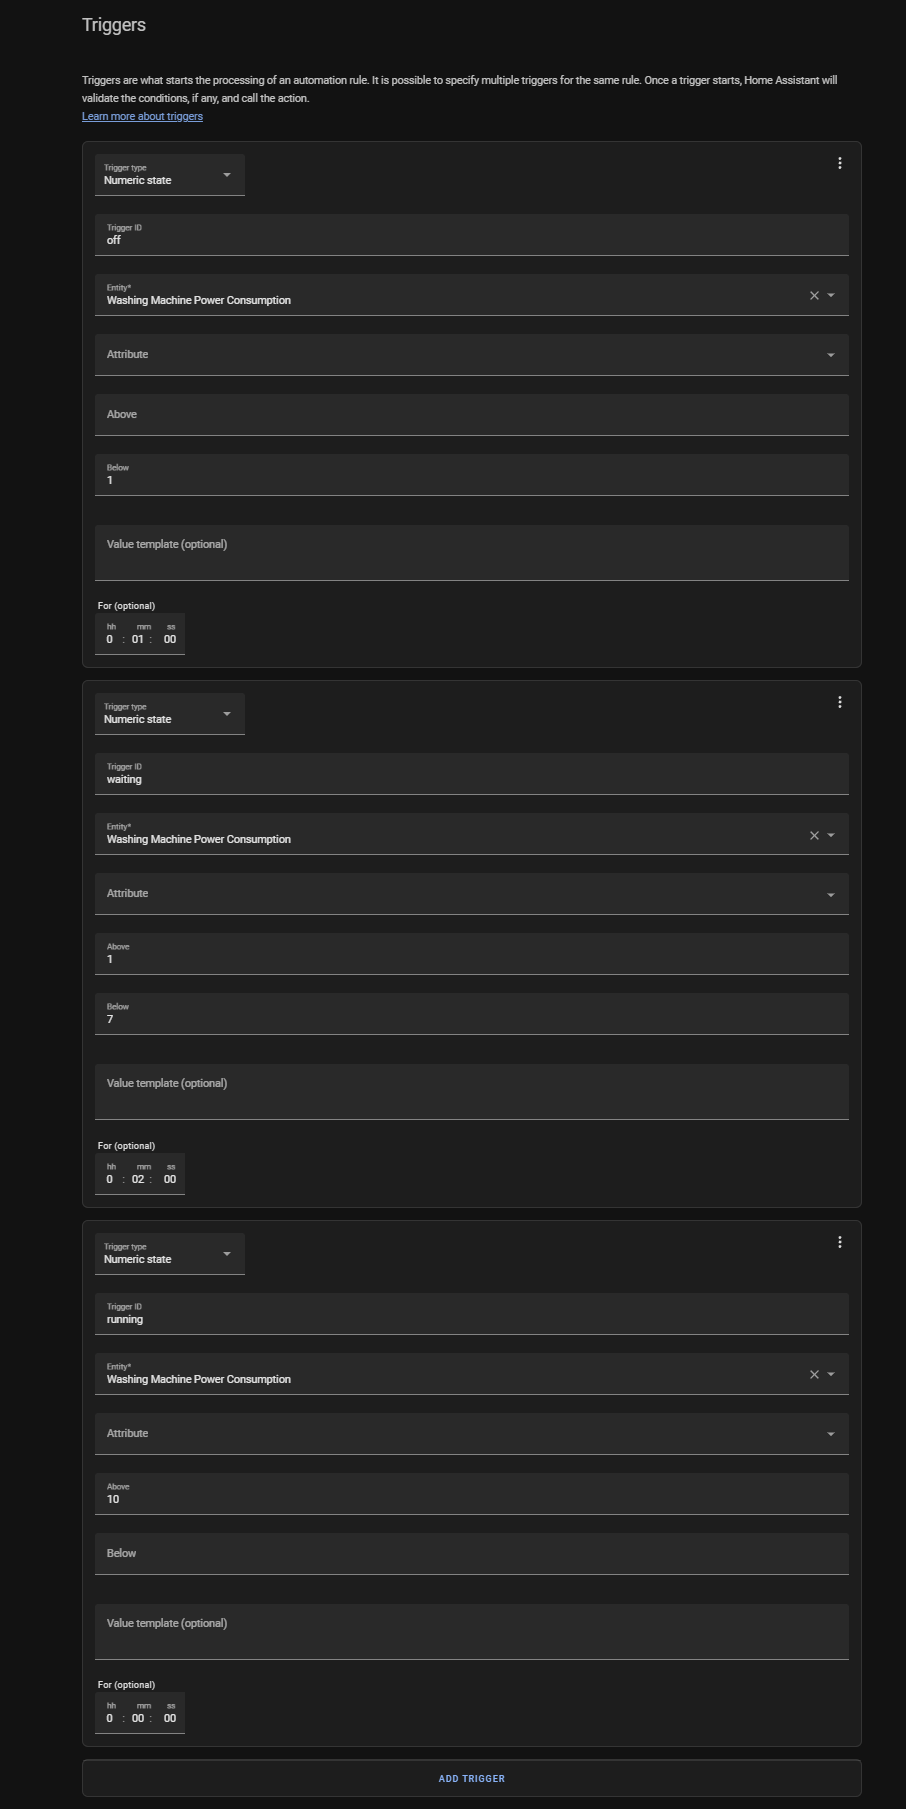
In the triggers section, we are going to create 3 different triggers, one for "off", one for "waiting" and one for "running".
These triggers will require just a little bit of investigation on your end - since everyone will have different values depending on their washing machine.
I'll first show you the triggers I've created and then I'll explain how to get the values for your machine.
The first trigger I create is for the off state. Select "Numeric state" from the trigger type drop-down.
Then in the entity drop-down, select the smart plug you have attached to your washing machine - make sure to choose the entity that gives you the real-time current energy consumption and not the accumulating value otherwise it won't work.
In the "Below" box, enter the number 1 and then in the "For" box enter 1 minute.
Finally, hit the three dots in the right hand corner of the trigger and select "Edit trigger ID" - in the box that appears, give it a descriptive name that we can reference later.
Your trigger should look like this:
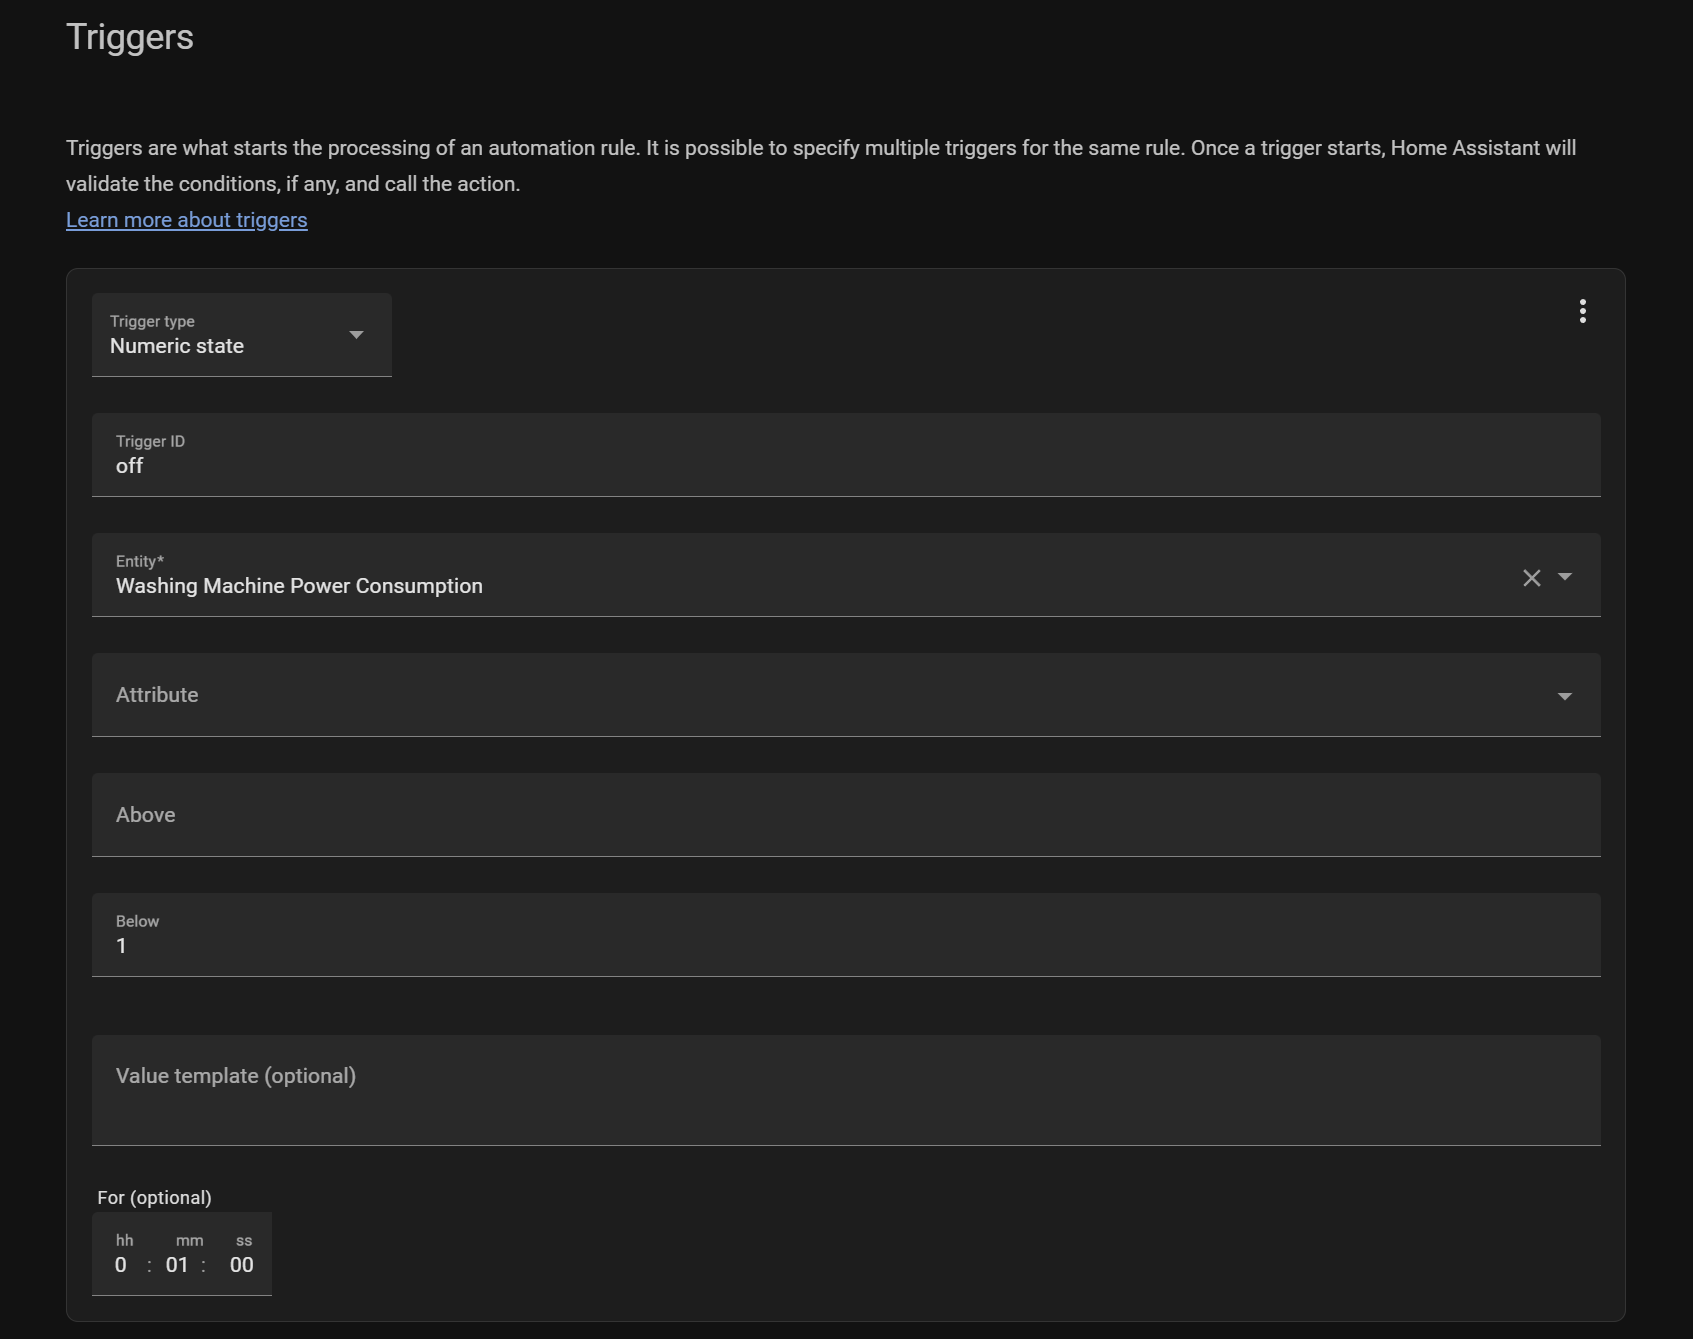
In summary, this tells our automation to trigger whenever the current energy consumption is below 1 watt for 1 minute.
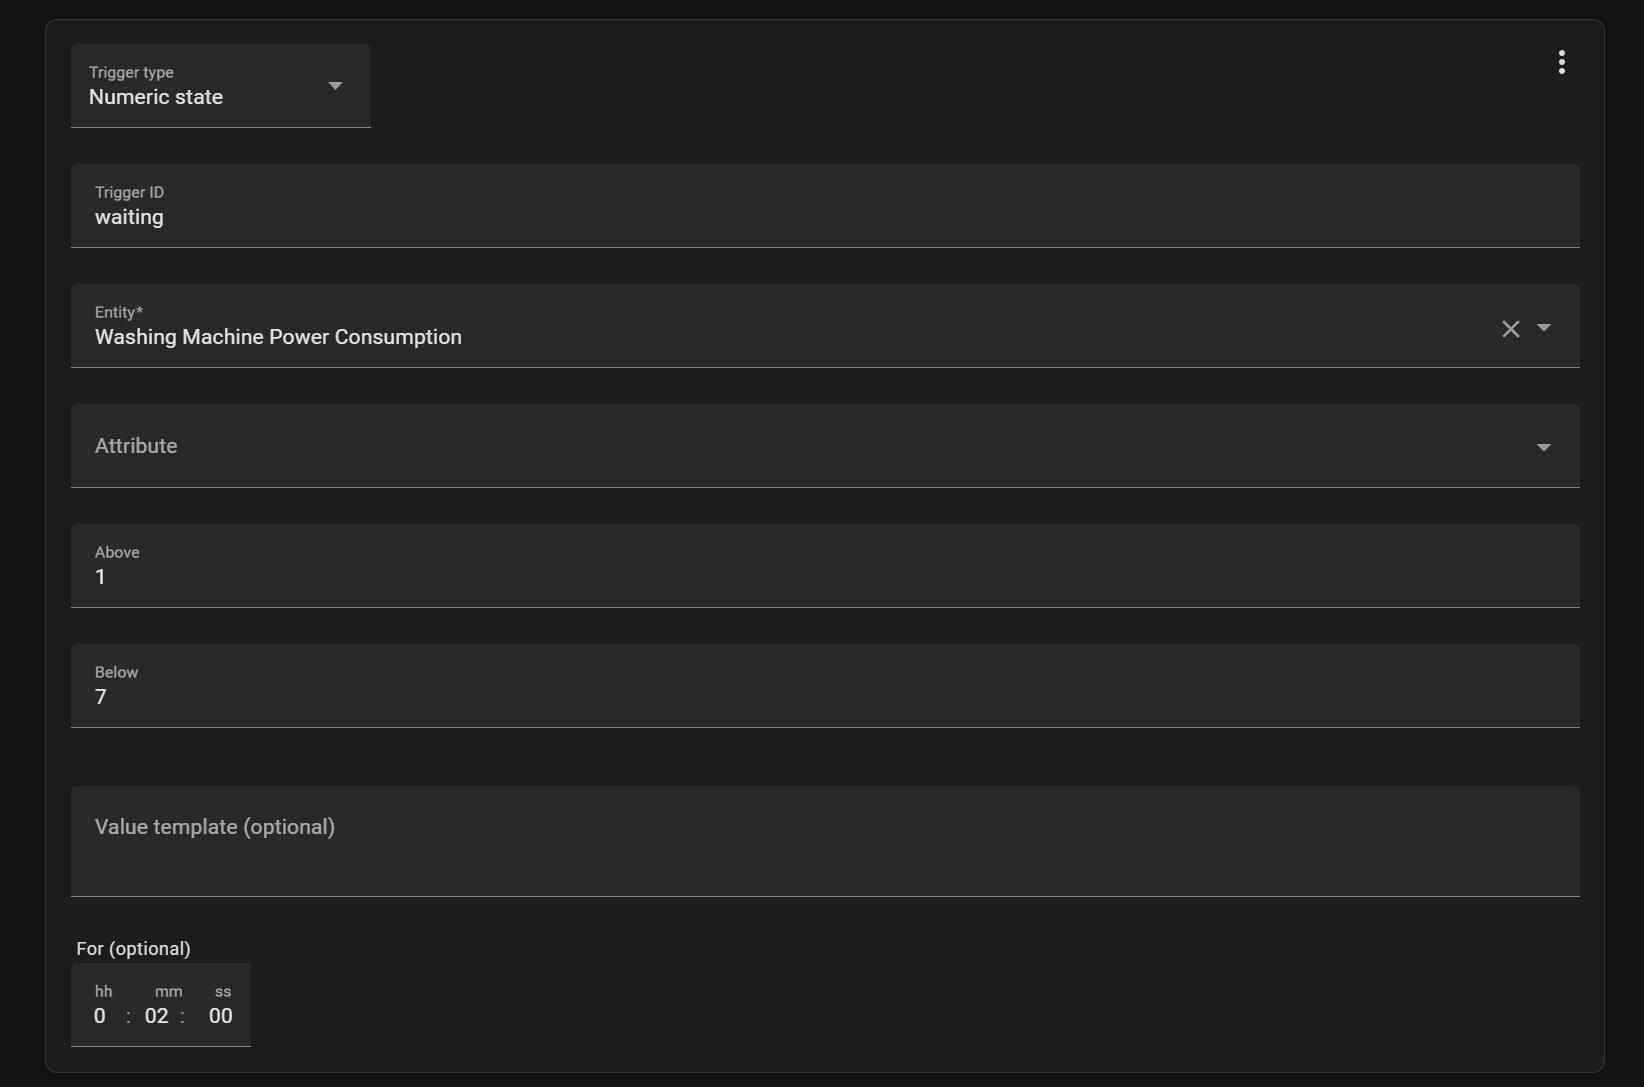
I'll add a second trigger for waiting:
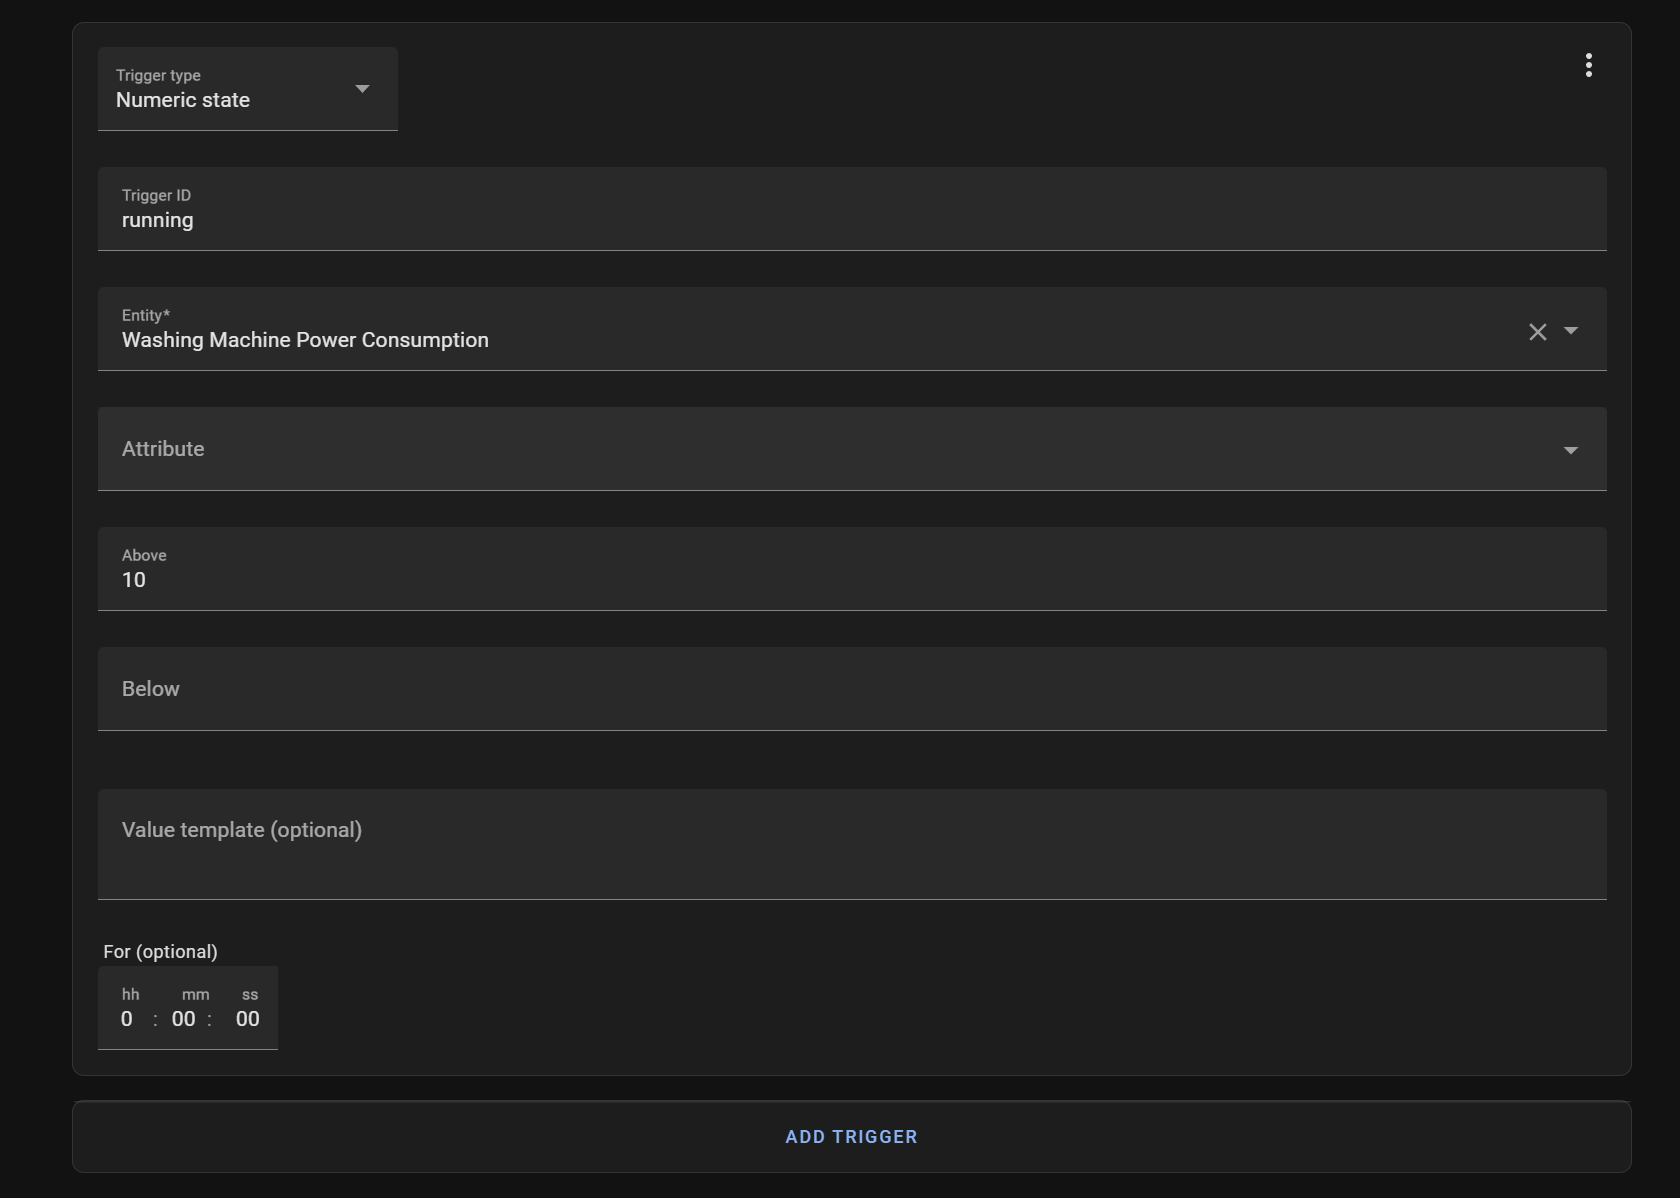
And a final third trigger for running:
All 3 triggers together look like this:
So as mentioned, these values are specific to my washing machine and you need to gather your own values. So how did I get these?
Simple - just run your washing machine through a full normal cycle and then take a look at the usage on the history page:
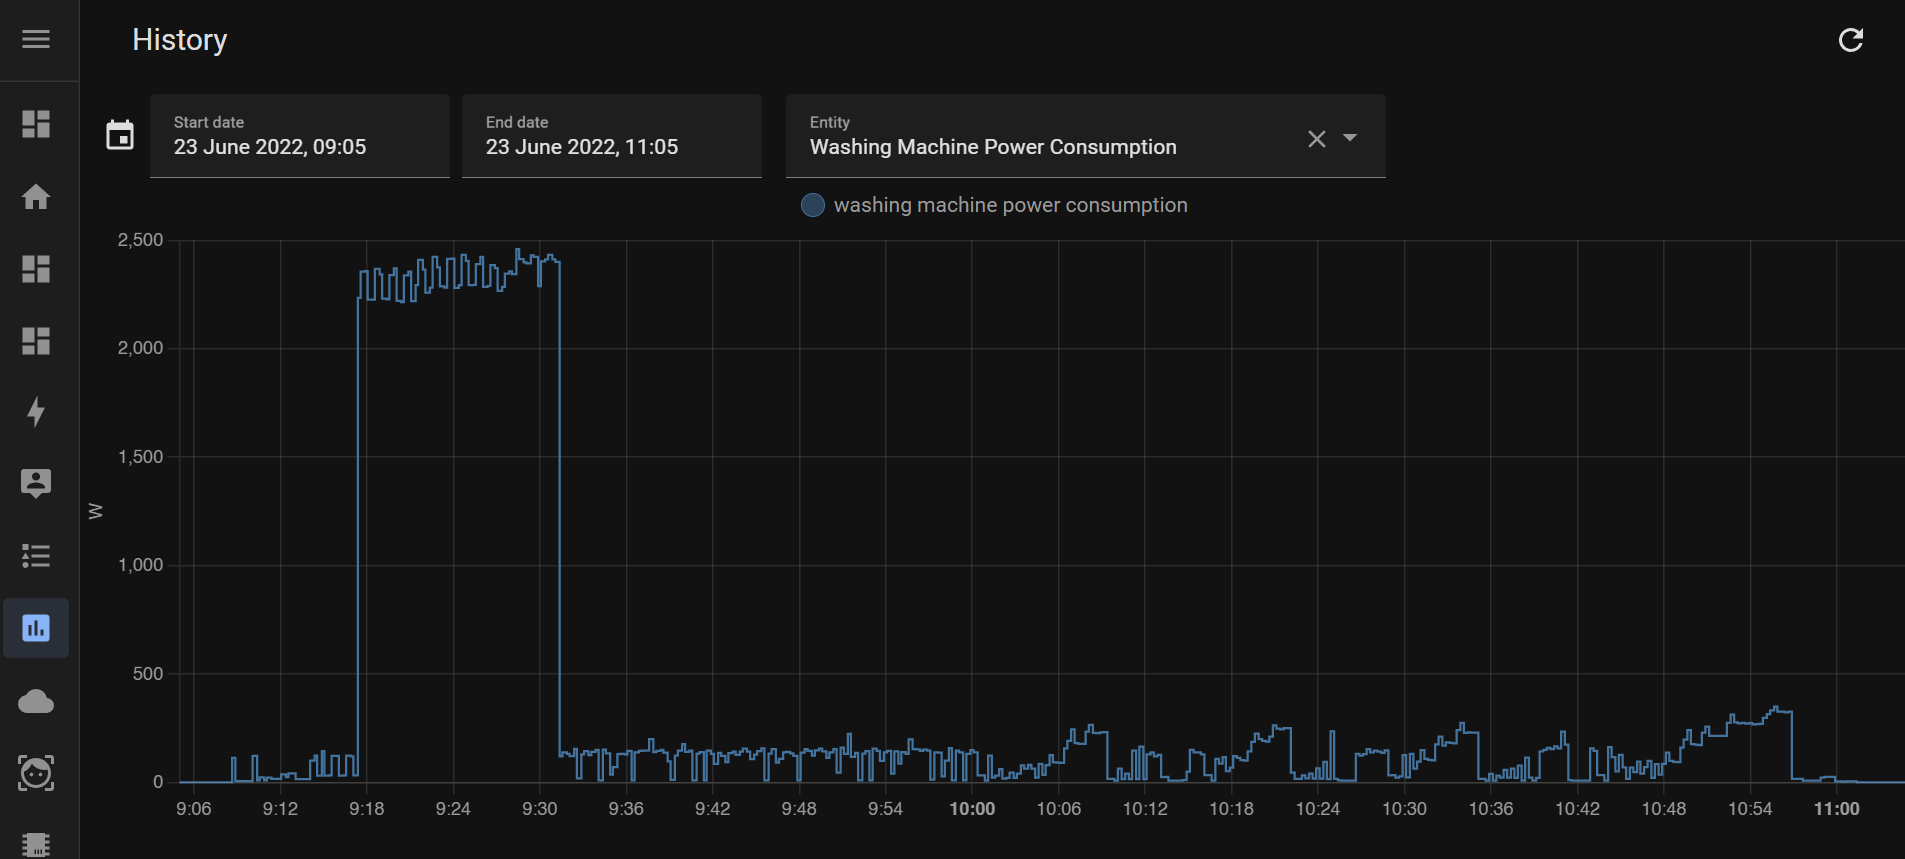
Here is the entire history of my washing machine as it goes through a normal cycle. By hovering my mouse over different sections of it, we can get the energy usage and put those values into the above automation. For example, here is the consumption for mine when I first turn it on, but haven't yet selected a cycle:
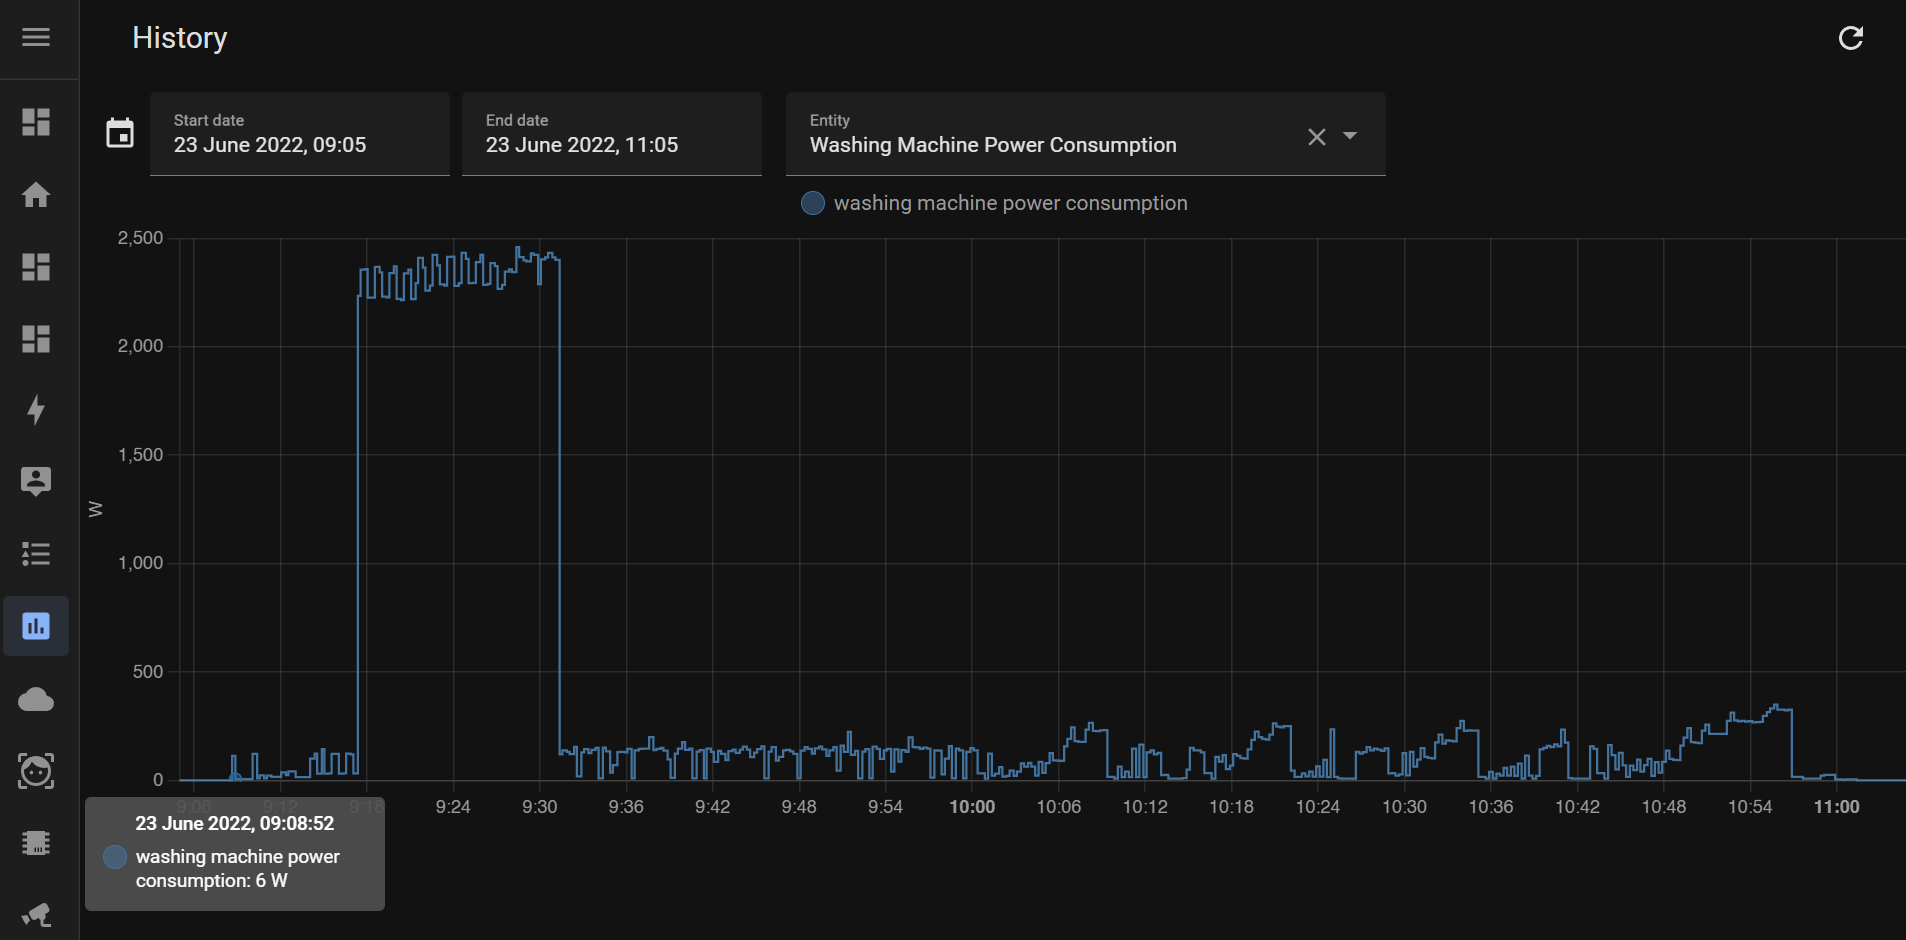
So 6 watts at idle. If you check back the trigger from earlier, you will see that my "waiting" trigger is set to above 1 and below 7:
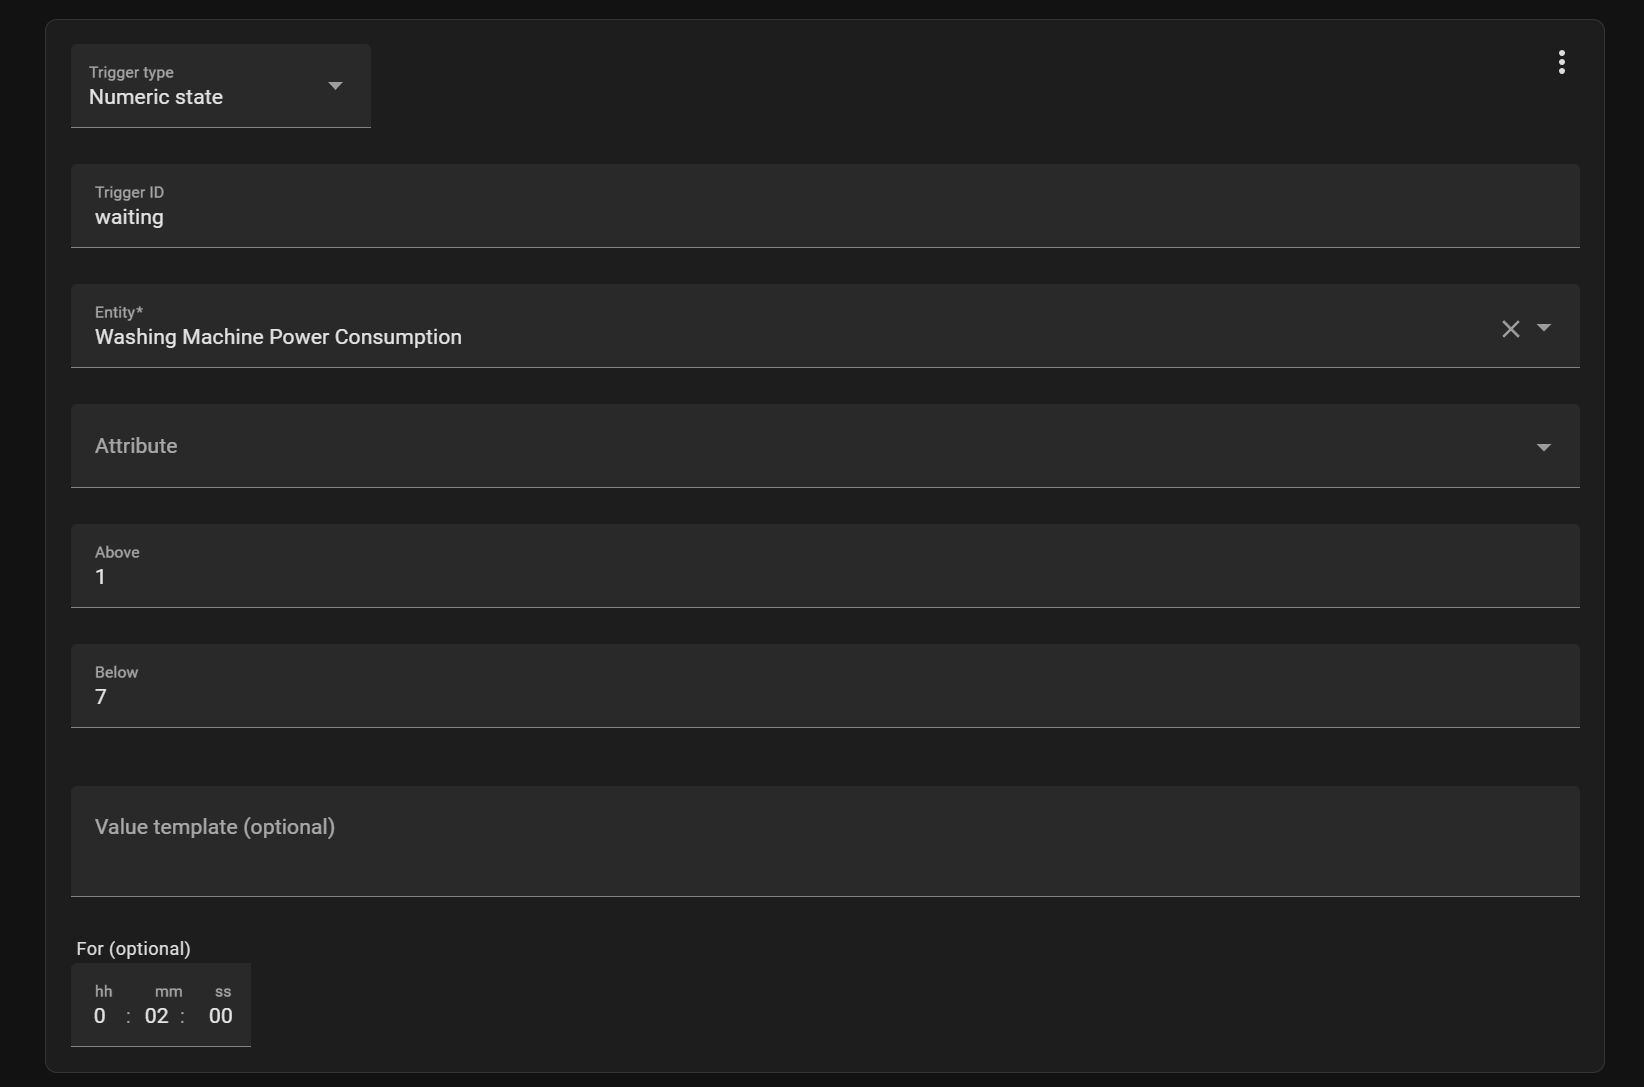
The reason I don't do exactly 6w but do a slight range is that sometimes the plug can read ever so slightly different - 5.8 watts or 6.2 watts - so this makes sure it always works OK.
We can then see that as soon as I start the machine, it goes above 10w:
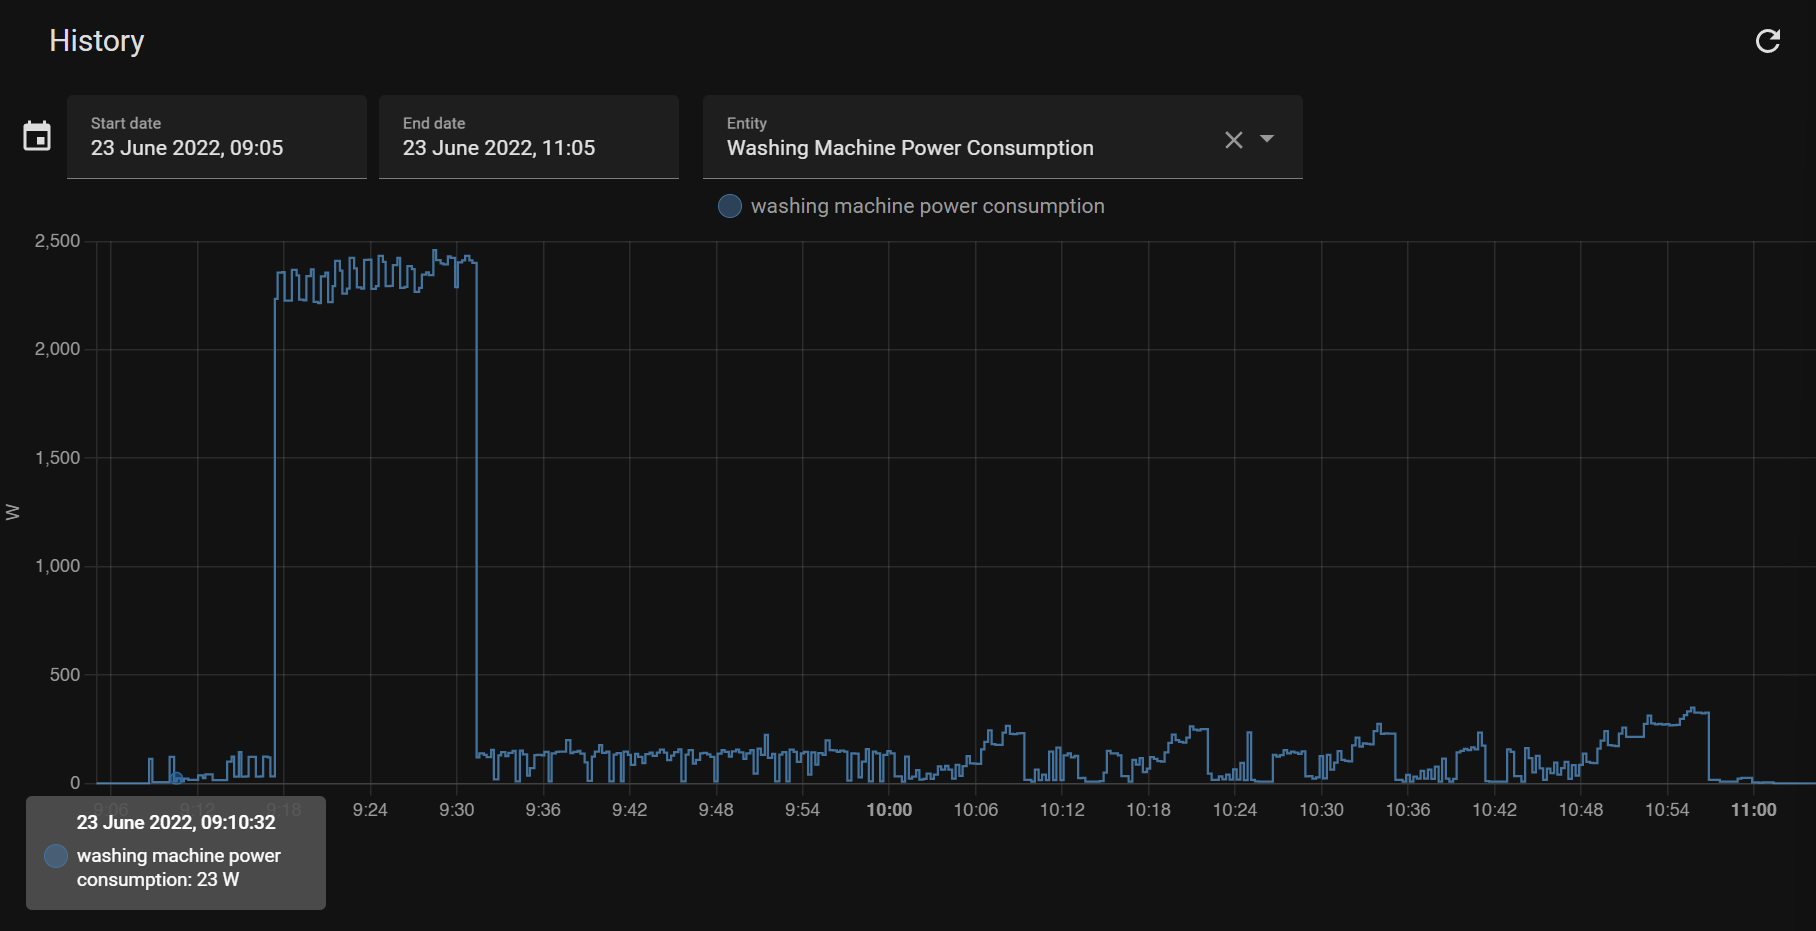
Where it generally remains above through the cycle - there is some points where it will dip below 10, but they are never for more than 30-60 seconds - which is where the "for 2 minutes" bit comes in:
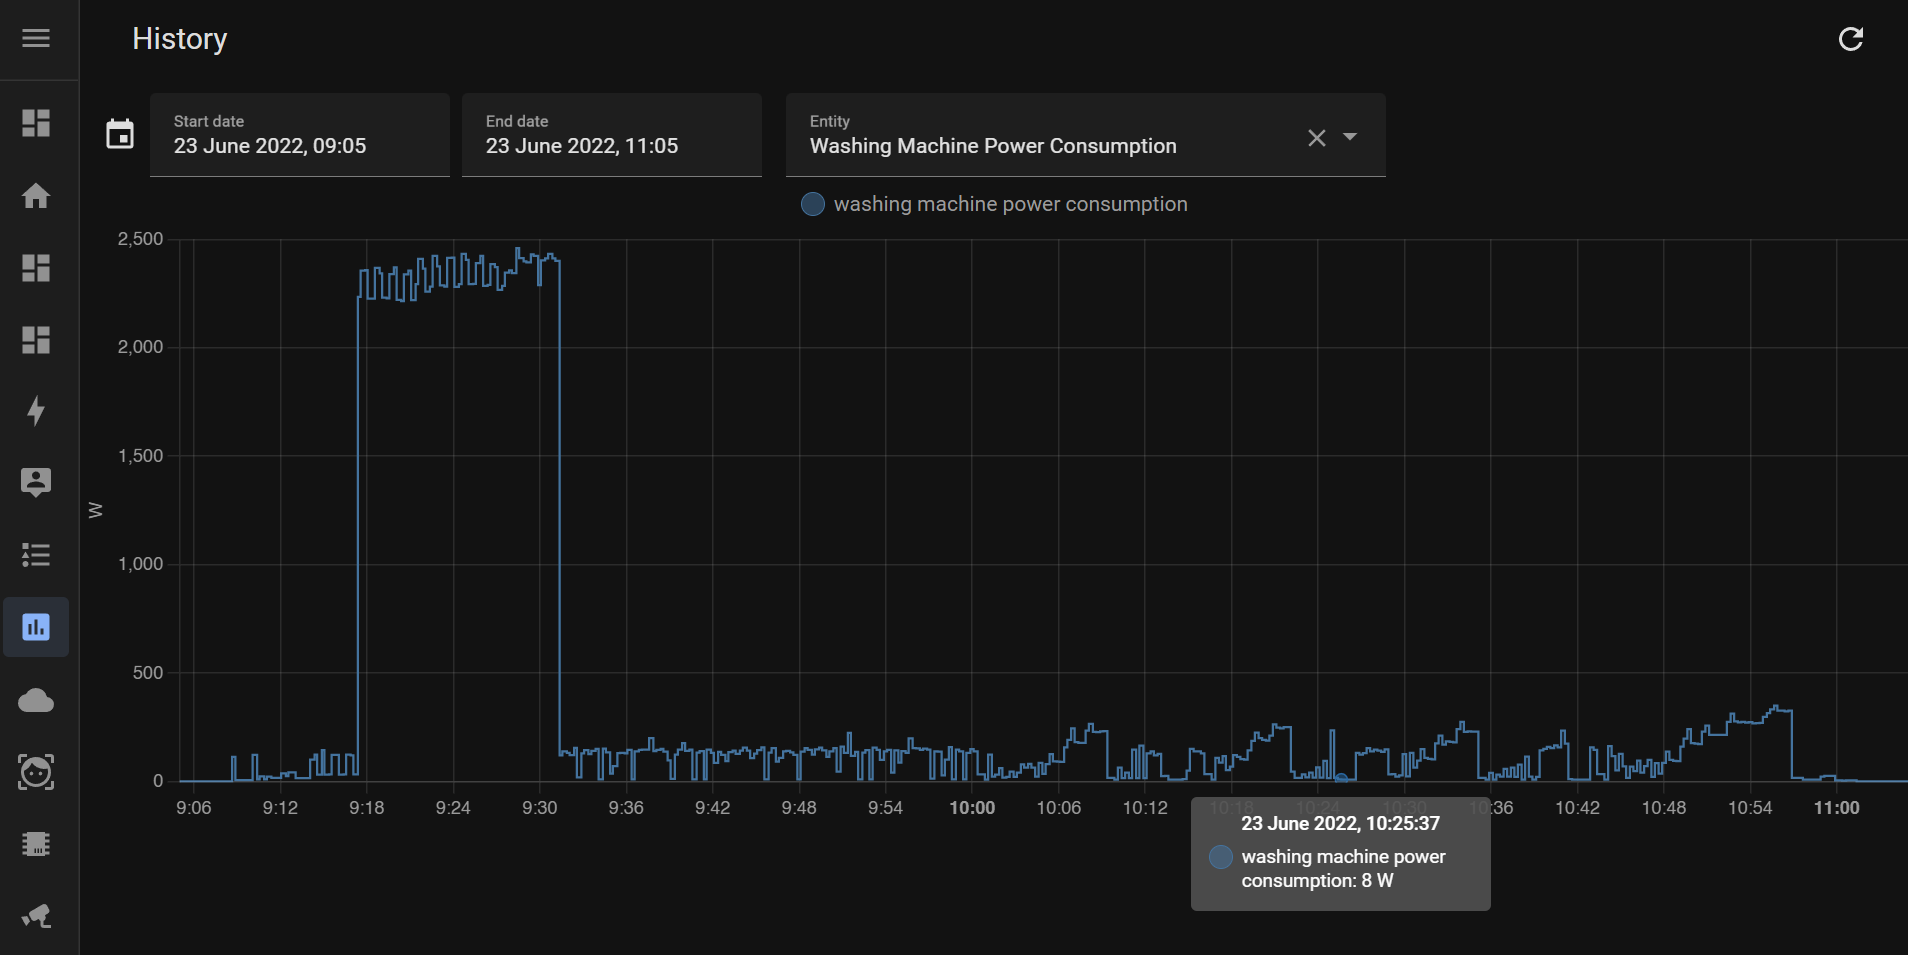
As long as it is never below 10 watts for 2 minutes, which it isn't, then the automation won't trigger.
Back to our automation - things are going to seem a little complex, but it should make sense at the end.
We are going to make use of the "choose" action and then using the "trigger ID" that we set earlier, we can figure out what we need to actually set. We are going to create 4 "choices":
- If the "Off" trigger fires THEN we set the status to "off" - simple.
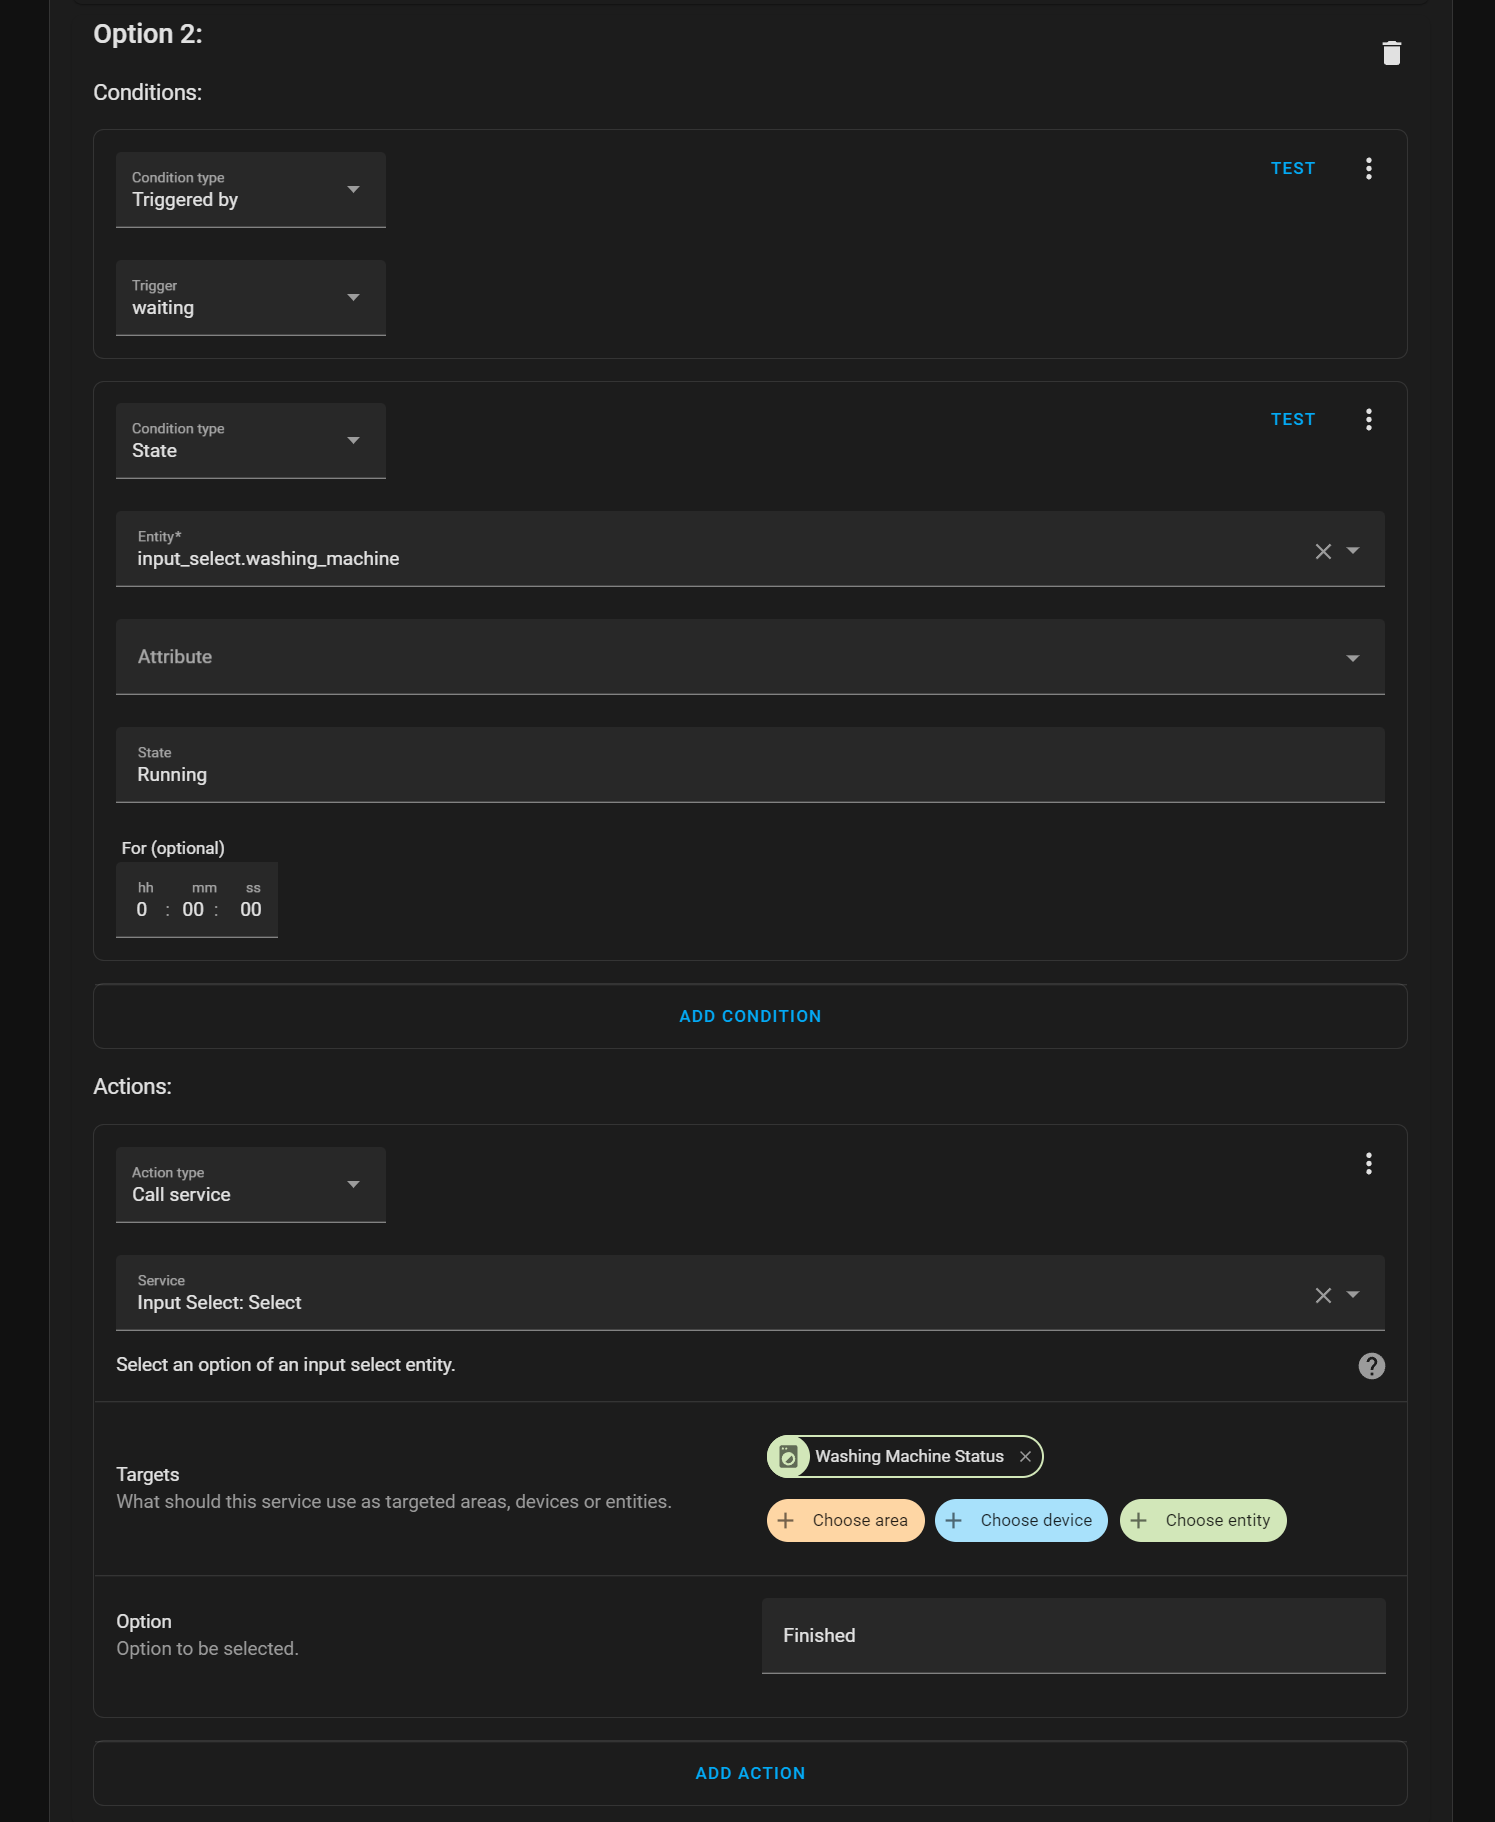
- If the current status of the washing machine is "Running" AND the "Waiting" trigger fires THEN we set the status to "Finished" - we can assume that if the machine was running and it changes to "waiting" then likely the machine just finished
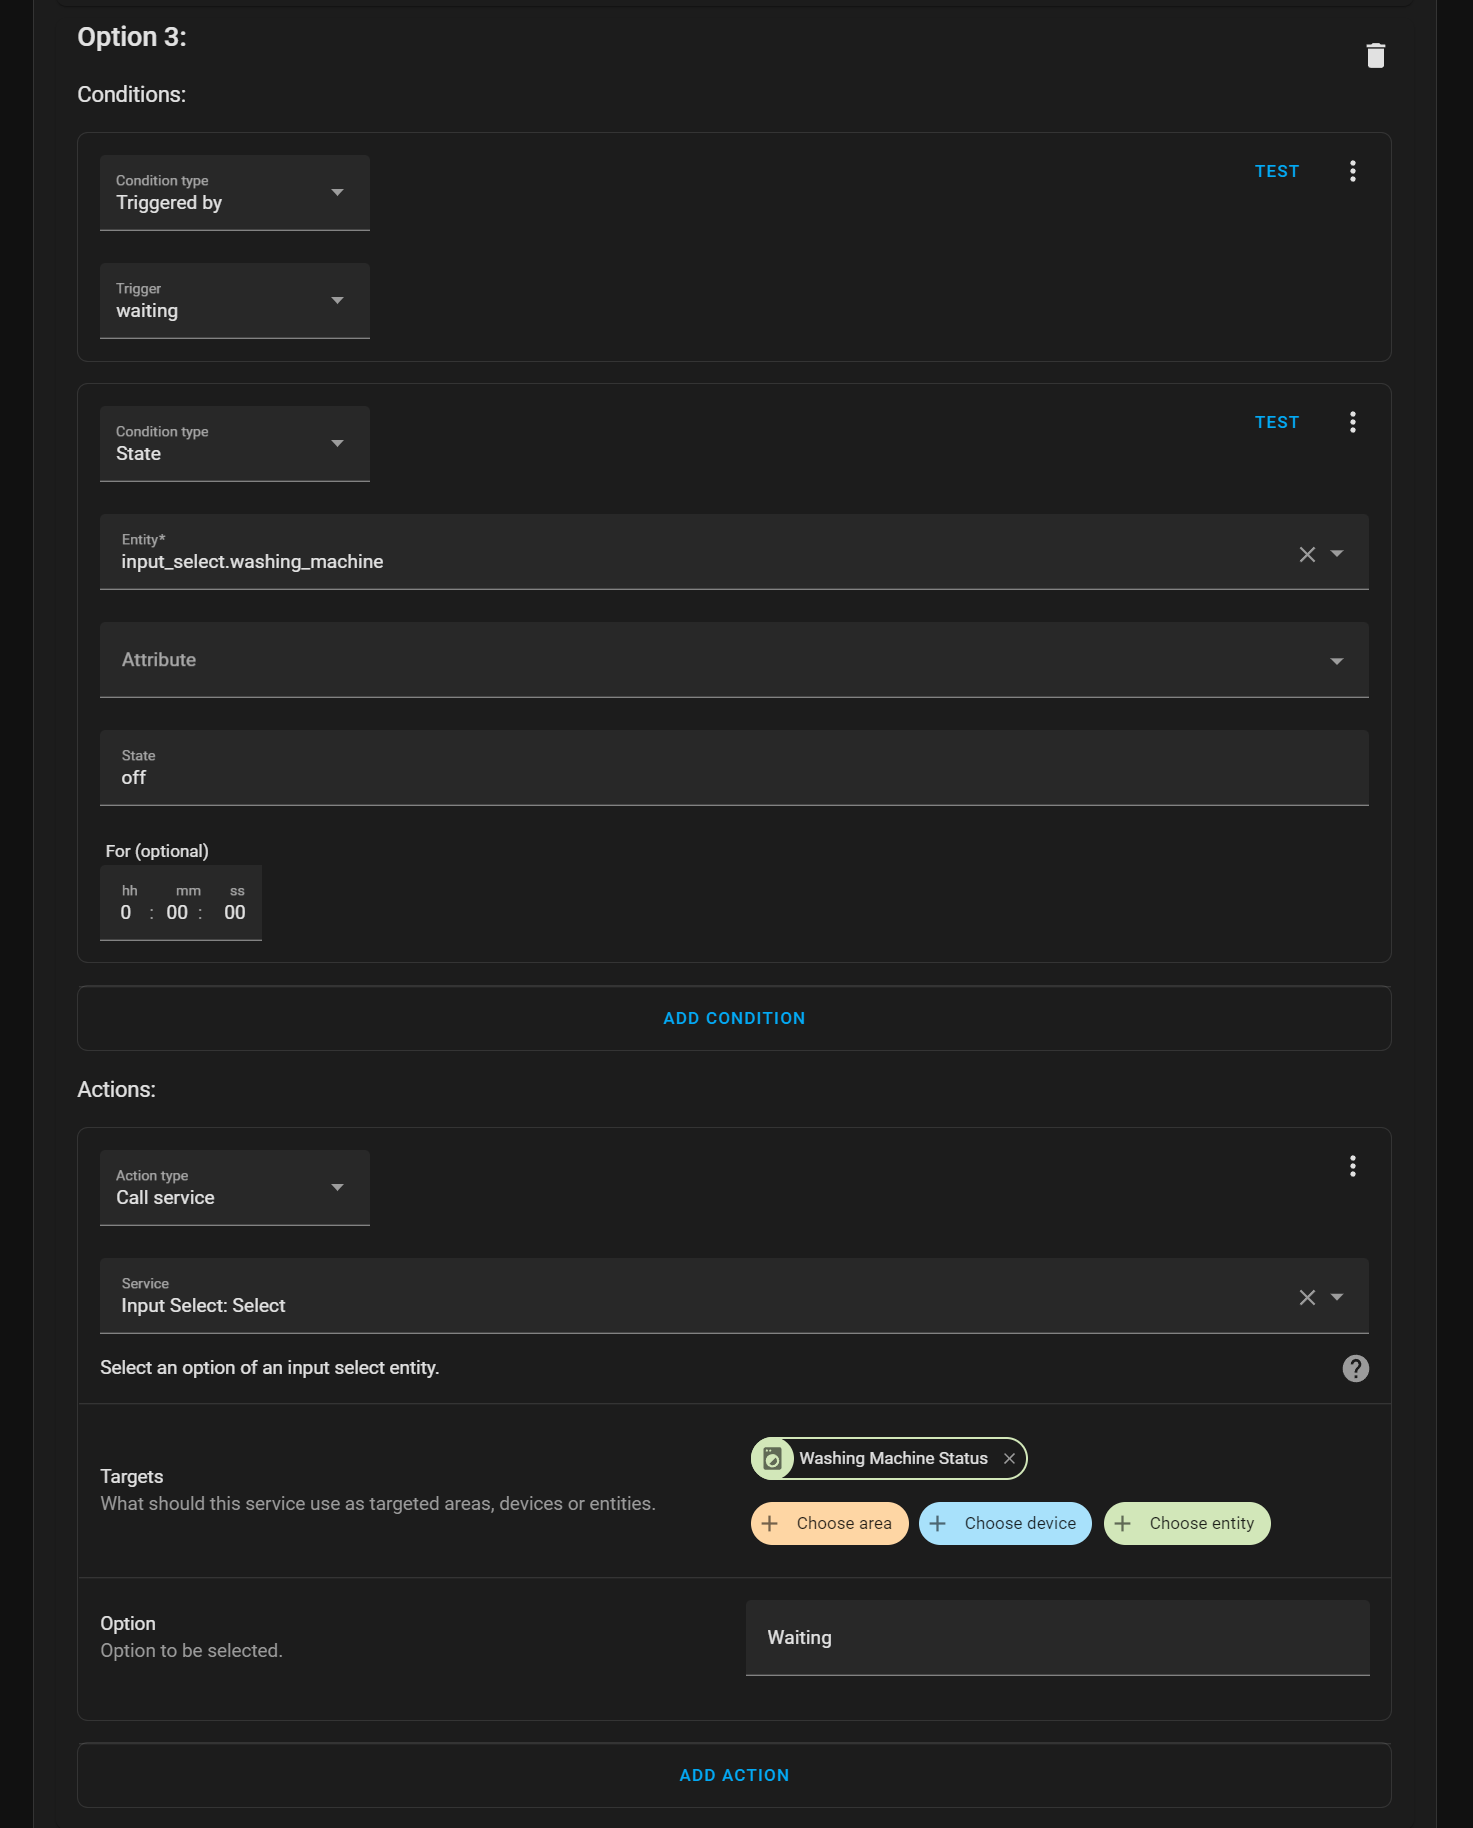
- If the current status of the washing machine is "Off" AND the "Waiting" trigger fires THEN we can set the status to "Waiting" - because it just turned on!
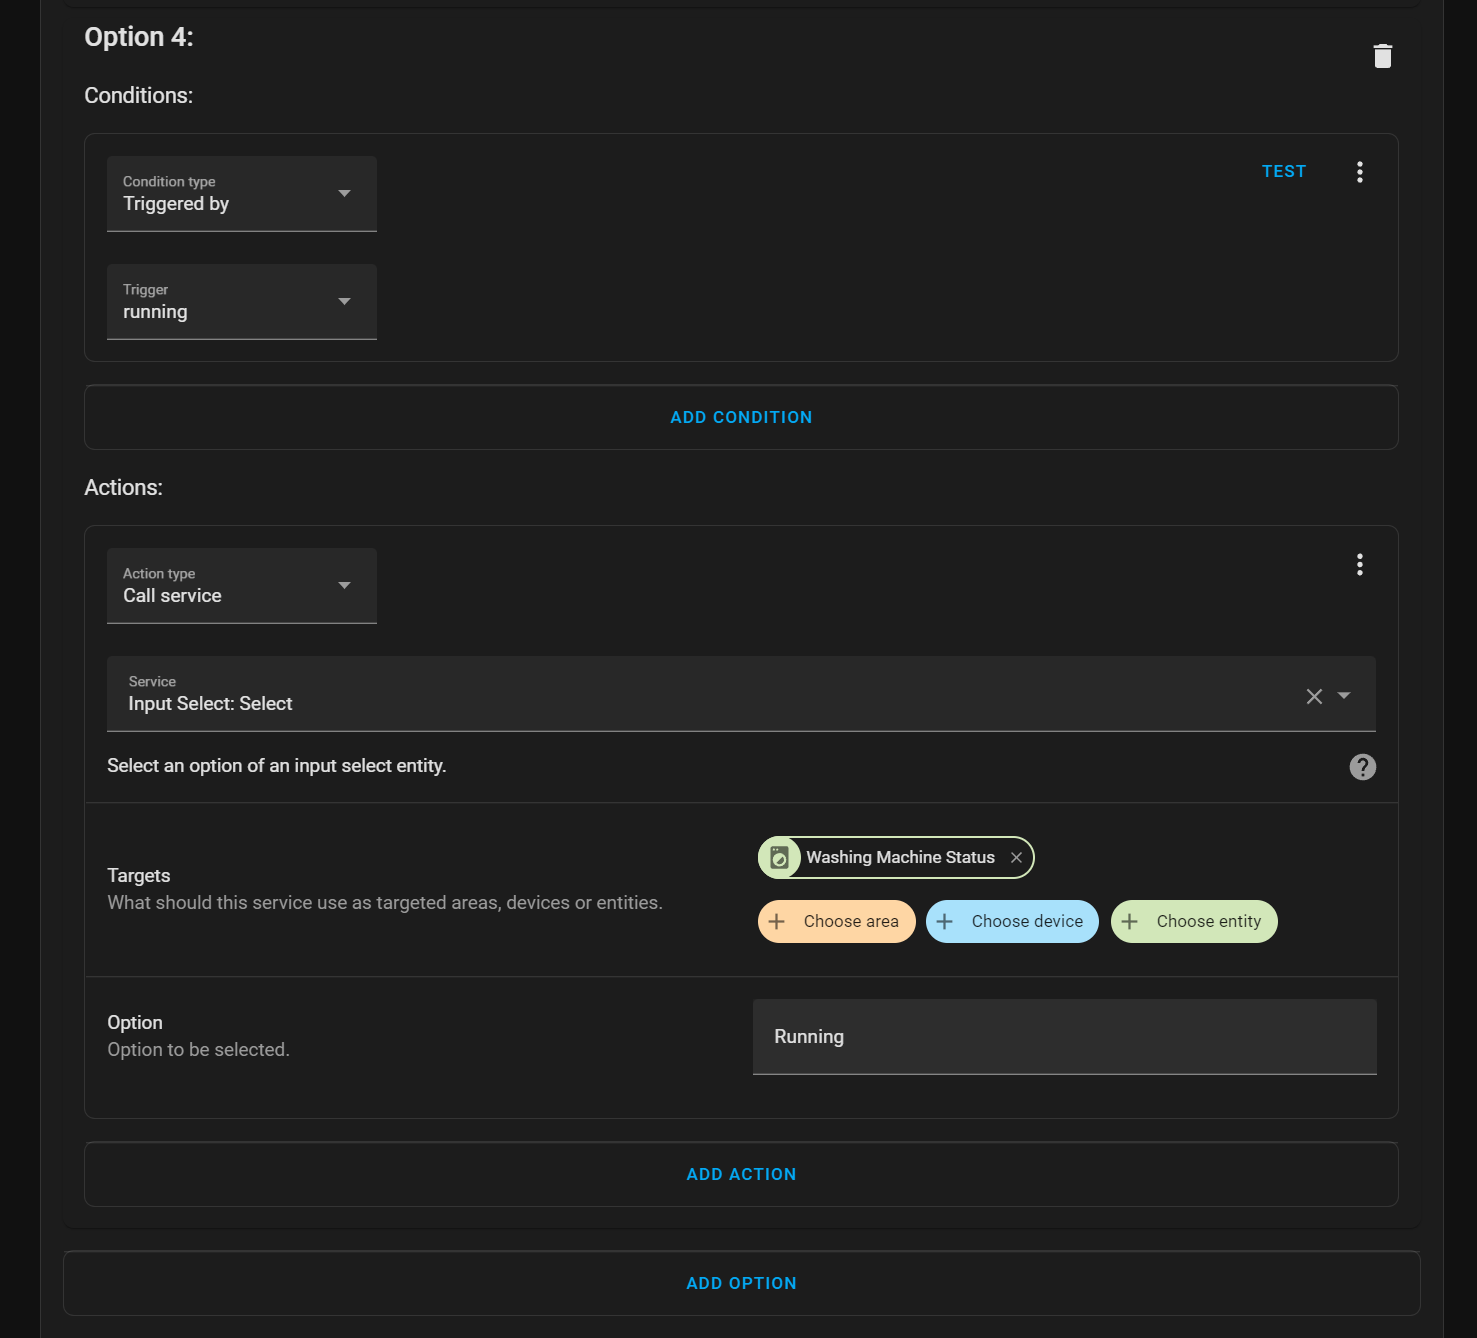
- If the "Running" trigger fires THEN we can set the status to "Running" - simple.
I'm hoping you are following along here!
I'll walk you through the first choice and then show you all 4.
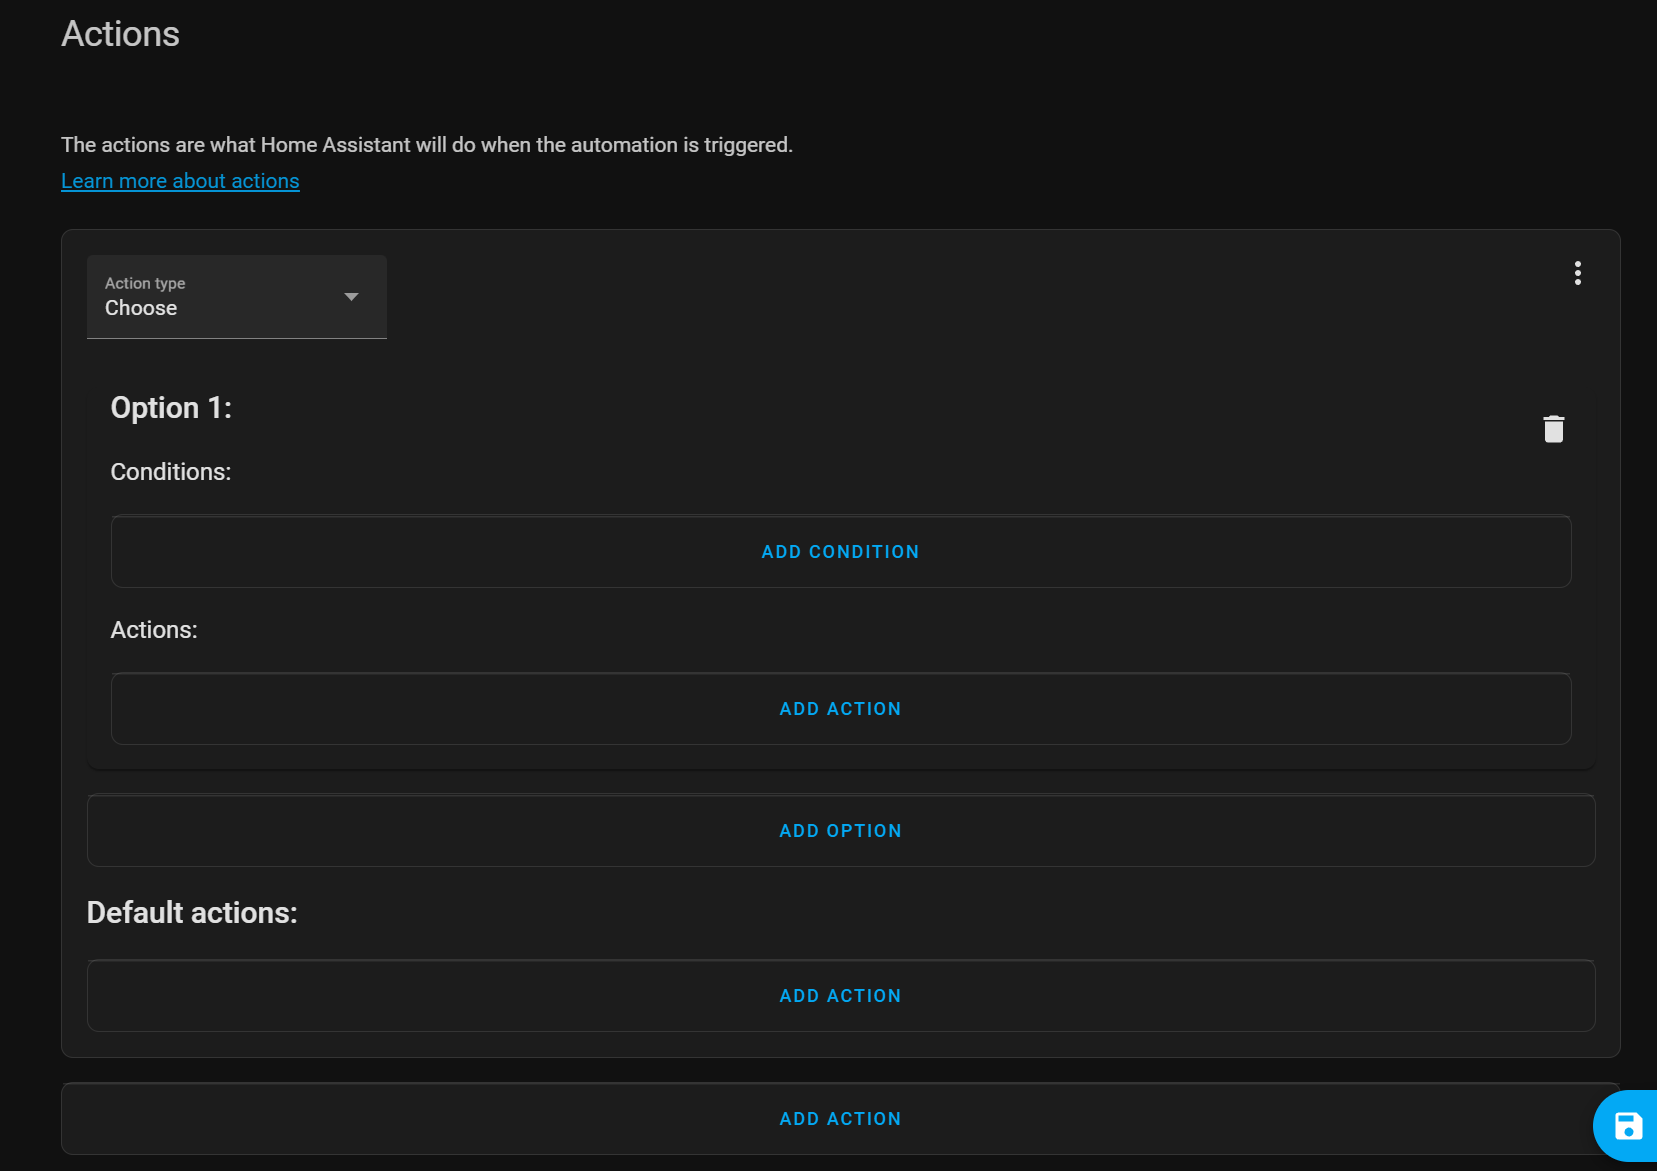
Firstly, select "Choose" from the action type. You will see that an "Option 1" appears with a condition and an action, and then you can add additional options are you need:
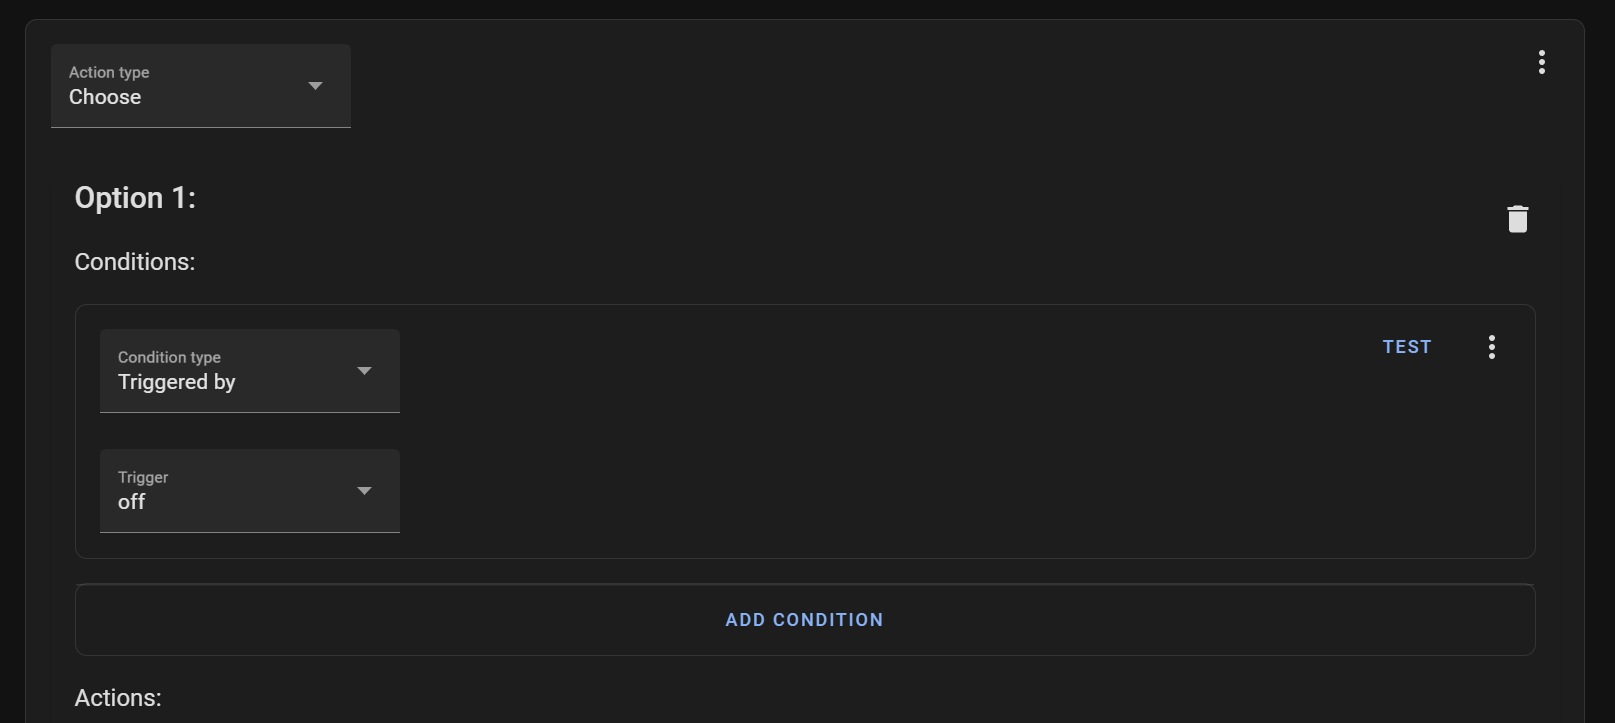
For option 1, add a condition and select "Triggered by" as the type. In the trigger box, select "off" from the drop-down - these values reference the "trigger ID" that you created in the "Triggers" section:
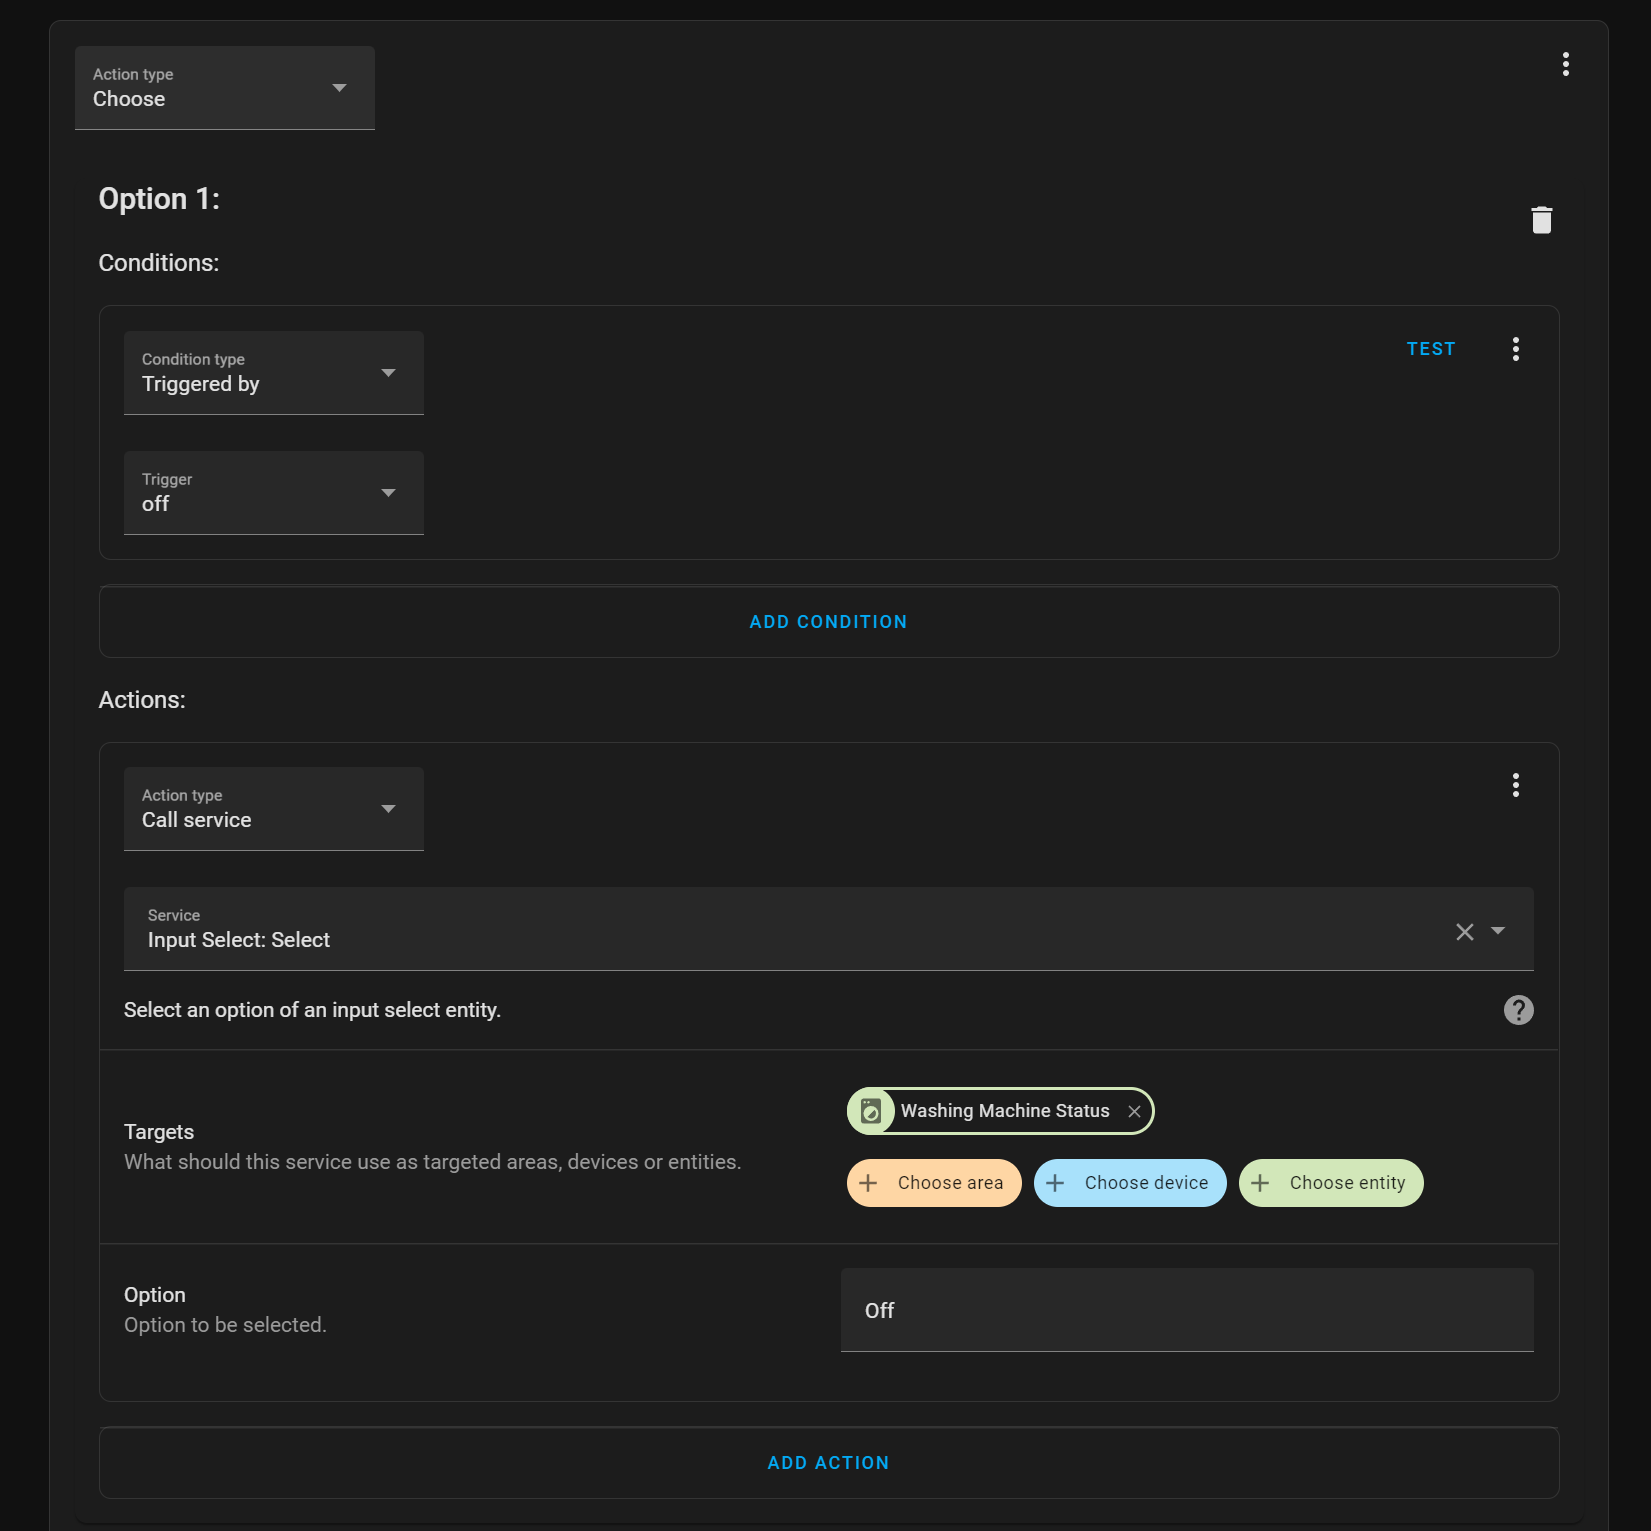
Then in the action section for option 1, select "Call Service" from the action drop-down. For the service, select "Input Select: Select" and as the target, select the input select helper you created earlier. Enter "Off" in the option box.
Your Option 1 box should look like this:
Now we will repeat the steps for option 2, 3 and 4 using the information above as our guide:
Option 2 - notice the 2 conditions this time:
Option 3 - 2 conditions again:
And finally option 4:
Phew, that was a lot! But the worst is now over!
Save this automation since it is now complete.
The Second Automation - Sending Notifications
Create another new blank automation and name this one like so:
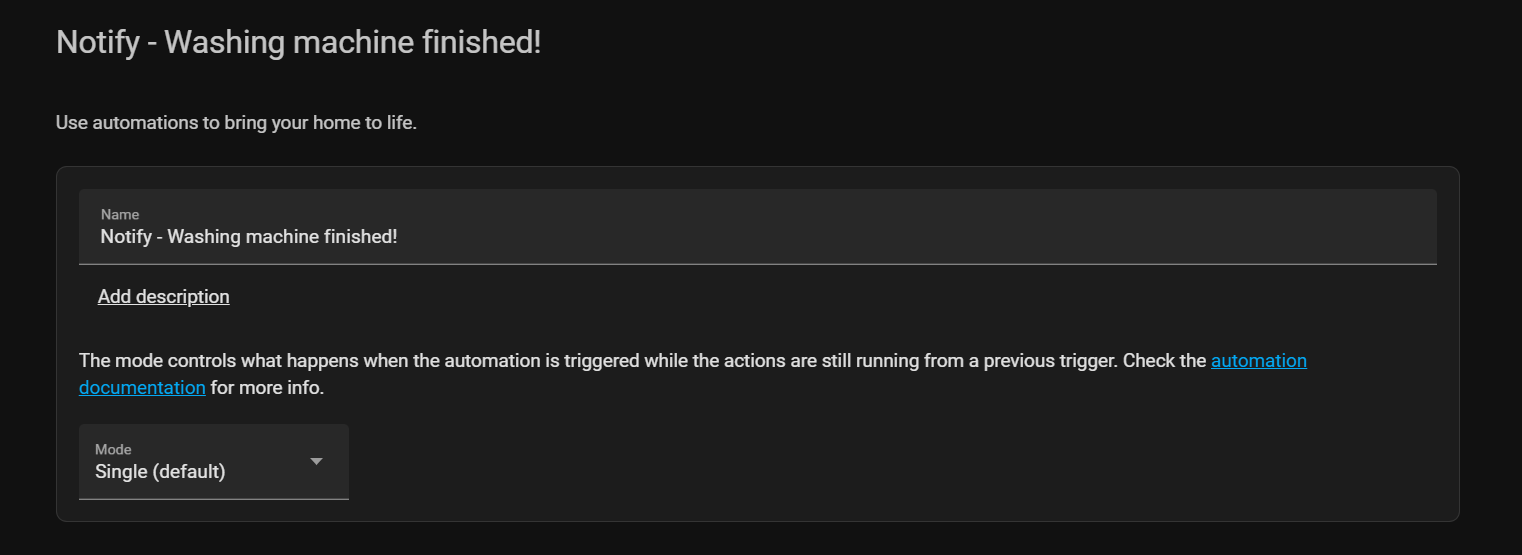
Now we've done all the hard work of getting the washing machine status in the above automation, everything is easy to work with now.
In the automation trigger, select "State" as the type and then select the "Washing Machine Status" input select that we created earlier (and did all of the setting states with in the first automation!). In the "To" box enter "Finished" (case sensitive) and you should have a trigger that looks like so:
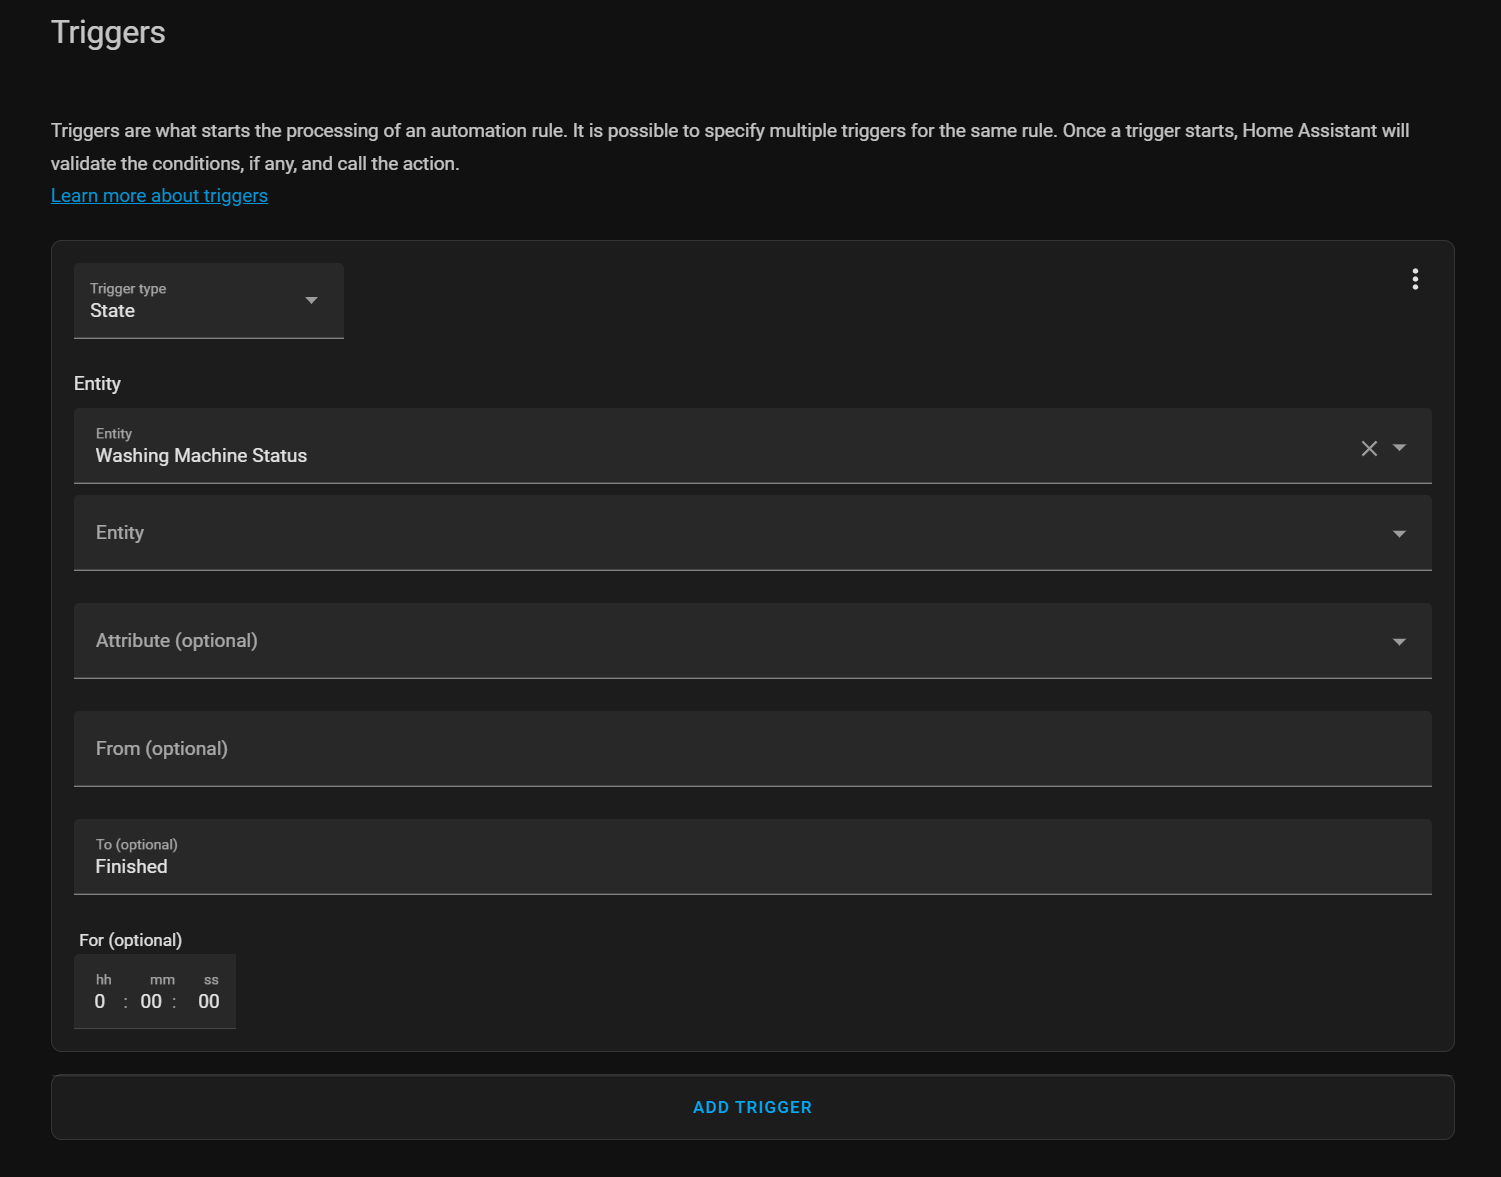
This is pretty self-explanatory hopefully but this tells our automation to fire whenever the washing machine status is set to the "Finished" state.
Scroll down to actions and we are going to create our notification. Select "Call service" from the Action drop-down, then search for "Notify" and select the notification service for your phone.
Enter a message in the box, and then tick the "data" option and enter the following code in:
persistent: true
tag: washing
actions:
  - action: MACHINE_EMPTIED
    title: It's done
Your action should look like this:
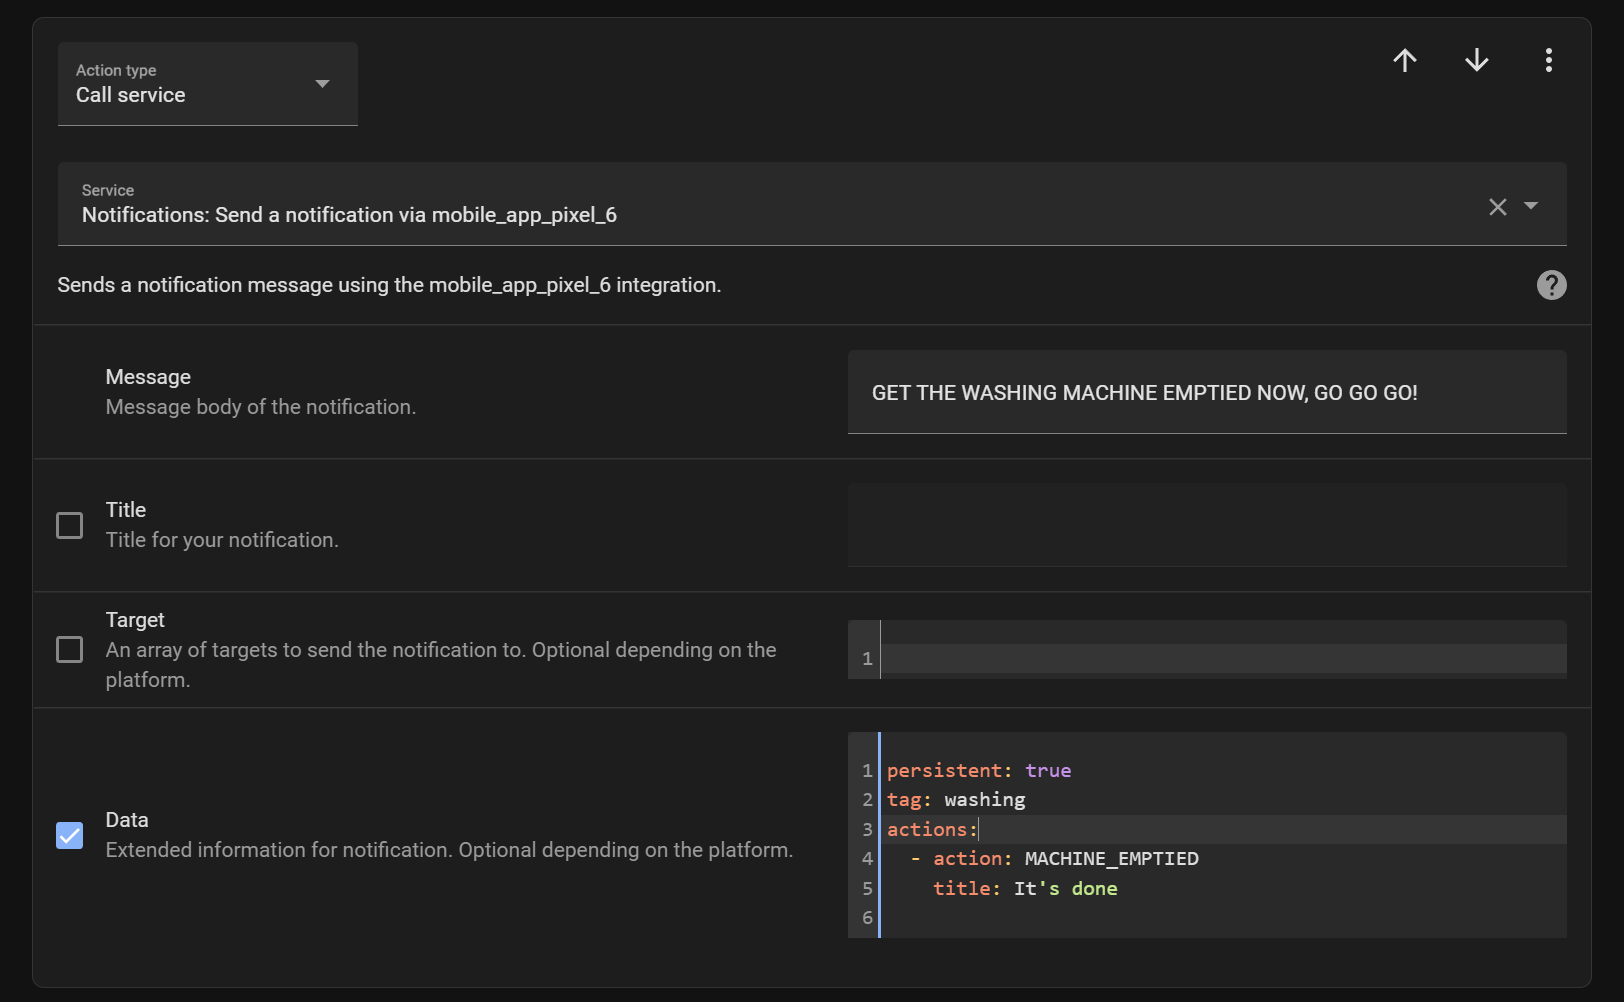
What this does is send a notification to a phone same as normal. But, in the data section, we have added a few additional bits of information:
- The "persistent: true" code tells our device to make the notification persist on screen so that it can't be swiped away.
- The "tag: washing" code allows us to clear the notification later after we acknowledge that the machine has been emptied.
- Finally the action section is what adds a button to our notification that we can press to acknowledge that the machine has been emptied - take a note of the "MACHINE_EMPTIED" bit as we need this later (if you decided to change this, you can make it whatever you want)
If you want to, you can also add an optional Text-to-speech announcement on a speaker to inform you the washing has been done:
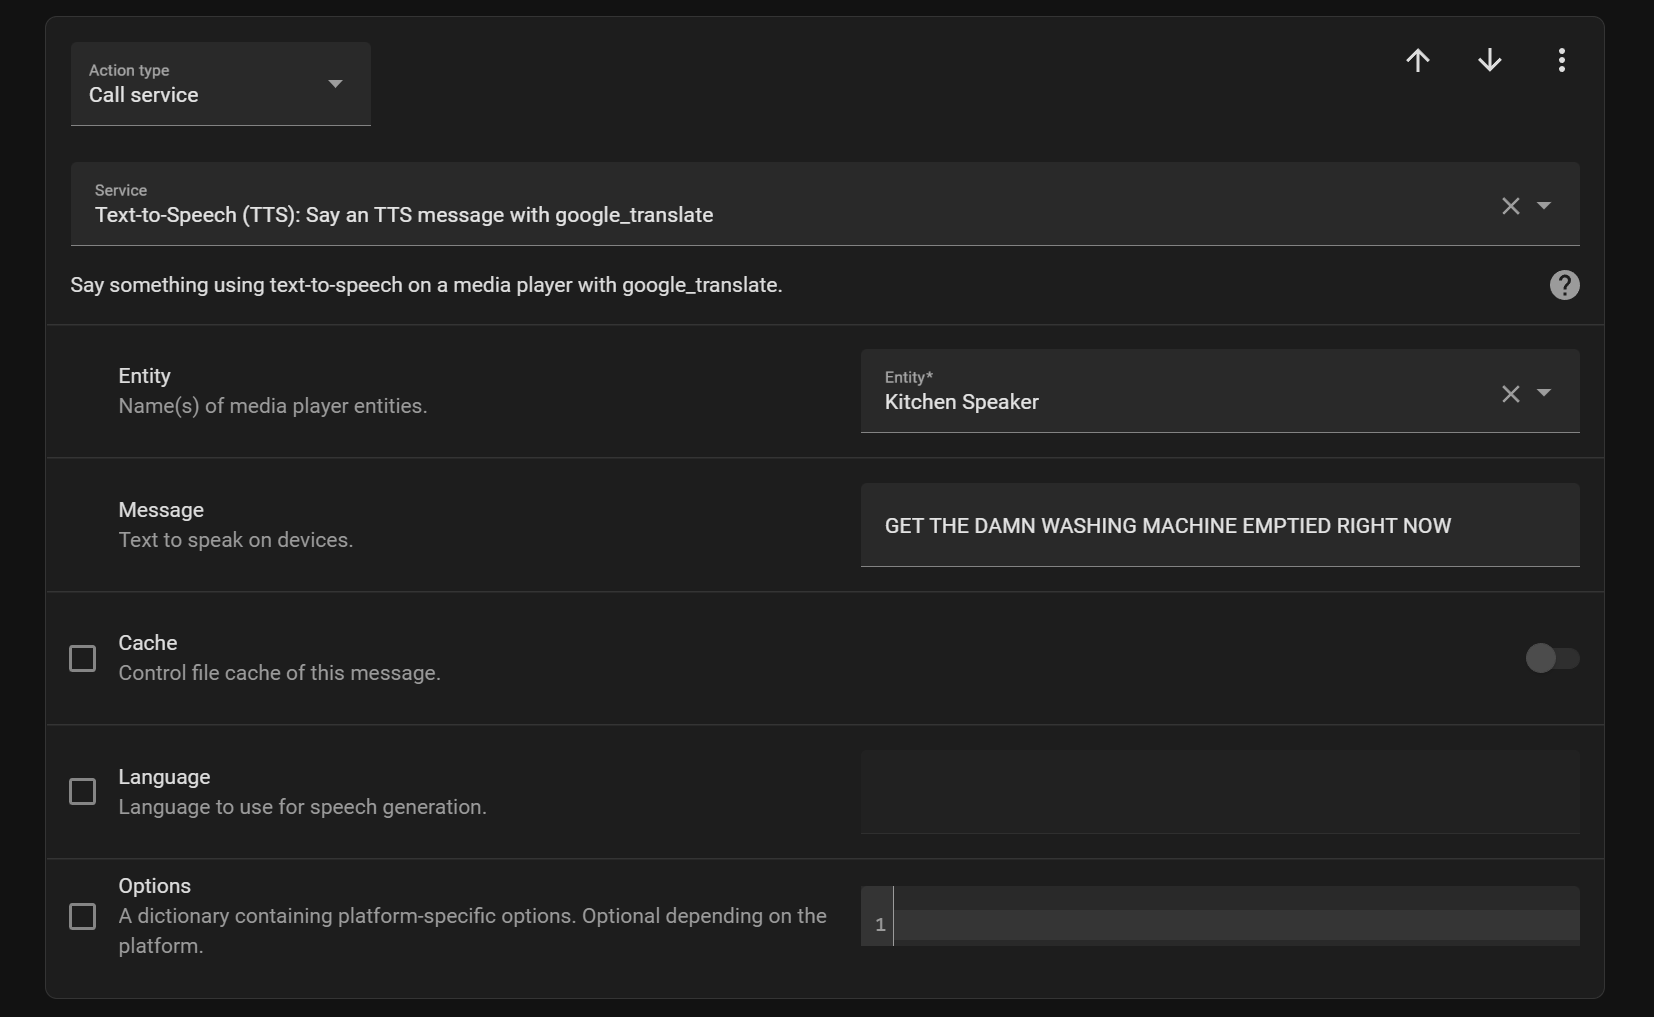
Our third and final action for this automation is going to be to turn on our "Washing machine emptied" input helper we created earlier - we aren't going to use it for anything in this guide but I think its useful to have - in my house I use it to for sending repeated notifications to REALLY annoy Sarah. It's also nice to have if you want something to display on your dashboard.-
Select call service from the drop-down and then select "Input Boolean: Turn On" as the service. Select our washing machine boolean we created before:
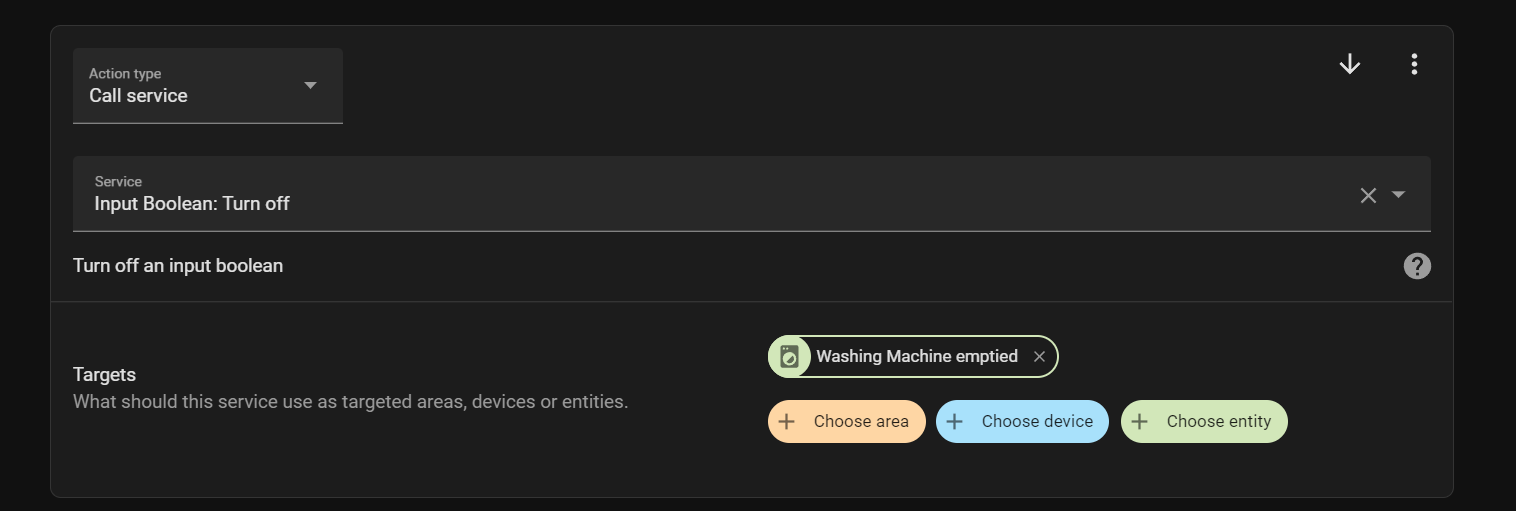
That's it for this automation, onto the final one - acknowledgment!
Automation 3 - The Acknowledgment
The third and final automation will wait for us to press the button on our notification and then clear the persistent notification on our phones.
Create a new blank automation and give it a name:
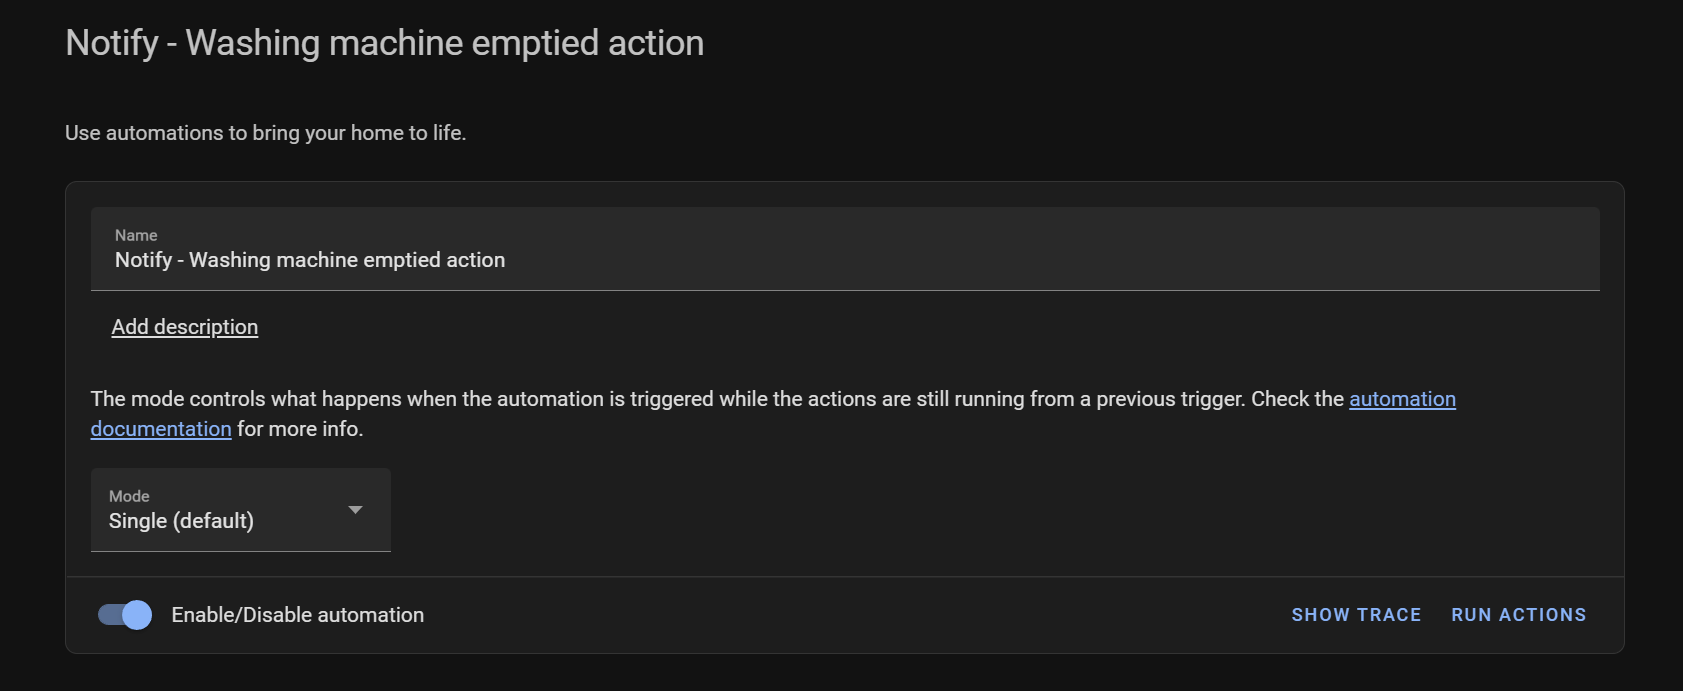
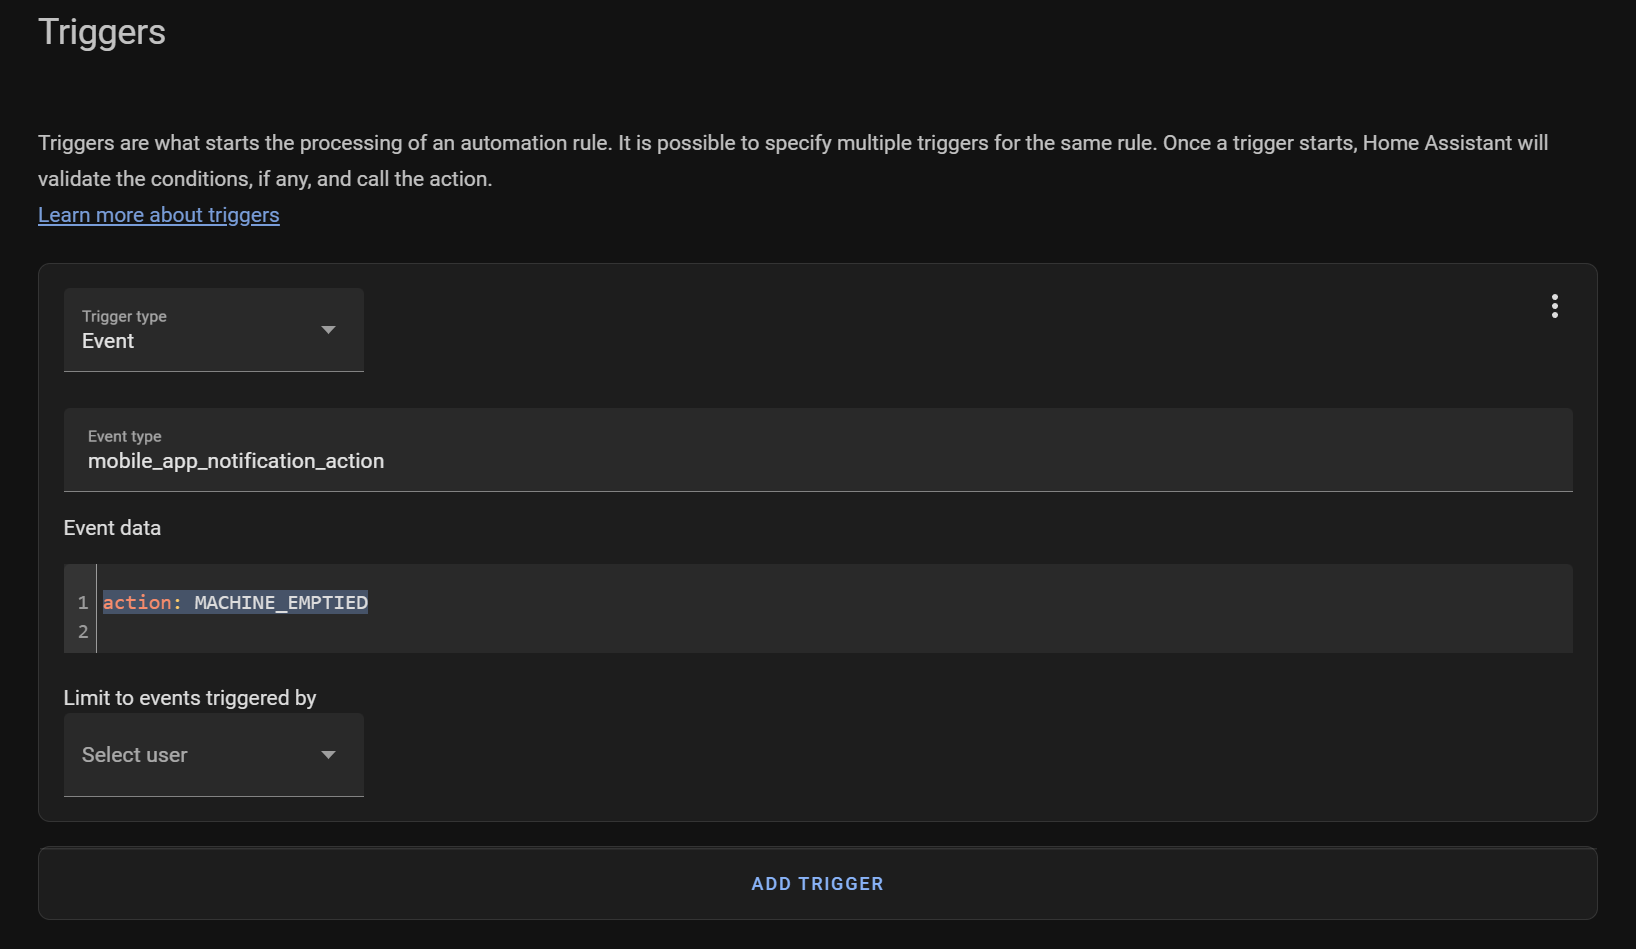
In the trigger section, select "Event" as the type, then in the "Event Type" box, enter the following:
mobile_app_notification_actionAnd in the event data box enter:
action: MACHINE_EMPTIEDNotice how this "MACHINE_EMPTIED" string matches what we set in automation 2 for our notification button. If you changed this, make sure to change it here too:
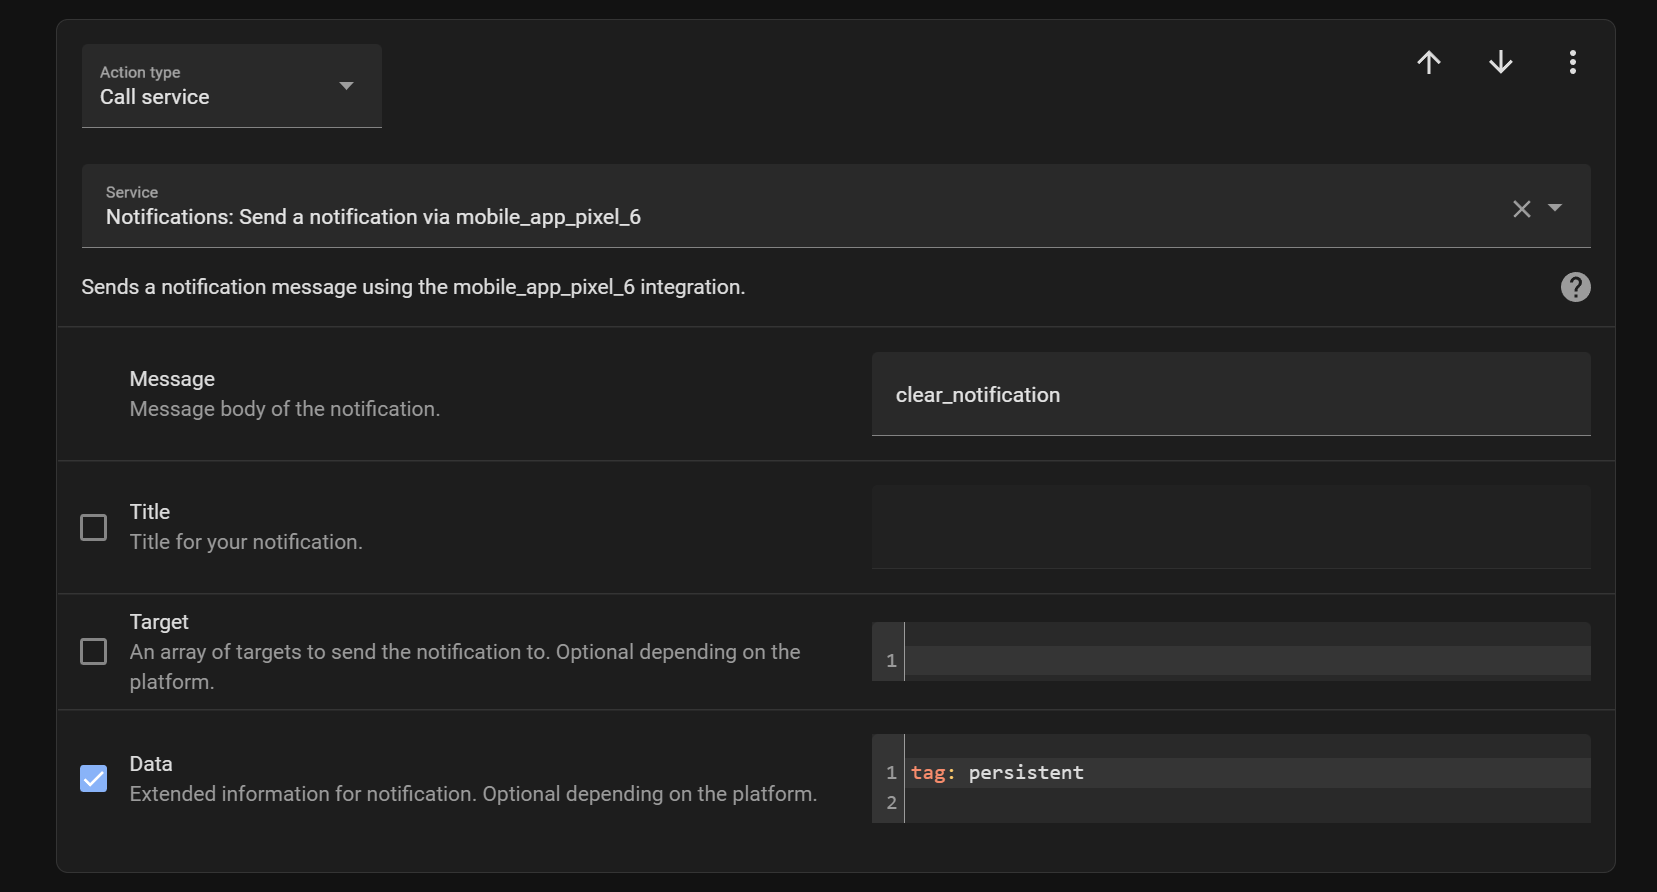
Scroll down to actions and enter "Call Service" in the type drop-down. In the service box, search for "notify" and select the notification service for your mobile phone.
In the message box, you need to enter "clear_notification" - it's important it doesn't contain anything else otherwise it won't work.
Tick the data option and then enter:
tag: washingNotice how this tag matches the tag that we set in automation 2? This is so it knows which notification to clear in the event that you had multiple different ones.
Your action should look like this:
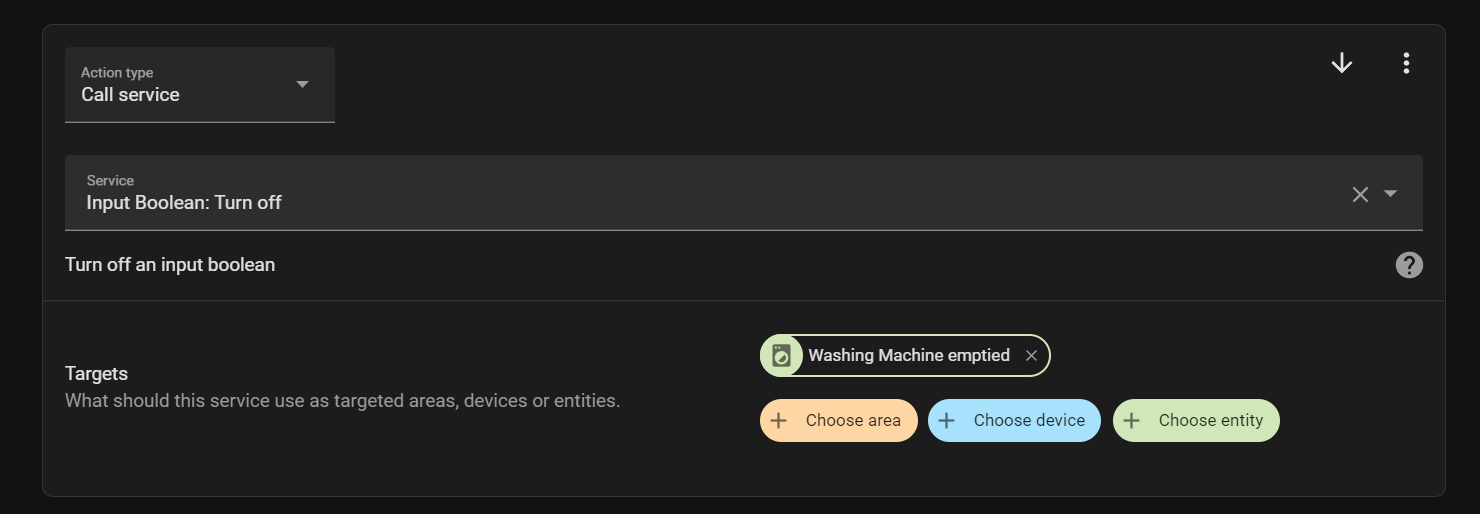
And then finally, we want to set our Input Boolean to off, indicating that we have emptied the machine:
That's it!! We are finally done! This was long huh 😅.
All that's left to do is actually take your washing machine for a spin (pun intended) and see if it works. You may need to do a little fiddling with the values in the first automation to make sure everything works as expected, but other than that..
Washing = completed it!
Now if only we could automate the emptying..
The code
Here is the code for all 3 automations for those of you who prefer YAML:
Automation 1 - Set Washing Machine States:
alias: Set - Washing Machine States
description: ''
trigger:
  - platform: numeric_state
    entity_id: sensor.washing_machine_power_consumption
    id: 'off'
    below: '1'
    for: '00:01:00'
  - platform: numeric_state
    entity_id: sensor.washing_machine_power_consumption
    above: '1'
    below: '7'
    id: waiting
    for:
      hours: 0
      minutes: 2
      seconds: 0
      milliseconds: 0
  - platform: numeric_state
    entity_id: sensor.washing_machine_power_consumption
    id: running
    above: '10'
condition: []
action:
  - choose:
      - conditions:
          - condition: trigger
            id: 'off'
        sequence:
          - service: input_select.select_option
            target:
              entity_id: input_select.washing_machine
            data:
              option: 'Off'
      - conditions:
          - condition: trigger
            id: waiting
          - condition: state
            entity_id: input_select.washing_machine
            state: Running
        sequence:
          - service: input_select.select_option
            target:
              entity_id: input_select.washing_machine
            data:
              option: Finished
      - conditions:
          - condition: trigger
            id: waiting
          - condition: state
            entity_id: input_select.washing_machine
            state: 'off'
        sequence:
          - service: input_select.select_option
            target:
              entity_id: input_select.washing_machine
            data:
              option: Waiting
      - conditions:
          - condition: trigger
            id: running
        sequence:
          - service: input_select.select_option
            target:
              entity_id: input_select.washing_machine
            data:
              option: Running
    default: []
mode: single
Automation 2 - Notify Washing machine finished:
alias: Notify - Washing machine finished
description: ''
trigger:
  - platform: state
    entity_id:
      - input_select.washing_machine_status
    to: Finished
condition: []
action:
  - service: input_boolean.turn_on
    data: {}
    target:
      entity_id: input_boolean.washing_machine_emptied
  - service: notify.your_mobile
    data:
      data:
        persistent: true
        tag: washing
        actions:
          - action: MACHINE_EMPTIED
            title: It's done
      message: GET THE WASHING MACHINE EMPTIED
  - service: tts.google_translate_say
    data:
      message: GET THE WASHING MACHINE EMPTIED RIGHT NOW
      entity_id: media_player.kitchen_speaker
mode: single
Automation 3 - Washing machine emptied action:
alias: Notify - Washing Machine Emptied action
description: ''
trigger:
  - platform: event
    event_type: mobile_app_notification_action
    event_data:
      action: MACHINE_EMPTIED
condition: []
action:
  - service: input_boolean.turn_off
    data: {}
    target:
      entity_id: input_boolean.washing_machine_emptied
  - service: notify.your_mobile
    data:
      data:
        tag: washing
      message: clear_notification
mode: single
